Chapter 11
Sequence Testing[edit]
Goal[edit]
The goal of sequence testing is to run different (types of) tests after each other, without the intervention of a test engineer. These tests can be of the same type or of completely different types.
The sequence testing functionality can for example be used to:
- Run a radiated emission test, a conducted emission test and a radiated immunity test (all performed in the same anechoic chamber) after each other.
- Another example is the situation where different amplifiers are used for different frequency bands. For this situation, multiple TSF files can be generated where each TSF file defines one of the frequency bands. All the created TSF files, can then be placed in a sequence so they can be run like one test. The same is true for antenna polarisation, where a horizontal and a vertical TSF file can be created and be put into a single sequence.
- three (or more) different conducted emission frequency bands can be added to a sequence file, and be tested sequentially after each other.
| Warning: | Sequence testing allows unattended testing. However some tests can cause dangerous situations. Please be especially aware with immunity testing! |
Especially in combination with the Pause test, sequence testing can be very attractive to easily automate a fixed combination of tests.
Creating and saving a sequence[edit]
From the main menu, select:
-
 File
File
-
 New
New
-
 Sequence
-
-
-
A new sequence file will be created. To add a test to a sequence, open the test configuration menu for the desired test, and select the desired TSF file.
This sequence file can be saved through the pull down menu:
-
 File
File
-
 Save as
-
-
EXAMPLE 1:
Select:
-
 File
File
-
 New
New
-
 Sequence
-
-
-
Enter a description for this sequence file
-
 Tests
Tests
-
 Radiated immunity
-
 Substitution
-
-
-
select the desired TSF file from the list.
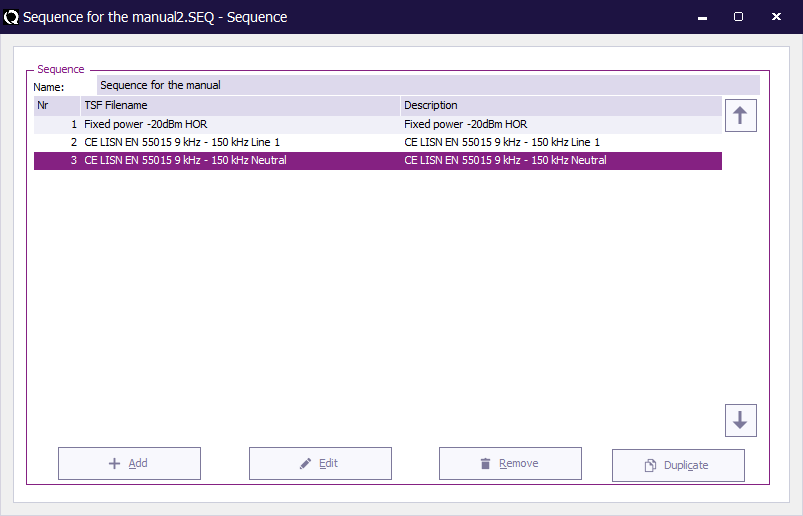
The TSF file will now be added in the sequence window as shown the picture below.
To save the sequence file, select:
-
 File
File
-
 Save sequence as...
-
-
Check if the correct sequence name is mentioned.
Adding a test to a sequence[edit]
When a sequence file has to be modified, the file can be opened from the menu:
-
 File
File
-
 Open
Open
-
 Sequence...
-
-
-
The list of current TSF files in the sequence will be displayed.
To add a new test to a sequence, select the desired test from the Tests, pull down menu.
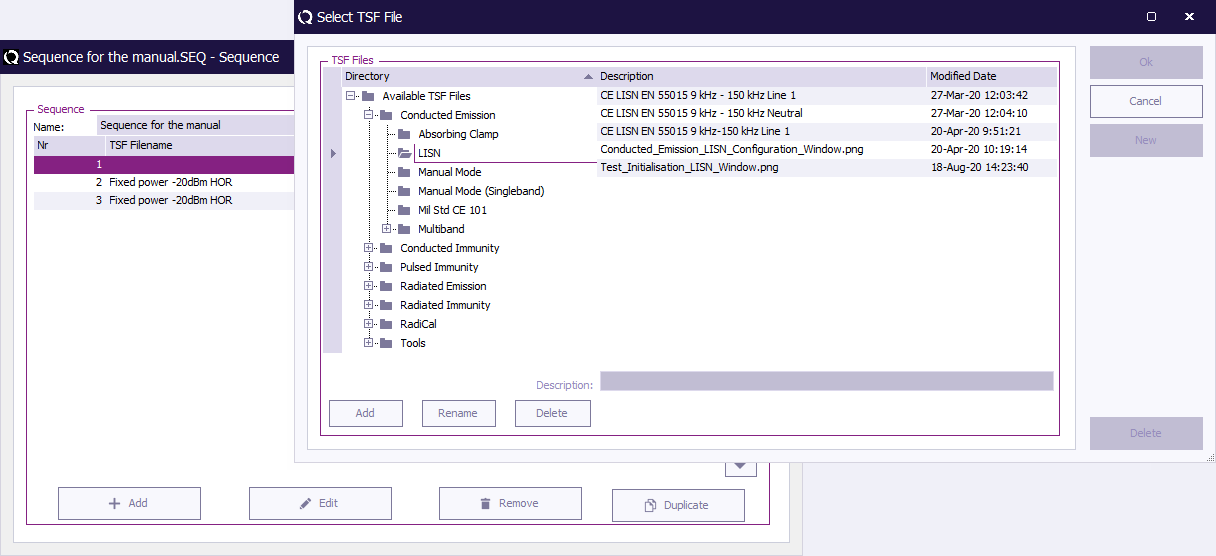
A list of the available TSF files for this test method will be shown. Select the desired TSF file by double clicking on it.
The TSF file will be added to the sequence file.
| Note: | A copy of the selected TSF file will be added to the sequence. This means that if the original TSF file is changed afterwards, the copied TSF that is present in the sequence, will still use the original test parameters.
If the changed TSF file should also be updated in the sequence, the corresponding TSF file has to be removed from the sequence, and the changed TSF file has to be added again to the sequence. |
Changing a test in a sequence[edit]
The configuration of a TSF that is already included in a sequence, can be changed by selecting the test in the sequence and pressing the Edit button.
The TSF window of the selected test will be shown, and it is possible to change any parameter. When all the required parameters are changed, pressing the Store button will update the configuration of the TSF file in the Sequence, and the TSF window will be closed.
Removing a test from a sequence[edit]
On the other hand, TSF files can be deleted from the sequence list, by selecting the test in the sequence and pressing the delete button.
Changing the order of the tests[edit]
The order off the tests in the sequence can be changed by selecting the desired test and clicking the up or down arrow in order to promote or demote this specific test.
Starting a sequence[edit]
A sequence can be started by selecting from the menu:
-
 Tests
Tests
-
 Sequence
-
 Start Sequence...
-
-
-
A file selection window will be shown, in which a sequence file (*.SEQ) can be selected. As soon as the sequence file is opened, RadiMation® will start to perform all tests that are selected in the sequence, in the order in which they are specified.
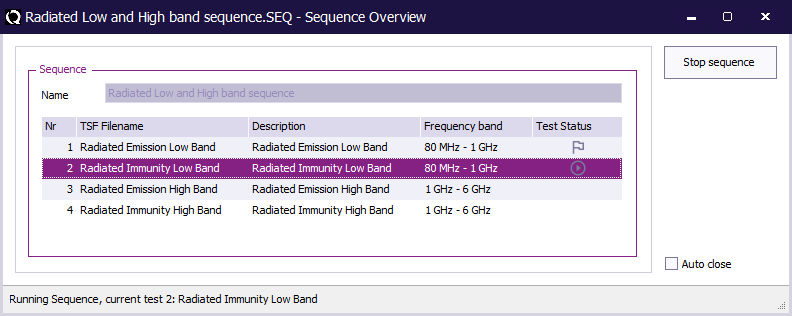
While the sequence is running, the Sequence Overview window is being shown, which shows the contents of the sequence file, and indicates which test is currently running.
The sequence overview window can also be made visible by selecting from the menu:
-
 Tests
Tests
-
 Sequence
-
 Sequence overview... .
-
-
-
Stopping (a test in) a sequence[edit]
To end the currently running test in the sequence, press the Stop button in the test itself. RadiMation® will then interrupt the current test as soon as possible, save the already determined test data, and continue to the next test that was configured in the sequence.
There are two ways to stop the complete sequence:
- Press the Stop sequence button in the Sequence overview window.
- Select the menu entry
-
 Tests
Tests
-
 Sequence
-
 Stop Sequence... .
-
-
-
When the Auto close checkbox is unchecked, the sequence overview window will not automatically close at the end of the sequence. This allows to review the actual status of the sequence, and if it has actually finished running all tests. The sequence overview window has to be closed manually by the user.
When the Auto close checkbox is checked, the sequence overview window will be closed automatically if the sequence has finished executing all tests.
Pause test[edit]
A Pause test is available in RadiMation® to insert informational messages between two tests in a sequence. This Pause test can for example be used to direct the end-user to change the test setup, or it can be a reminder to turn off the amplifier. It is allowed to include multiple Pause tests (also after each other) in a sequence, so it can be used to easily automate a fixed sequence of steps.
The Pause test is available from the menu via:
-
 Tests
Tests
-
 Tools
Tools
-
 Pause
Pause
-
-
-
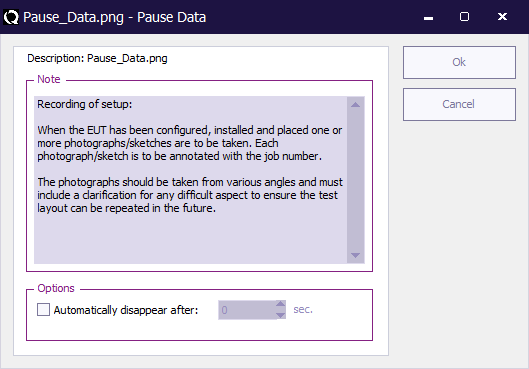
The Pause Data window is used to configure the Pause test.
The following elements are available on this window:
| Is the note (or informational message) that should be shown during the pause period, when the pause test is started. |
| If the checkbox is activated, it is possible to specify a timeout (in seconds) after which the pause test should automatically close. This option allows to show a message for only a determined amount of time, between two tests. When the specified time has passed, the sequence will automatically continue with the next test in the sequence. |
| Saves the current configuration of the pause test to the TSF file and closes the window. |
| Closes the window, without storing the modifications to the TSF file. |
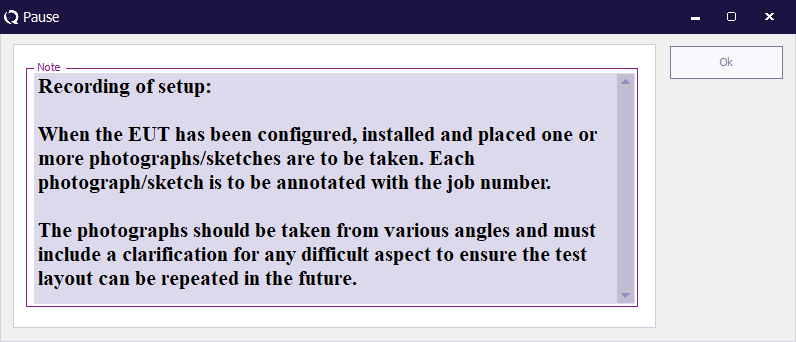
The Pause window will be shown, when the Pause test is included in the sequence.
The informational message that was specified in the Pause Data window is shown in a bigger font, to make it more visible. The shown message can also be selected and copied to clipboard (using Ctrl+C).
If a timeout has been specified, the window will automatically close after the specified timeout period. It is however also possible to close the window with the Ok button.
The Pause window will remember its position and size, and will be shown on the same position with the same size, the next time it shown again. This allows the end-user to place the Pause window on a convenient and visible location.
The pause test will not store any test results, and therefore no test results will be added to the list of performed tests in the EUT file.
Command Line Interface (CLI)[edit]
From RadiMation® version 2023.1.2, it is possible to automatically start a sequence from the command line. This can be accomplished by calling "radicli.exe", which is available in the same directory in which RadiMation® is also installed.
| Note: | When a sequence is started with the command line interface and there is an active instance of RadiMation, the sequence will be started in the active instance. Otherwise RadiMation® will be automatically started with the same version as the radicli.exe used. |
"C:\Program Files (x86)\Raditeq\RadiMation\Version x.y.z\radicli.exe"
To start a sequence from the command line, first open command prompt and go to the correct path. Then pass at least the verb "startsequence", eut filename and the sequence filename.
| “ | Example to start the sequence:
cd "C:\Program Files (x86)\Raditeq\RadiMation\Version x.y.z\" radicli.exe startsequence --eut "C:\EUT_Files\eutfile.eut" --sequence "C:\sequence files\sequencefile.seq" |
” |
The possible arguments are:
| Argument | Description |
|---|---|
| startsequence | Required verb that specifies that a sequence should be started from the command line interface. |
| --eut <eutfilename> | Required argument that specifies the EUT filename that should be used. |
| --sequence <sequencefilename> | Required argument that specifies the sequence filename to use. |
| --help | Shows all the possible command line arguments that can be used. |
It is also possible to close the RadiMation® instance by calling "radicli.exe"
| Argument | Description |
|---|---|
| close | Required verb that specifies that RadiMation® should be closed from the command line interface. |
| --help | Shows all the possible command line arguments that can be used. |
| “ | Example to close RadiMation®:
radicli.exe close |
” |
