RadiMation Application Note 109
Configuration of RadiMation® on a network[edit]
This application note describes how RadiMation® can be configured on multiple PC's that are connected to a network.
| Note: | Make sure that you back-up your RadiMation® configuration before you attempt to move it. |
Introduction[edit]
In a network environment multiple computers are connected with each other through a shared communication medium. This provides several advantages compared to a local installation. One of these benefits is that data can be shared between the connected computers. The RadiMation® software is designed to optimally use this advantage. All the data that is used or generated by RadiMation® can also be shared on the network. In most cases we recommend the use a of network configuration over a local configuration.
| Note: | When RadiMation® is using a network configuration the program itself will still be executed from the local computer. It is therefore neither cached nor running directly from the network. |
Be aware that it is very important to decide where you want to store data. We advise to make this decision during the initial installation as it is hard to change later on as the paths in the TSF files to for example the Calibration and Correction files are stored as an absolute path. This means they direct to the file via an absolute reference and will not be able to find the file when the location is altered.
Why store the configuration and files on the network[edit]
There are several advantages to store the the data on a shared location on the network:
- Measurement results are available on all company PC's
- TSF files can be shared by all the measurement PC's in the laboratory
- LLF files can be created once, and use on all locations
- Because of flexible configuration of directories, you can decide to only put LLF, COR and EUT on the network and leave TSF files and CAL files locally
- If measurement equipment is moved around, it is easier to select the correct device from the shared device driver configuration
- Only one location to back-up, in case of an emergency you can restore your back-up to the networkdrive and asure everybody is working with the correct files again
Disadvantages of storing the configuration on the network[edit]
There are a couple of things you need to be aware of when using networked storage:
- Can be slower to load TSF file directory structures
- Changes on one location can result in unexpected different behaviour on another location where another engineer is testing
- When using a configuration on the local disk but sharing TSF files on the network can result in testsites not being available when using these TSF files.
- A shared device driver configuration can result in a lot of devices, and a lot of testsites.
Copying and setting application folders[edit]
This paragraph explains what certain folders are and how to copy them from a local location to a network location. The files can broken down into two groups. Configuration files hold the settings for the application. Application files contain files that are used by the users of the application. We will go into more detail below.
What is the CONFDVDR folder[edit]
The CONFDVDR directory of the RadiMation® main installation directory contains the complete configuration of the RadiMation® software. This directory can contain the following files:
- SETTINGS.INI: The main RadiMation® configuration file. This file contains all the important settings of the software.
- RDC*.INI: Each RDC*.INI file, stores the configuration of a configured device driver. All the modifications made on the "Device Drivers" tab of the Configuration window of the software, will be stored in one of the RDC*.INI files.
- Other files can be present that store specific configuration items of the RadiMation® software.
Copying the CONFDVDR folder[edit]
Now we know what the folder is used for we can go ahead and copy the folder. The default location of the "Configured Device Drivers" directory is: "C:\Program Files\DARE Development\RadiMation\CONFDVDR\".
The following steps are:
- Finding the folders on the local machine.
- Creating the proper folder structure.
- Copying your files to the network directory.
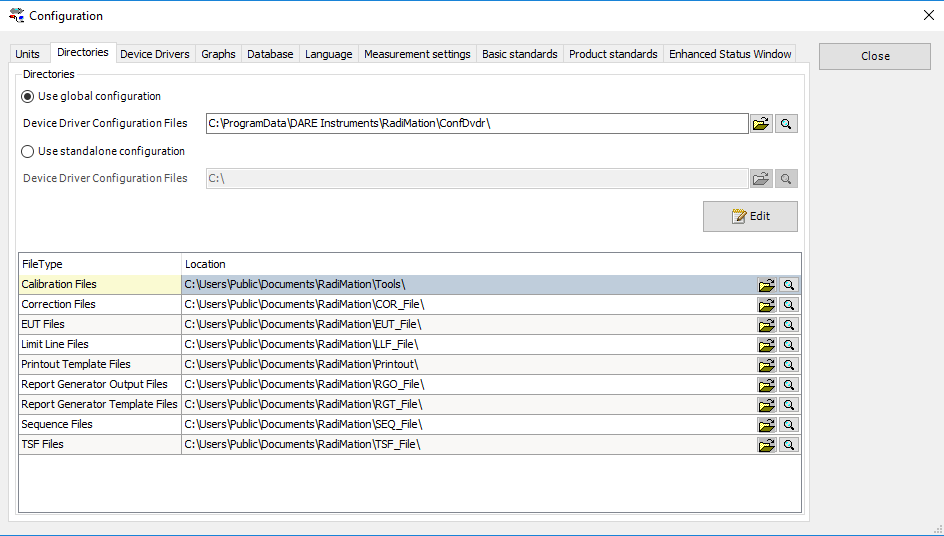
To find out where the files are located you need to lookup the paths:
Select from the menu bar:
-
 Configuration
-
 Configuration
-
 Directories
-
-
-
The local drive will be represented by <LocalDrive> and the networkdrive will be represented by <Network-Drive>. The paths shown here is the default folder structure. To make sure that we can change these paths to the network location we have to create and copy the existing structure to the network.
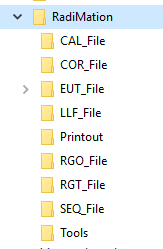
Make sure that you have a network location and that you have sufficient permissions to this directory. Make sure that when you share the configuration that you grant the other users enough permissions as well. Let's first create the folder structure on the network drive to copy the files to, the folders can be created manually:
Now we have prepared the folder it is time to copy the local configuration. To open the local folder click the magnifying glass behind the confdvdr path.
This opens windows explorer at the location of the confdvdr
Right click on the confdvdr folder and click 'Copy' Now go to your <Network-Drive> and go to the folder structure we just created and paste the confdvdr folder in <Network-Drive>\Dare Instruments\Radimation
Copying the application files[edit]
Now the confdvdr folder is copied we are going to copy the application files.
You can find this location by clicking on the magnifying glass behind the path name.
As we want to move them all to the network it is easier to open the file location of the first folder as in the picture above. The file explorer window opens. Now select the main folder <Radimation> and copy it by clicking on the folder.
Now go to your <NetworkDrive> and paste the whole folder
If both steps where executed correctly you will now have two folders on your <NetworkDrive>.
- One called Dare Instruments containing the confdvdr
- The other is called Radimation and contains all your application files.
Changing the paths to your network location[edit]
Now that we have copied the data to its new location we can update the configuration of {{Radi<ation}}.
Start RadiMation® and select the menu:
-
 Configuration
-
 configuration
-
 Directories
-
-
-
Now click the folder icon next to the path to configure the new path.
Go to your <NetworkDrive>\Dare Instruments\Radimation and select the confdvdr folder.
| Note: | Make sure that you restart RadiMation® after you have changed the confdvdr folder. |
Now we have to update the paths for the FileType directories. You can do this by clicking on the folder icon and select the relevant folder.
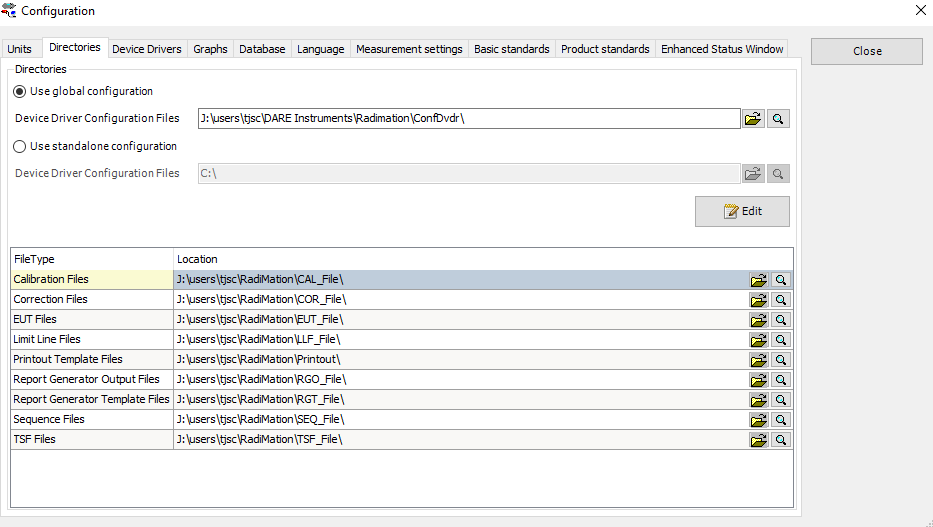
Do this for all FileTypes that you want to be stored on a network location. In the next screenshot I have moved the whole configuration to the network.
You can see that the folders are now directing to a network path. You have now completed all the steps and RadiMation® is configured to run from the network.


