How to measure data from the EUT using the Configurable AD Convertor device driver[edit]
This Application Note explains how the Configurable AD Convertor can be used to monitor an EUT.
With the Configurable AD convertor, any type of signal can be measured, monitored and plotted within RadiMation® during an immunity test.
Let's assume that the EUT is a central heating boiler, and that the temperature of the water inside the boiler should be measured and monitored. The central heating boiler has a serial port (which is connected to COM3 on the testing PC), and if the command: "TEMP?" is transmitted over the serial line, the microcontroller in the boiler will respond with: "Temp: 46.5".
The configuration in RadiMation® can be separated in three steps:
- Configure the Configurable AD Convertor.
- Configure the monitoring input in the EUT.
- Perform the test.
Configuring the Configurable AD convertor[edit]
First create a new Configurable AD Convertor device driver. It is best to give this new device driver a clear description to identify it easily for the task that it is used for. In this example 'Central heating boiler' would be a suitable name.
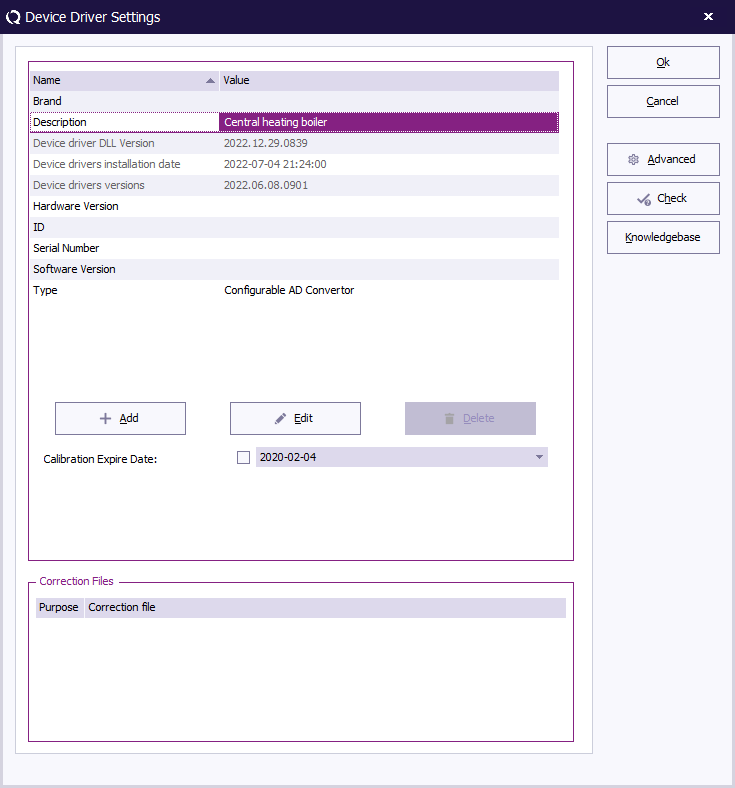
After the device driver is created, open the Advanced settings window of the new device driver, which allows to further specialise how the driver should communicate with the actual device.
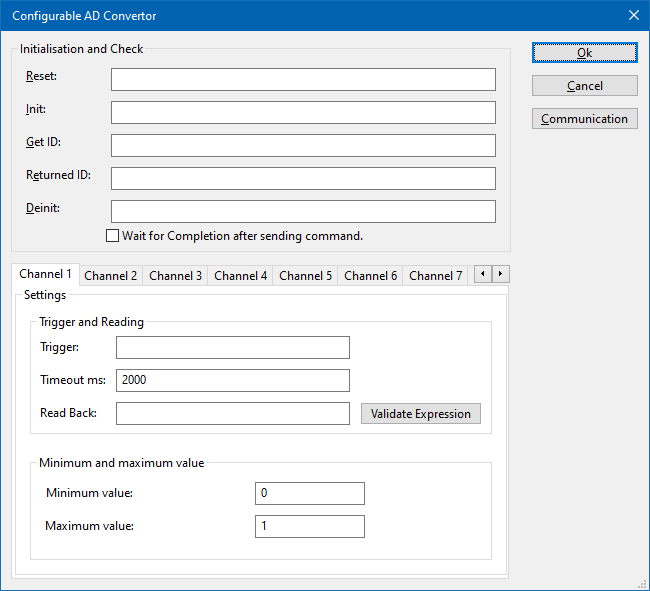
Configure the commands for the initialisation of the device[edit]
The Configurable AD Convertor device driver has several boxes, in which the remote programming commands can be specified, which should be transmitted to the measurement device on defined moments.
 Reset Reset
|
The reset code that needs to be transmitted to device. When left blank, no command will be transmitted.
|
 Init Init
|
The command that is transmitted to initialise the configured device. When left blank, no command will be transmitted.
|
 Get ID Get ID
|
The query-command that is transmitted to retrieve the ID of the device. This is used to check if the device is connected. A commonly used SCPI command is: '*IDN?'. When left blank, no command will be transmitted.
|
 Returned ID Returned ID
|
The expected response of the device on the Get ID query. The text that is specified will be searched in the real response on Get ID query. If the specified text can be found in the response, the check for the connection is successful, otherwise it is reported that the measurement device is not connected. Leaving this blank, will skip the check if the measurement device is connected, and it is always assumed that the device is connected.
|
 Deinit Deinit
|
Specifies the command that is transmitted when the device will not be controlled anymore.This can for example be used to put the measurement device in an intrinsic safe state. When left blank, no command will be transmitted.
|
 Wait for Completion after sending command Wait for Completion after sending command
|
If the checkbox is ticked, RadiMation® will wait for all the commands to complete, before it continues. This is achieved by also transmitting the SCPI query-command '*OPC?' to the device, and waiting for the response.
|
None of these commands have to be specified, as the central heating boiler doesn't need to be initialized or deinitialized.
Configure the triggering and interpretation of the measured value[edit]
AD convertors can have multiple channels from which values can be read. The Configurable AD Convertor device driver is able to retrieve the values from up to 50 different channels from the measurement device.
For each AD channel, an individual query-command can be specified, specific for the measurement value that should be retrieved. For this example we only need a single channel, as we are are only interested to retrieve the water temperature.
The configuration of the single channel can be configured on the Channel 1.
 Trigger Trigger
|
The trigger query-command can be specified to trigger and request a new measurement value from the device. For the central heating boiler, the command 'TEMP?' should be transmitted to request a reading.
|
 Timeout ms Timeout ms
|
The timeout (specified in milliseconds) that should be used to read the response from the device. We can leave this on the default 2000 milliseconds.
|
 Read Back Read Back
|
The regular expression that should be used to determine the numeric value in the response from the central heating boiler. As the response is something like: "Temp: 46.5", a very simple suitable regular expression can be: "Temp: ([0-9.]+)".

|
Note:
|
See the regular expression topic for a more detailed explanation of regular expressions, and more complex regular expressions to handle different responses
|
|
 Validate Expression Validate Expression
|
Shows a small window where the expected response of the measurement device and a regular expression can be typed.
|
The minimum and maximum measurable value of the measurement device can be specified to correctly scale the measured value. This will also be used to re-calculate the retrieved measurement value to another value with another unit.
 Minimum value Minimum value
|
The lowest value of the channel that can be measured with the controlled measurement device. The value must be the same as filled in the EUT window. It normally is the best to configure this value to be 0.
|
 Maximum value Maximum value
|
The highest value of the channel that can be measured with the controlled measurement device. The value must be the same as filled in the EUT window. It normally is the best to configure this value to be 1.
|
A correct configuration to read the temperature of the central heating boiler will thus be:
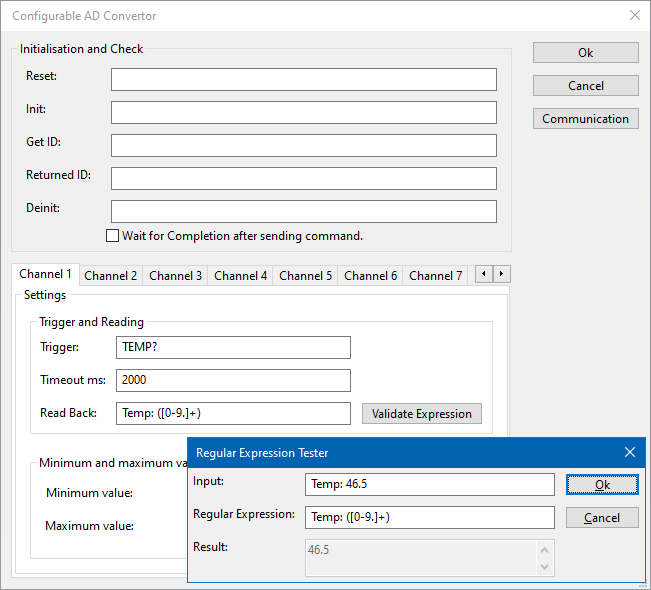
The correctness of the regular expression can be tested, verified and improved by using the Validate Expression tool within the configurable device driver. In the Regular Expression Tester, the following fields are available to verify the regular expression:
 Input Input
|
Any text that is expected to be returned by the device. In this example this will be "Temp: 46.5"
|
 Regular Expression Regular Expression
|
The Regular expression that is being tested. For this example we can verify if the "Temp: ([0-9.]+)" regular expression is sufficient.
|
 Result Result
|
The numerical value that is determined by the device driver using the Regular Expression on the Input. This should show the 46.5 value that we are expecting.
|
By changing the Input field, we can easily test if the regular expression is able to determine the correct water temperature.
Specify the communication type[edit]
The correct settings for the communication with the measurement device (which is the actual EUT in this example) must also still be configured. The Configurable AD Convertor supports several communication types, which can be used to communicate with the measurement device. Click on the Communication button, to open the configuration dialog to specify the actual details of the medium to use for the communication. Depending on the connection that is used, select the correct Communication Stream, and configure the parameters correspondingly to communication settings that are used by device. Different Communication Streams are available, which are described in more detail in the Communication settings section of Chapter 15.
In this example the RS-232 stream is selected, and the COM Port is set to COM3 to allow communication with the central heating boiler.
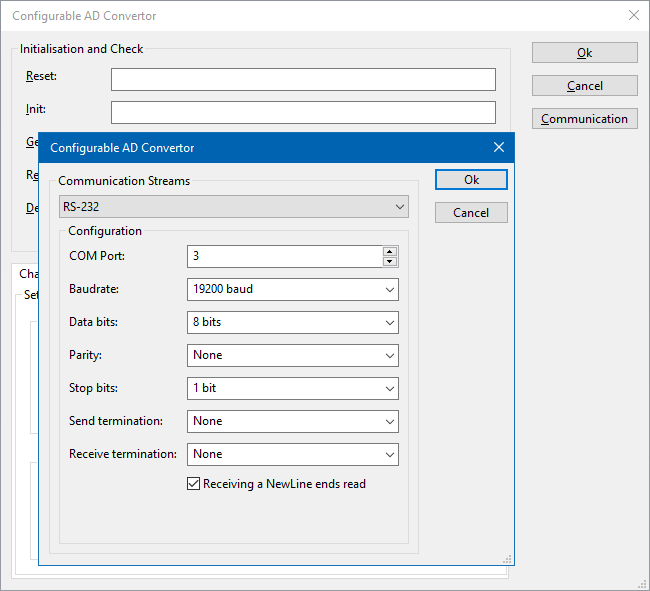
After this last configuration, the device driver is configured correctly and all configuration windows can be closed.
Configure the monitoring input in the EUT[edit]
Once the Configurable AD Convertor device driver for the central heating boiler has been created, the EUT file in RadiMation® can be configured to actually use that device driver, during the immunity tests.
Create a new monitoring input channel[edit]
The monitoring functionality for a specific EUT is configured in the EUT itself, because it is specific to that EUT. Therefor we first need to (create and) open the EUT file.
In the opened EUT file, we can select the Monitoring input channels tab. Double click an existing input channel to open the configuration of that channel or add a new monitoring input channel by using the Add button.
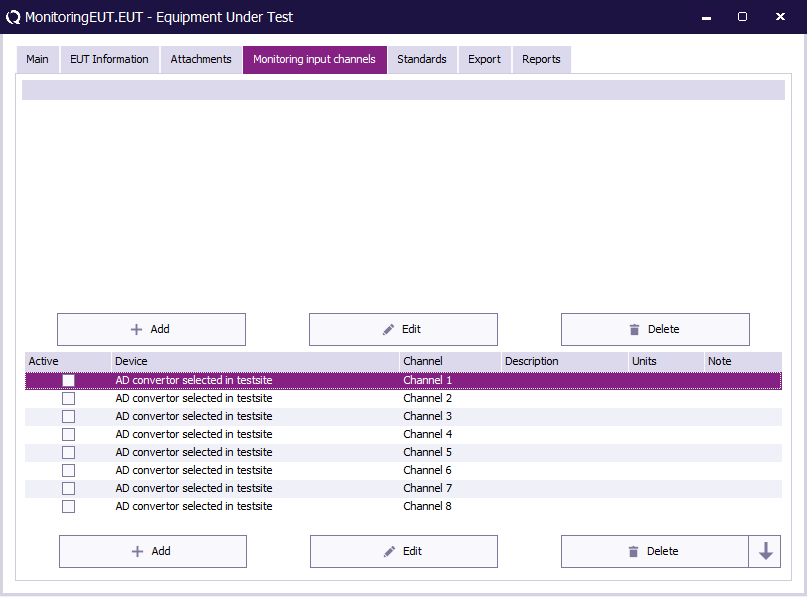
In the new window, the monitoring input channel can be configured.
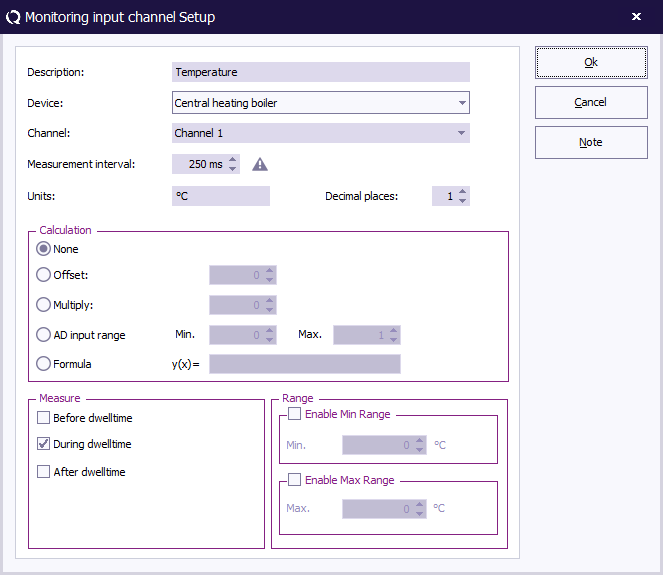
 Description Description
|
Can be any text that identifies this channel. This description will also be used as the graphline in the final test.
|
 Device Device
|
The device driver that should be used to perform the measurement of the value. This will be the device driver that was created earlier, and will thus be the 'Central heating boiler' device driver in this example.
|
 Channel Channel
|
The channel of the selected device driver that should be measured. In this example this should match with the channel that was configured in the Configurable AD Convertor device driver, which was 'Channel 1'.
|
 Measurement interval Measurement interval
|
For pulsed immunity tests, a measurement interval can be specified. This interval is however not used for radiated and conducted immunity tests, and thus not relevant in this example.
|
 Units Units
|
The unit that should be used for the representation of the measured value. This can be '℃' in this example to show that the values are degrees Celsius.
|
 Decimal places Decimal places
|
The number of decimal places that should be used to represent the measured values, when the values are shown as a numerical value, for example in a table. In this example we would like to see the temperature with a 0.1 resolution, so the Decimal places can be set to 1.
|
 Calculation Calculation
|
The measured value can be recalculated to another value. In this example we just want to represent the measured value without any recalculation so the None option can be selected.
|
 Measure Measure
|
The selected options in the Measure group, determine at which moment the monitoring input will be measured. One or more of these options can be selected.
 Before dwelltime Before dwelltime
|
The monitoring input will be measured after the testlevel has been regulated, just before the modulation is activated and the dwelltime is started.
|
 During dwelltime During dwelltime
|
The monitoring input will be measured while the modulation is still being applied at the end of the dwelltime just before the dwelltime will finish. This is the best selection, as the value that is measured just before the end of the dwelltime is the most interesting point to determine if the EUT is being influenced.
|
 After dwelltime After dwelltime
|
The monitoring input will be measured directly after the dwelltime has passed, and the modulation has been deactivated again.
|
|
 Range Range
|
A range of allowed values can be specified for this measurement. The Min Range can be set to specify the minimum allowed valid value of the measurement. The Max Range can be set to specify the maximum allowed valid value of the measurement. If at any moment the measured value is out of this accepted allowed range, it is assumed that the EUT is being influenced.
|
 Note Note
|
Any additional information or documentation can be added to the monitoring input, by specifying it in the note.
|
Perform the test[edit]
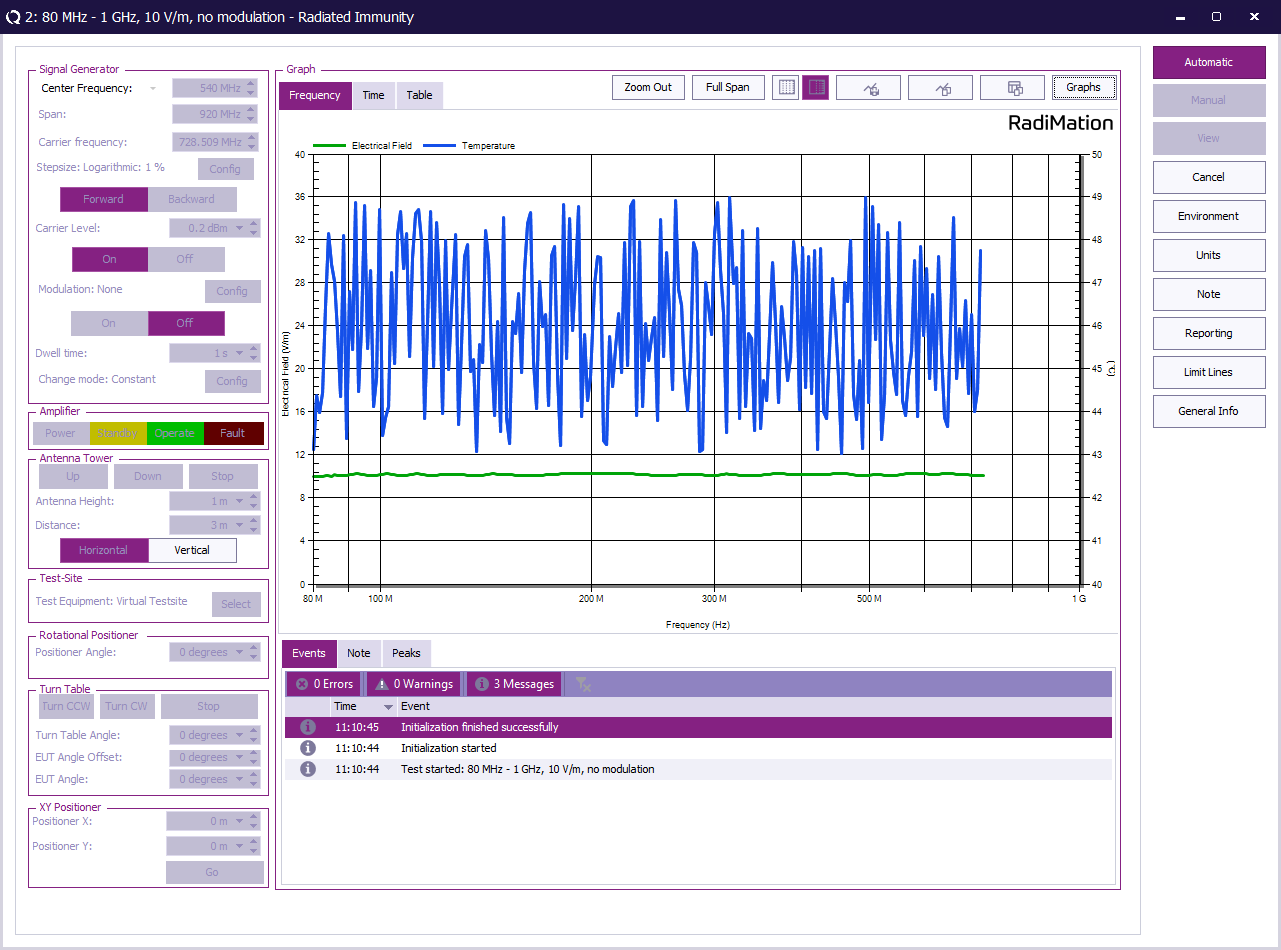
When an immunity test is performed, RadiMation® will also automatically measure the values from the measurement devices of the activated monitoring inputs and it will plot the corresponding graphlines. By switching to the Table tab, the measurement values can also be shown in a tabular style.
Recalculation of the retrieved value[edit]
The monitoring input configuration dialog also has the option to configure a calculation on the retrieved value. The following options are available to recalculate the retrieved value:
 None None
|
No calculation on the retrieved value is done. The retrieved value is directly passed as the final value of the monitoring input.
|
 Offset Offset
|
The value specified for the Offset will be added to the retrieved value. Offset can be a positive or negative number. The result of the addition will be the final value of the monitoring input.
|
 Multiply Multiply
|
The value specified for the Multiply will be used to multiply the retrieved value. Multiply can be a positive or negative number. The result of the multiplication will be the final value of the monitoring input.
|
 AD input range AD input range
|
The values specified for the Min and Max values are used to perform a re-mapping of the minimum and maximum value of the AD convertor device driver.
|
 Formula Formula
|
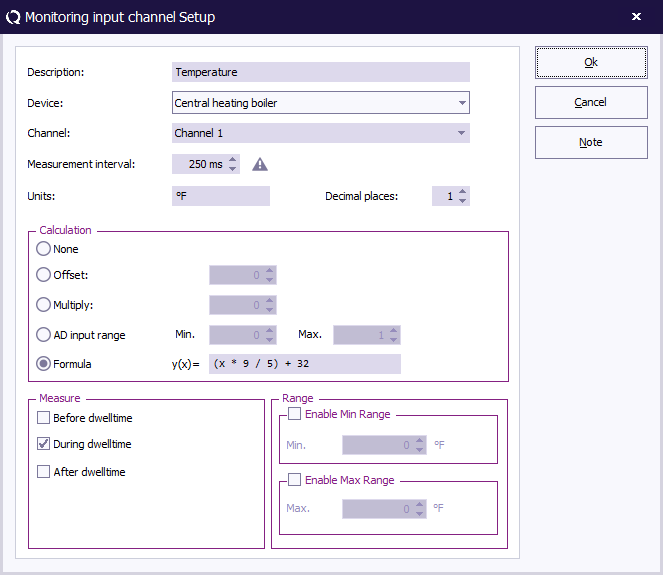
The text specified for the Formula is used to recalculate 'x' into a final value of the monitoring input. Standard operations like, *, /, +, -, ( and ) can be combined with values to perform a more complex recalculation of the retrieved value.
|
The Formula option can for example be used if the water temperature is reported by the central heating boiler as a value in degree Celsius, but the value in the graphs of the immunity test, should be specified in degrees Fahrenheit. By specifying "(x * 9 / 5) + 32" as the Formula, the final value of the monitoring input will be recalculated and expressed in degrees Fahrenheit. By also specifying "°F" as Unit, this will also be clear in the final graphs.
Conclusion[edit]
By using the Configurable AD Convertor device driver, it is easy and flexible to implement a query command to a measurement device, after which the response can be interpreted using a regular expression. The configured device driver can then be used by any EUT file, by configuring and activating the desired monitoring input. Every immunity test for that EUT will from then on perform the retrieval of the actual measurement value and plot it in the graphs besides the other measurement values.
Also using the flexibility to recalculate the measured value to another value (for example by converting it from degrees Celsius to degrees Fahrenheit), it is easy to represent the measured values in the desired unit in the final test results.


