National Instruments DAQmx Generic: Difference between revisions
No edit summary |
No edit summary |
||
| Line 9: | Line 9: | ||
[[File:Daqmx_advanced.png]] | [[File:Daqmx_advanced.png]] | ||
=== Setting up DAQmx simulator === | === Setting up DAQmx simulator === | ||
| Line 48: | Line 41: | ||
# Open the tab "Settings" make sure that the "Signal Input Min" and "Signal Input Max" are -10 and 10. for all channels (both tabs). | # Open the tab "Settings" make sure that the "Signal Input Min" and "Signal Input Max" are -10 and 10. for all channels (both tabs). | ||
# Now it should be possible to use the AD converter in a test-site and get simulated values in a test. | # Now it should be possible to use the AD converter in a test-site and get simulated values in a test. | ||
{{DeviceDriverInfo | |||
|DLLFile=RADNIDAQ.DLL | |||
|DeviceBrand=National Instruments | |||
|DeviceDriverName=NIDAQmxGenericAD | |||
|DeviceType=DAQmx Generic | |||
|SupportedDeviceTypes=64 | |||
}} | |||
Revision as of 15:28, 11 November 2020
Configuring the device[edit]
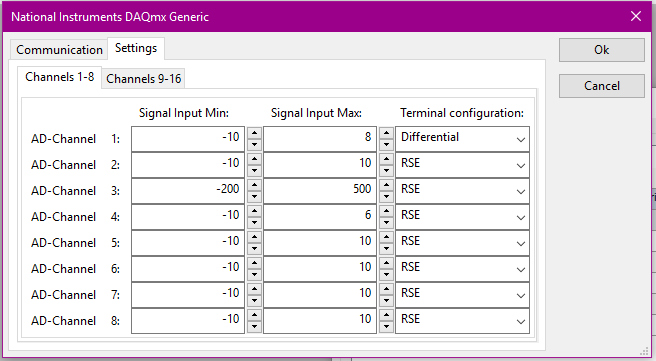
The values configured in the advanced settings for the Ni cDAQ driver, seen below, stand for an estimate of the expected measurement values on each channel.
The controlled device uses these values to determine the best scaling and gain configurations internally in the hardware for the selected input channels.
Note. This means that the actual measured values returned from the device do not necessarily have to be within this specified range.
The actual measured values will eventually be determined by the internal hardware of the controlled device.
This can be different for each device depending on the installed module.
Setting up DAQmx simulator[edit]
It is possible to test the NI-DAQmx software in simulated mode
NI has documentation on how to install and configure a simulated device.
- https://knowledge.ni.com/KnowledgeArticleDetails?id=kA03q000000x0PxCAI&l=nl-NL
First download and install the NI-DAQmx setup which can be found here.
- https://www.ni.com/nl-nl/support/downloads/drivers/download.ni-daqmx.html#348669
- Start NI MAX
- Locate "My System" > "Devices and interfaces".
- Right click on "Devices and Interfaces"
- Choose "Create new..."
- Choose "Simulated NI-DAQmx Device or Modular Instrument".
- Click "Finish"
- Now search for the device to test, in this case "USB-6212"
- And click "Ok"
Now the simulated device is added, if it's the first device, it most probably is called: USB NI-6212 "Dev1".
The next steps are done within RadiMation:
- Open RadiMation
- Open the menu "Devices" > "Configure".
- At "Device Driver Type" choose "AD Converters"
- Click "Add"
- Search for: National Instruments DAQmx Generic
- Select the type from the list and click "New"
- In the "Device Driver Settings" screen click "Advanced"
- Make sure that under "Communication" the "Device Name" matches with the name created in NI-MAX.
- Open the tab "Settings" make sure that the "Signal Input Min" and "Signal Input Max" are -10 and 10. for all channels (both tabs).
- Now it should be possible to use the AD converter in a test-site and get simulated values in a test.
The National Instruments DAQmx Generic device driver is a AD Converter which is supported by RadiMation®.
Related pages
Links
- Google search: National Instruments DAQmx Generic
- Google image search: National Instruments DAQmx Generic
| This information about an equipment is automatically generated from the list of supported device drivers from RadiMation. |
| If you need more information you can contact radimation-support@raditeq.com. |
