Mk Messtechnik On Screen Display: Difference between revisions
No edit summary |
|||
| (12 intermediate revisions by 6 users not shown) | |||
| Line 1: | Line 1: | ||
{{DeviceDriverInfo | |||
|DLLFile=RADSWTCH.DLL | |||
|DeviceBrand=mk Messtechnik | |||
|DeviceDriverName=MKMESSTECHNIK_OSD | |||
|DeviceType=On Screen Display | |||
|HideAutoData=1 | |||
|SupportedDeviceTypes=16777216 | |||
}} | |||
To use the MK Messtechnik On screen Display coupling between Radimation and the software from MK Messtechnik you need to add it to your drivers. Configure it as you see below and add it to the test site that you are using to send the data to the OSD software to display values from Radimation on screen. | |||
For more information on how to add drivers and devices please check the manual as this is covered in the chapter "getting started" | |||
* | |||
* | [https://wiki.dare.nl/wiki/index.php/Chapter_2#Device_driver_configuration Device Drivers] | ||
* | [https://wiki.dare.nl/wiki/index.php/Chapter_2#Test_equipment_list_configuration Test Sites] | ||
* | |||
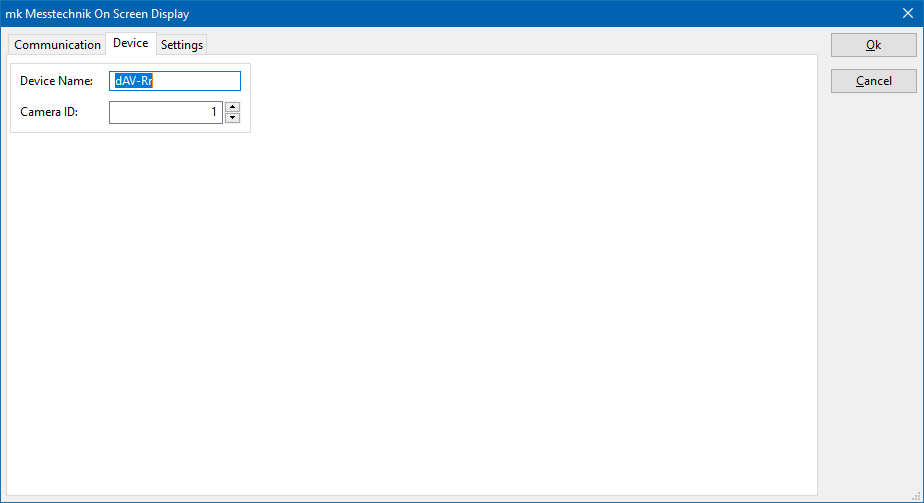
* | The {{ScreenElement|Device}} tab allows to select the correct device and camera on which you want to overlay the video image. | ||
* | |||
* | [[File:MkMesstechnikOnScreenDisplayDevice.png]] | ||
* | |||
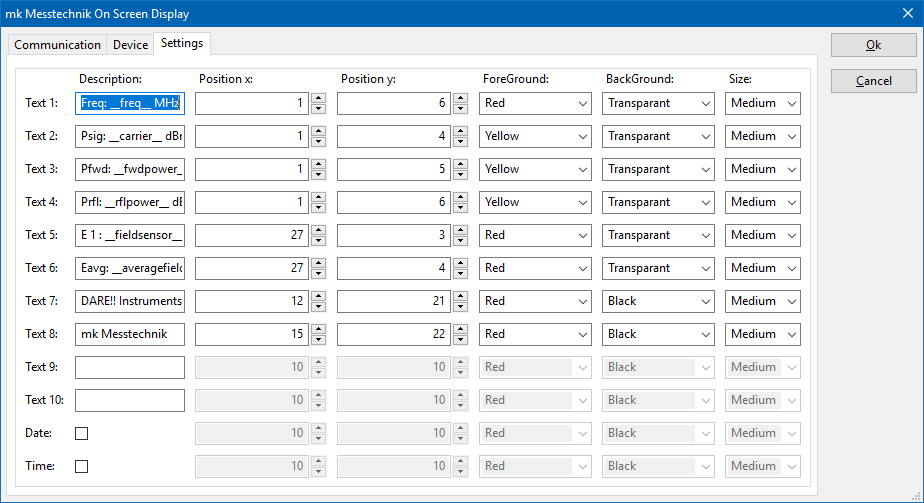
* | The {{ScreenElement|Settings}} tab allows to configure the content that should be overlaid over the video image. | ||
*" | |||
[[File:MkMesstechnikOnScreenDisplaySettings.png]] | |||
It is allowed to specify up to 10 texts. Also the actual date and time can be shown. For each of those texts it is possible specify: | |||
{{ScreenElementDescriptionStart}} | |||
{{ScreenElementDescription|Description|The text that should be shown. These texts can include [[#keywords | keywords]] to show actual data values.}} | |||
{{ScreenElementDescription|Postition x|The x position on which the text should be shown. 1 is on the left side.}} | |||
{{ScreenElementDescription|Postition y|The y position on which the text should be shown. 1 is on the top.}} | |||
{{ScreenElementDescription|ForeGround|The colour of the text that is shown.}} | |||
{{ScreenElementDescription|BackGround|The background colour of the text.}} | |||
{{ScreenElementDescription|Size|The size of the text, which can be {{ScreenElement|Small}}, {{ScreenElement|Medium}} or {{ScreenElement|Large}}.}} | |||
{{ScreenElementDescriptionEnd}} | |||
== Keywords == | |||
When using the following keyword(s) in the {{ScreenElement|Description}} of a text it will be replaced with they corresponding data value. Each keyword starts with a double underscore ('_') and it ends with a double underscore. | |||
* __freq__ | |||
* __averagefield__ | |||
* __carrier__ | |||
* __fwdpower__ | |||
* __rflpower__ | |||
* __fieldsensor__ | |||
* __modulationtype__ | |||
* __modulationfreq__ | |||
* __modulation__ | |||
* __dwelltime__ | |||
* __calcfield__ | |||
* __polarization__ | |||
* __angle__ | |||
== Communication settings == | |||
The [[Mk Messtechnik]] On Screen Display can be controlled by RS232 (9600 baud) or by an Ethernet connection. | |||
The USB connection to the mk Messtechnik controller is also using the RS232 protocol. | |||
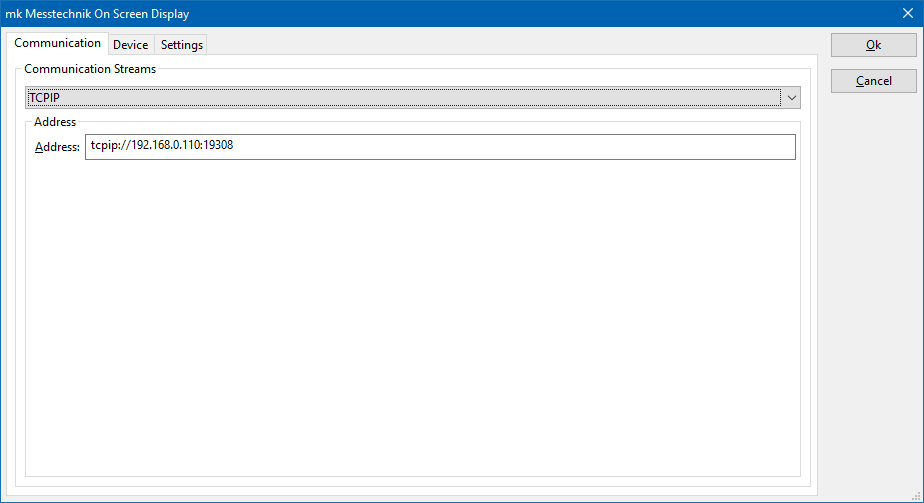
The Ethernet connection is working by using a raw socket connection on port number 19308. To configure this correctly it is advised to use the "TCPIP" connection and specify the correct IP-address and the port number 19308. | |||
[[File:MkMesstechnikOnScreenDisplayCommunication.png]] | |||
Latest revision as of 11:26, 14 April 2023
The mk Messtechnik On Screen Display device driver is a EUT Controller which is supported by RadiMation®. To use the MK Messtechnik On screen Display coupling between Radimation and the software from MK Messtechnik you need to add it to your drivers. Configure it as you see below and add it to the test site that you are using to send the data to the OSD software to display values from Radimation on screen.
For more information on how to add drivers and devices please check the manual as this is covered in the chapter "getting started"
The Device tab allows to select the correct device and camera on which you want to overlay the video image.
The Settings tab allows to configure the content that should be overlaid over the video image.
It is allowed to specify up to 10 texts. Also the actual date and time can be shown. For each of those texts it is possible specify:
| The text that should be shown. These texts can include keywords to show actual data values. |
| The x position on which the text should be shown. 1 is on the left side. |
| The y position on which the text should be shown. 1 is on the top. |
| The colour of the text that is shown. |
| The background colour of the text. |
| The size of the text, which can be Small, Medium or Large. |
Keywords[edit]
When using the following keyword(s) in the Description of a text it will be replaced with they corresponding data value. Each keyword starts with a double underscore ('_') and it ends with a double underscore.
- __freq__
- __averagefield__
- __carrier__
- __fwdpower__
- __rflpower__
- __fieldsensor__
- __modulationtype__
- __modulationfreq__
- __modulation__
- __dwelltime__
- __calcfield__
- __polarization__
- __angle__
Communication settings[edit]
The Mk Messtechnik On Screen Display can be controlled by RS232 (9600 baud) or by an Ethernet connection. The USB connection to the mk Messtechnik controller is also using the RS232 protocol. The Ethernet connection is working by using a raw socket connection on port number 19308. To configure this correctly it is advised to use the "TCPIP" connection and specify the correct IP-address and the port number 19308.


