ODBC text setup: Difference between revisions
No edit summary |
No edit summary |
||
| Line 18: | Line 18: | ||
[[Image:Define Text format three columns.png]] | [[Image:Define Text format three columns.png]] | ||
Now everything is set correctly, close all windows by pressing the {{ScreenElement|Ok}} button on every window. Once the ODBC Data Source connection is correctly configured, the configuration of the [[customer database | Now everything is set correctly, close all windows by pressing the {{ScreenElement|Ok}} button on every window. Once the ODBC Data Source connection is correctly configured, the configuration of the [[customer database]] in {{RadiMation}} can be performed. | ||
[[Category:WindowTitle]] | [[Category:WindowTitle]] | ||
Revision as of 13:28, 25 November 2010
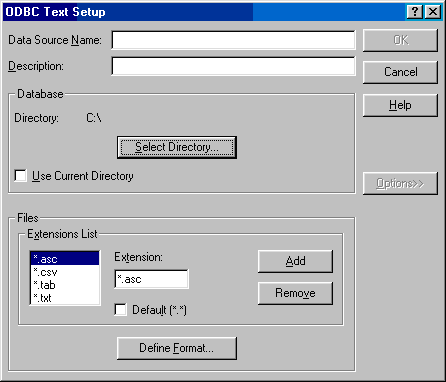
The ODBC text setup dialog is used to configure the ODBC driver for a text based database.
In this window we need to set several items:
| This just a name for the setup you are making, name this Radimation, or another descriptive name for the used database |
| Allows to select the directory in which the text based database files are stored |
| Overrules the selected directory to use the current directory. It is best to turn this checkbox off, and select a specific directory by using the Select Directory... button |
| Shows a list of filename extensions which will be used to determine the correct text files. Remove *.asc and *.tab from the extentions list |
| Will show the Define Text Format dialog, which can be used to define the format of the database as it is maintained in the text file |
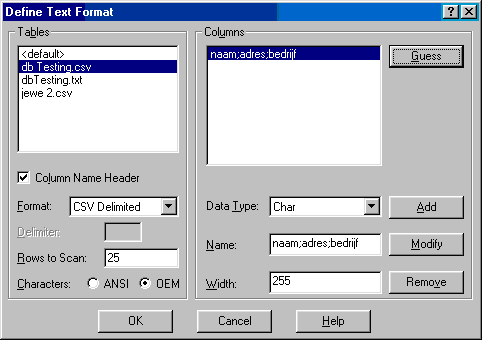
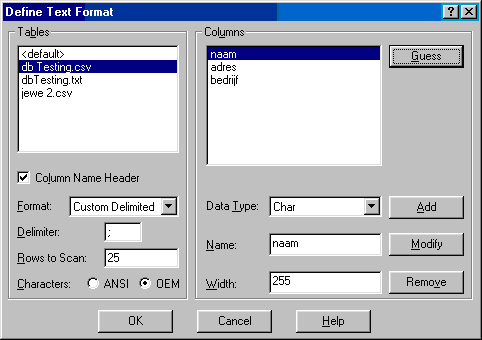
Select the file you want to use, check the Column Name Header checkbox and select the format. Press Guess button to see if the column headers from your database are set correctly. In the screenshot above the columns are not set correctly. The .csv file format is different, to solve this press the Format combobox and select Custom Delimited. Insert ';' in the delimiter textbox and press Guess again.
Now everything is set correctly, close all windows by pressing the Ok button on every window. Once the ODBC Data Source connection is correctly configured, the configuration of the customer database in RadiMation® can be performed.


