Chapter 4: Difference between revisions
| Line 510: | Line 510: | ||
Slight differences in the calculated field strength can occur due to field sensor and power meter uncertainties. | Slight differences in the calculated field strength can occur due to field sensor and power meter uncertainties. | ||
===Changing the current test level=== | ===Changing the current test level=== | ||
Revision as of 10:09, 10 September 2008
Radiated immunity[edit]
Radiated immunity test are a simulation of R.F. fields generated by strong transmitters as walky-talkies, mobile phones, porto-phones and broadcast transmitters.
During radiated immunity tests, a RF field is generated in the test room. Different EMC standards use different methods to generate this field. The RadiMation® test software supports the following four different methods for radiated immunity tests:
- Substitution method
- Field levelling method
- Fixed generator method
- Performance level method
For more information, please read the chapters “Substitution method”, “Field levelling method”, “Fixed generator method” and “Minimum performance level method”, Each test method has it’s own benefits and draw backs.
Substitution method[edit]
To perform radiated immunity tests according to the “substitution” method, the empty room is first calibrated. The calibration file is then used generate the same power into the transmitting antenna as was needed during the calibration, to achieve the desired field strength (with the EUT in the anechoic chamber).
For immunity tests according to IEC 1000-4-3, normally a shielded, full anechoic chamber is used. The chamber must have a minimum of 1.5 m * 1.5 m square homogeneous field area in front of the transmitting antenna.
The transmitting antenna should be preferable at a distance of 3 meters from the Equipment Under Test. Before actual tests can take place, calibration of the test set-up is required. See the chapter on Calibration for more information about the method for a 1-point calibration, and the method used for a 16-point field homogeneity check as required by IEC 1000-4-3.
During the calibration, a calibration file is made, which contains the drive power levels for each test frequency. The values recorded in the calibration file are depended on the type of calibration.
Three different types can be used:
- Signal generator level
- Forward power
- Net power (Forward-Reflected)
The calibration files are downwards compatible. This means that a Net power calibration file can be used to perform a Forward power or signal generator level test and a Forward power calibration file can be used to perform a signal generator level test.
The recorded value is the value necessary to generate a constant field in the anechoic chamber. For example, if a test level of 10 V/m has to be generated, the generated field in the anechoic chamber must be 10 V/m (- 0 dB + 6 dB) on 75% of the 16 test points in the 1.5 m * 1.5 m area (See Calibration).
After the test set-up has been calibrated, tests can be performed using the calibration file. Care should be taken for selecting the correct calibration file. The calibration file(s) for horizontal and vertical antenna polarisation are quite often different. Room characteristics and dimensions cause these differences.
Benefits[edit]
Substitution method tests have a high level of reproducibility. In contradiction to the field levelling method no correction is made for the influence on the field strength caused by the EUT.
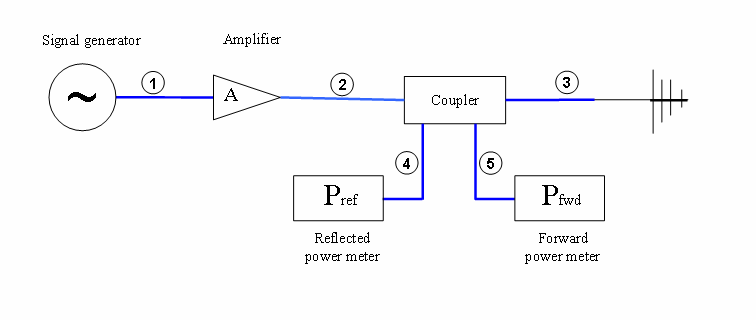
| Device name | Tab in Radimation configuration window |
|---|---|
| Signal Generator | Standard 1 |
| Amplifier | Standard 1 |
| Coupler | Standard 1 |
| Power meter Pfwd | Standard 1 |
| Power meter Refl | Standard 1 |
| Antenna | Standard 1 |
| # | Device name | Tab in Radimation configuration window |
|---|---|---|
| 1 | Sign-> Amp | Cables |
| 2 | Amp-> Coupler | Cables |
| 3 | Coup->Ant | Cables |
| 4 | Coup->Pfwd | Cables |
| 5 | Coup->Pref | Cables |
| Note: | Usage of cable correction factors is not mandatory. However, using correction factors will increase measurement accuraccy during immunity measurements.
Although, during immunity measurements according to the substitution method, cable correction factors will increase the accuracy of measured/displayed power values. The generated field accuracy will however be the same when using correction factors or not. When in doubt contact your reseller. |
Field levelling method[edit]
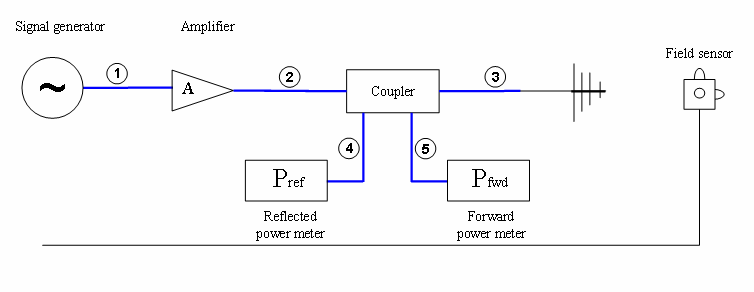
During Radiated immunity tests according to the “field levelling” method, the generated field during the test is real time levelled to the desired value. For “Field levelling” tests, no calibration files are required. Some EMC standards, like automotive standards, describe field levelling test methods.
| Device name | Tab in Radimation configuration window |
|---|---|
| Signal Generator | Standard 1 |
| Amplifier | Standard 1 |
| Coupler | Standard 1 |
| Power meter Pfwd | Standard 1 |
| Power meter Refl | Standard 1 |
| Antenna | Standard 1 |
| Field sensor | Field probes |
| # | Device name | Tab in Radimation configuration window |
|---|---|---|
| 1 | Sign-> Amp | Cables |
| 2 | Amp-> Coupler | Cables |
| 3 | Coup->Ant | Cables |
| 4 | Coup->Pfwd | Cables |
| 5 | Coup->Pref | Cables |
| Note: | Usage of cable correction factors is not mandatory. However, using correction factors will increase measurement accuracy during immunity measurements.
When in doubt contact your reseller. |
Fixed generator test method[edit]
Fixed generator tests can be useful during various kinds of EMC tests. During current injection tests, this method can be used to achieve the maximum injected current the amplifier is able to generate. Although this will not be a constant current over the frequency range, it can be useful during engineering work.
Fixed generator tests can be performed in three different ways:
- Fixed signal generator output level. Tests with a fixed generator output level do not take cable losses and amplifier frequency response into account. No power meters are needed during these tests and therefore, the test speed is higher than the fixed forward and fixed transmitted power tests.
- Fixed Forward power level Tests with a fixed forward power level do take cable losses and amplifier frequency response into account. One power meter is required during these tests. This test method does not take VSWR mismatch between the amplifier and current probe into account (i.e.: the forward power and transfer impedance of the current probe alone are not enough to calculate the actually injected current).
- Tests with a fixed transmitted power level take cable losses, amplifier frequency response and VSWR mismatch into account. Two power meters are required during these tests, one to measure the forward power, and one to measure the reflected power. The difference between forward power and reflected power is the transmitted power.
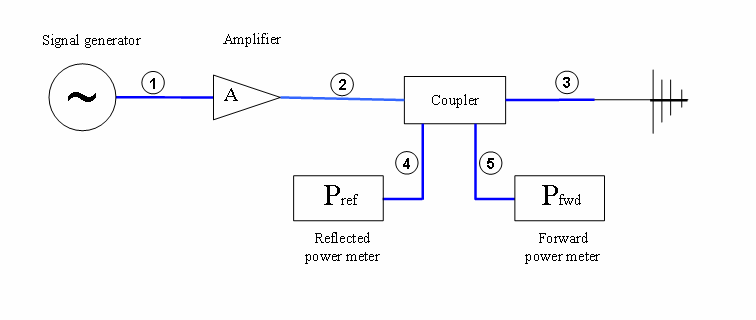
| Device name | Tab in Radimation configuration window |
|---|---|
| Signal Generator | Standard 1 |
| Amplifier | Standard 1 |
| Coupler | Standard 1 |
| Power meter Pfwd | Standard 1 |
| Power meter Refl | Standard 1 |
| Antenna | Standard 1 |
| # | Device name | Tab in Radimation configuration window |
|---|---|---|
| 1 | Sign-> Amp | Cables |
| 2 | Amp-> Coupler | Cables |
| 3 | Coup->Ant | Cables |
| 4 | Coup->Pfwd | Cables |
| 5 | Coup->Pref | Cables |
| Note: | Usage of cable correction factors is not mandatory. However, using correction factors will increase measurement accuracy during immunity measurements.
When in doubt contact your reseller. |
Triplate Test[edit]
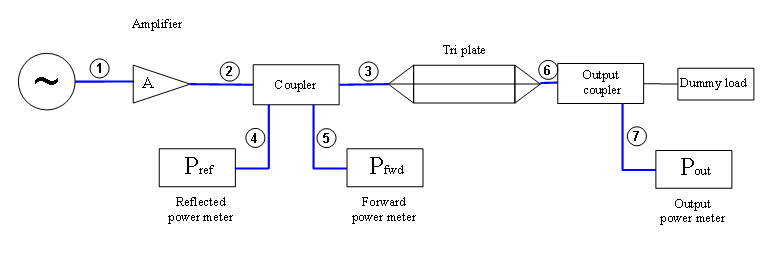
The triplate test is a substitution test, based on a triplate calibration. The triplate test is almost the same as the substitution test. The major difference is the amount of points and the determination of the needed power. The triplate impedance is determined during the calibration, using 5 calibrations. To calculate the required power the following formula is used:
Formula 4-1
where
Formula 4-2: Calculation of middle power
To configure a triplate test you need to open the configuration window.
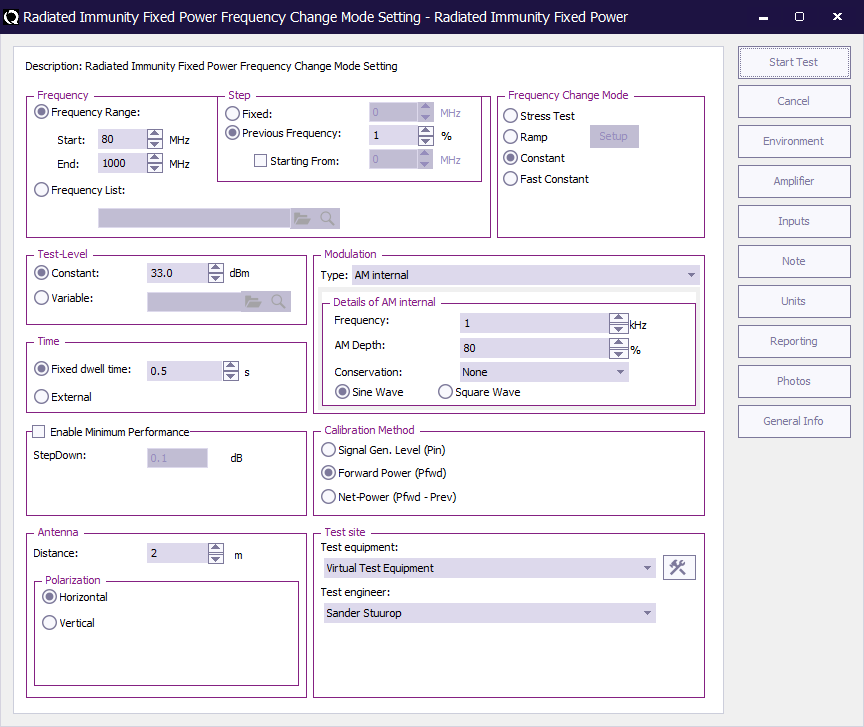
In the configuration window, you need to specify the calibration file you wish to use. Please note that it is possible to select a five-point calibration file as well as a one-point calibration. This is done so that you can verify your one point calibration. Don’t forget to define the following points: • Testlevel • Dwelltime • Antenna distance, in our case the triplate • Amplifier protection
Press the Start test button to start the test.
| Device name | Tab in Radimation configuration window |
|---|---|
| Signal Generator | Standard 1 |
| Amplifier | Standard 1 |
| Coupler | Standard 1 |
| Power meter Pfwd | Standard 1 |
| Power meter Refl | Standard 1 |
| Antenna | Standard 1 |
| Output coupler | Standard 2 |
| Output power meter | Standard 2 |
| # | Device name | Tab in Radimation configuration window |
|---|---|---|
| 1 | Sign-> Amp | Cables |
| 2 | Amp-> Coupler | Cables |
| 3 | Coup->Ant | Cables |
| 4 | Coup->Pfwd | Cables |
| 5 | Coup->Pref | Cables |
| 6 | Triplate->coupler | Cables |
| 7 | Output coupler -> power meter | Cables |
| Note: | Usage of cable correction factors is not mandatory. However, using correction factors will increase measurement accuraccy during immunity
measurements. When in doubt contact your reseller. |
Frequency step, test methods[edit]
“Stress tested” method
“Ramp” method
“Constant field” method
“Fast “Constant field” method
Goal[edit]
Most EMC standards do not describe if, or how the RF signal must be switched on and off between the test frequencies.
In real world situations, transitions in RF fields occur quite often. For example, switching on a hand held transmitter or mobile phone would give a transition in the RF field. For this reason, if the used test standard doesn’t prescribe a defined method to handle the field between test points, we recommend to use the “stress tested” method. During this test method, the RF signal is switched on and off between each test point.
RadiMation® supports four different ways to generate the RF signal between test frequencies. These four methods can be used during substitution, current levelling, fixed generator and minimum performance level tests. For more information on these methods, see the paragraphs:
- Stress test method
- Ramp method
- Constant method
- Fast Constant method
Next to these 'standard' test methods RadiMation® supports the so-called minimum performance method described in paragraph 3.4.6.
Stress test method[edit]
During the stress test method, The RF test signal is switched on and off between test points. Transients in the RF field can cause great influence on electronic equipment, where a constant RF field with the same amplitude, does not have any influence. The “stress tested” test method therefore is a worst case test method, which is not required for all EMC standards. However, since this test method simulates the real world situation in the best way, we recommend using this method as the standard method, unless there is a very good reason to test the EUT with another method.
Ramp method[edit]
During the Ramp method, for each test point, the RF signal is ramped up from a level below the required level. The ramp up and ramp down time, as well as the attenuation, is software configurable. After testing for a period of the “Dwell time”, the RF signal is ramped down to a level of below the test level.
Constant method[edit]
During the constant method, the RF field is kept constant as good as possible (i.e. the field is not switched off between test point). Of coarse, any test set-up (signal generator, amplifier, anechoic cabling and injection clamp) will have a frequency response, which is not completely flat. Because of this frequency response, switching between frequency points will always give a slight change in RF level. Depending on the frequency response, the gain of the system for the next frequency point can be greater or smaller than the gain of the previous frequency point. To avoid positive RF level transitions during frequencies changes (which will have over testing as a result) the software determines if the drive level for the next frequency point is higher or lower than the drive level of the current frequency point. If the drive level for the next frequency point is lower, first the amplitude is decreased and then the frequency is incremented. However, if the drive level for the next frequency point is higher, first the frequency is increased and then the amplitude is increased.
Fast constant method[edit]
As for the constant method, during the fast constant method, the RF field is kept constant as good as possible (i.e. the field is not switched off between test point). In contradiction to the constant field method, the modulation is not switched on and of during the test. This means that the software measures power and field with the modulation switched on. The software will correct for measurement errors due to the modulation. Although this will result in slightly higher test errors, no transients in the RF field will occur caused by modulation switching. This test method will be faster than constant field-testing caused by the lack of levelling time. Depending on the quality of the test equipment and the frequency step size, the amplitude of the test signal will slightly change. Using a small step size will minimise this problem. Due to the method described above, during the constant field method, over testing does not occur.
| Note: | Powermeter who doesn't have a RMS detector, should not be used in Fast constant mode |
Minimum performance Method[edit]
The RadiMation® package also supports a specific method to determine the minimum performance level of a Equipment Under Test. This method differentiates itself from the aforementioned methods that is does not generate a fixed specified field strength but a varying field strength based on the susceptibility of the Device Under Test.
The method relies heavily on EUT monitoring (see chapter 8) to determine at which level the Device Under Test is influenced. Before the test is started the relevant A/D-channels have to be configured. Pushing the input button on the configuration screen does this.
The test is started at a (low) field strength level after which the field strength is increased with a specified increment till either of both situations arises. The field strength is limited by amplifier protection or the Device Under Test will be influenced in such way that the specified limits are exceeded. The field strength is than reduced with a specified step and the software will change to the next frequency point. This test will result in a graph showing the level to which the Device Under Test is unaffected by a radiated field.
Calibration methods[edit]
Signal generator level calibration[edit]
During signal generator level calibration only the signal generator level is recorded during the calibration. During a signal generator power substitution test, the signal generator level to input of the amplifier, is kept the same as recorded during the calibration. This method does not take amplifier instability into account. During this calibration method, no power meters are required. This method is less accurate than the FWD power and transmitted power calibrations and therefore not recommended for full compliance tests. During a signal level calibration, the field strength during calibration is recorded.
Forward power calibration[edit]
During a Forward power calibration, the forward power to the transmitting antenna is recorded. During a forward power substitution test, the FWD power to the antenna is kept the same as during the calibration. By this method, amplifier drift will have no influence on the test. When a forward calibration is made, this calibration file can also be used to perform a signal generator substitution test. During a forward power calibration, the signal generator level and the field strength during calibration is recorded.
Net power calibration[edit]
During a net power calibration, the forward and reflected power to the antenna is recorded. The difference between the forward power and reflected power is the net power. During a test, the net power is kept the same as during calibration. When a large metallic, EUT is placed in front of the antenna, some R.F. energy is reflected back into the antenna, resulting in a worse V.S.W.R. When only forward power is calibrated, this effect is not compensated for. When net power is calibrated, the by the antenna transmitted power is kept the same as during calibration. When a net power calibration is made, this calibration file can also be used to perform a signal generator substitution test or a forward power substitution test. During a forward power calibration, the signal generator level, forward power level and the field strength during calibration is recorded.
Modulation[edit]
A.M. Modulation[edit]
During most radiated and conducted immunity tests, the test signal must be Amplitude Modulated. If a modulation is chosen, this modulation will only be switched on during the period of the dwell time. In between test points, when the test signal is set to the next frequency point, the modulation is switched off. The reason for this is that measurements of the field or current, with the modulation switched on, are less accurate than without modulation. This is essentially important during real time levelled tests. Dependent on the capabilities of the signal generator used, internal and external modulation sources can be used.
For most EMC standards the RF signal is modulated with a 1 kHz, 80% AM modulation.
Power peak conservation[edit]
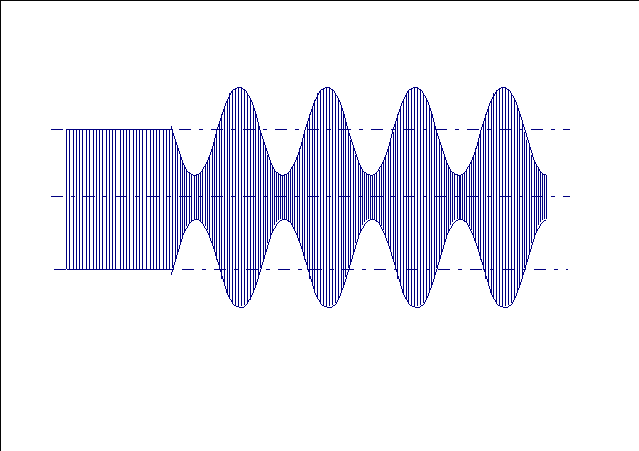
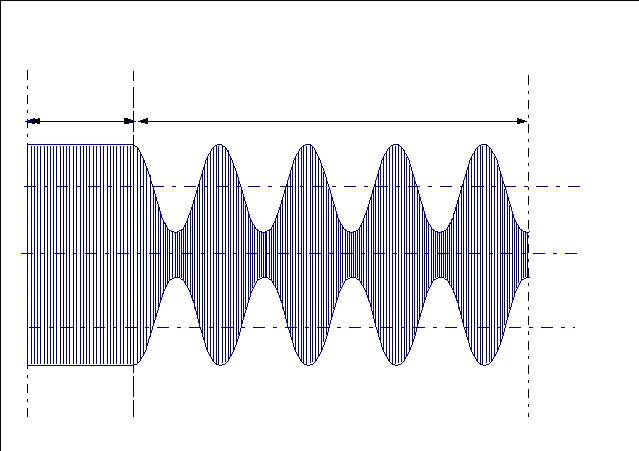
According to EN61000-4-3 and EN61000-4-6, the amplitude of the modulated RF signal is 1,8 times the amplitude of the unmodulated RF signal. For automotive standards, as for the 95/54/EEC, the peak value of the modulated signal equals the peak value of the unmodulated signal.
RadiMation® supports this different type of modulation by the option “Peak conservation” When “Peak conservation” is not selected, the peak value of an AM modulated signal equals ((100% + Modulation depth) / 100 %) times the peak value of the unmodulated signal. When “Power peak conservation” is selected, the peak value of the power of the modulated signal equals the peak value of the power of the unmodulated signal.
Voltage peak conservation[edit]
Voltage peak conservation equals “power peak conservation” with the following exception: When “Voltage peak conservation” is selected, the peak value of the voltage of the modulated signal equals the peak value of the voltage of the unmodulated signal.
Pulse modulation[edit]
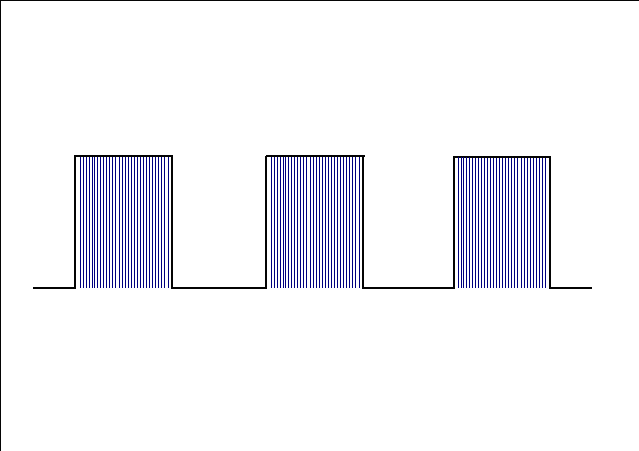
Pulse modulation is a simulation of the digital modulation technique used by GSM car telephones. The GSM modulation technique uses “bursts of data as shown in figure below. The repetition frequency of the bursts is approximately 200 Hz. As can be seen in the drawing, this modulation technique can be described as an AM signal with 100 % modulation depth and a 200 Hz square wave modulation signal.
Software checks:[edit]
To prevent accidental use of wrong calibration files and / or equipment, RadiMation® checks if calibration file has been made with the same equipment and under the same conditions as the currently configured test. The following items are checked, each time a test is started:
- Check for the correct antenna polarisation
- Check of the correct amplifier
- Check for the correct signal generator
- Check for the correct power meter
- Check for the correct current sensor
- Check for the correct distance between EUT and antenna
- Check if the selected test start frequency is higher then the lowest calibration frequency
- Check if the selected test stop frequency is lower then the highest calibration frequency
- Power delivery test
During the power delivery test the software check if a 4 dB increase of signal generator level results in a 4 dB increase op output power (at the output of the amplifier). The power delivery test is done in the middle of the frequency band of the current test.
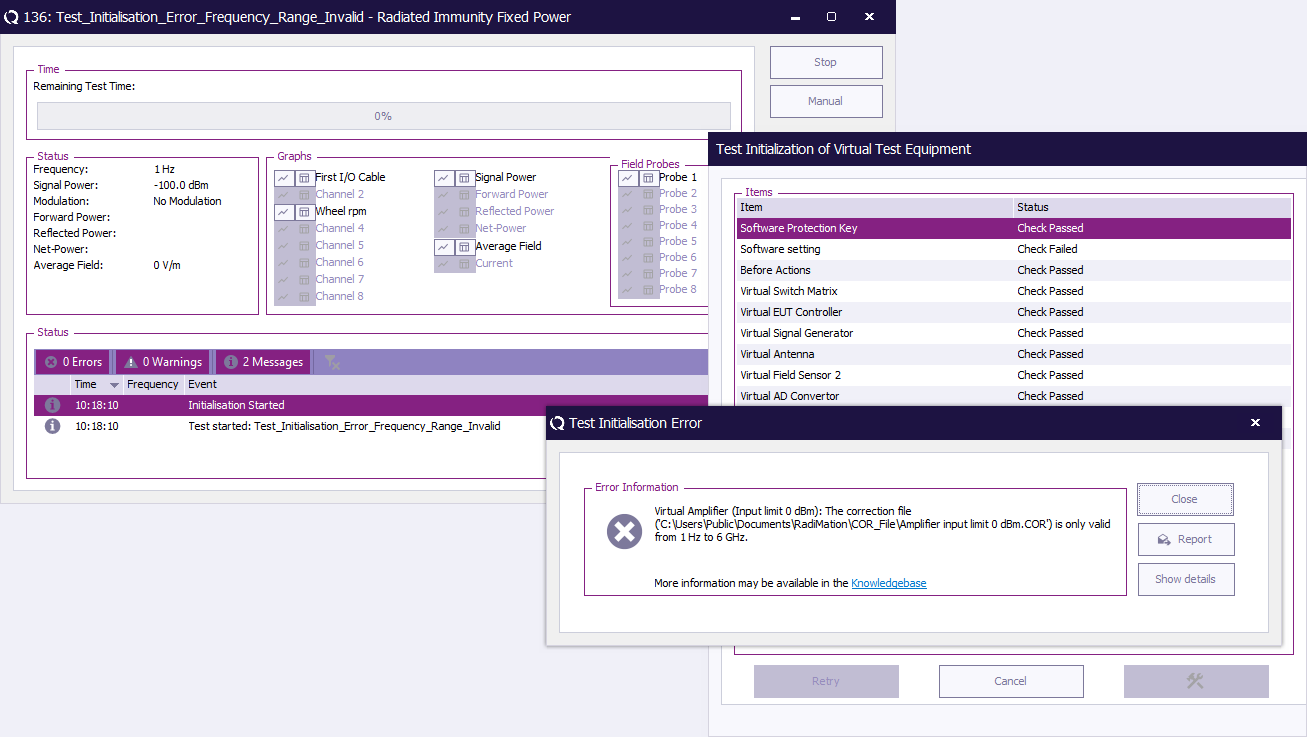
If an error occurs during the system check the user informed about the error and given additional information so the cause of the error can be corrected.
Amplifier protection[edit]
During EMC tests, there are three different situations where amplifier protection is needed:
- If an input level above the maximum allowed input level of the amplifier is supplied to the input, the input stage of the amplifier can be damaged. Limiting the output of the signal generator to protect he input of the amplifier will only be correct if the cable losses (which are frequency dependent) between the signal generator and amplifier are taken into account. Otherwise the maximum input to the amplifier will be higher at low frequencies.
- If the amplifier is used above it’s maximum allowed output power for an extensive period of time the amplifier life will be reduced significantly. This is especially through for high power amplifiers with tubes in the final stages. Further more, limiting the maximum output power of the RF amplifier will keep the amplifier in it’s linear region, avoiding non linear distortion and / or a distorted AM signal. Limiting the output power of the amplifier can be realised with a coupler and power meter, connected at the output of the amplifier. To measure the correct output power of the amplifier, the frequency response of cables between the coupler and power meter must be corrected for.
- When a poor antenna match is encountered most of the RF power is reflected back into the amplifier. Most amplifiers do not appreciate this while the reflected power will cause self-heating.
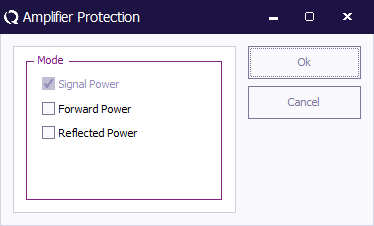
RadiMation® supports three levels of amplifier protection:
- The maximum input level to the amplifier can be limited. To correct for cable losses between the signal generator and the power amplifier, a correction graph can be entered.
- The maximum output power of the amplifier can be limited. To correct for cable losses between the coupler and the power sensor, a correction graph can be entered.
- The maximum reflected power to the amplifier can be limited. To correct for cable losses between the coupler and the power sensor, a correction graph can be entered.
In the case the software wants to drive the amplifier outside it’s pre defined settings, the software will limit the generator level, output power or reflected power to the maximum allowed value.
Manual mode[edit]
Goal[edit]
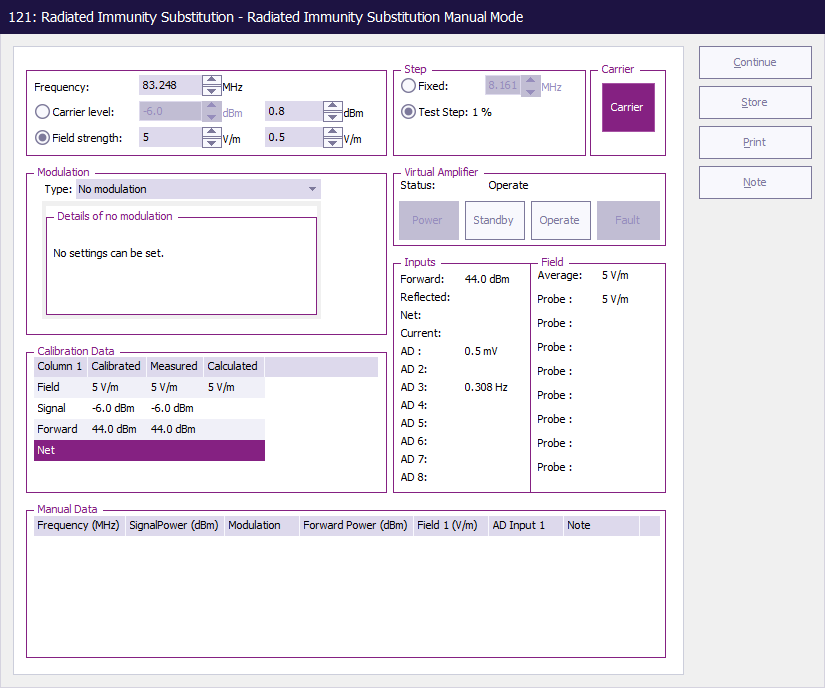
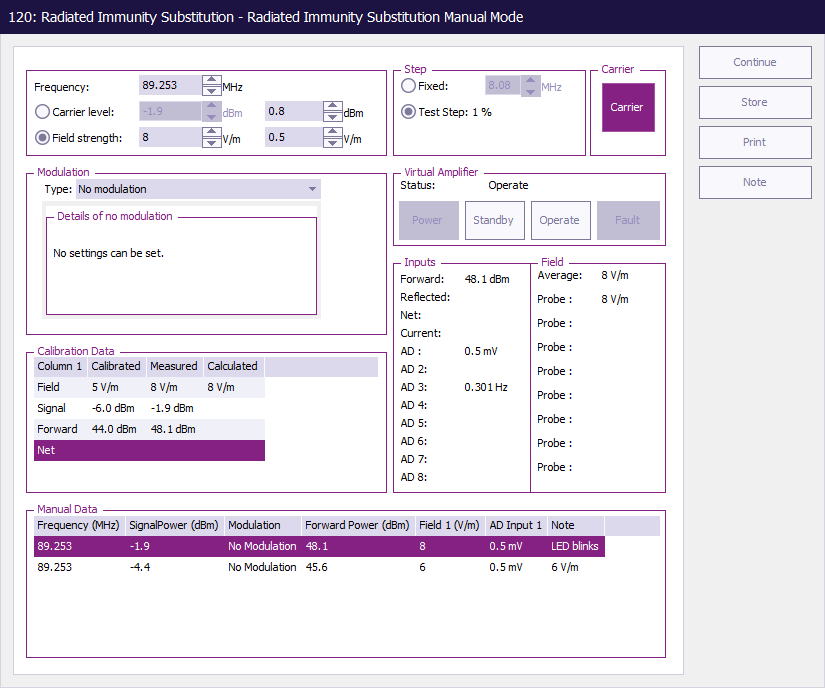
At any moment during a test, the software can be switched to manual mode by simply pressing the “Manual” button. When the manual mode is entered, the software will automatically switch off the output power. The picture below shows the manual mode window.
In the “manual mode” window, the immunity system can be completely manual controlled. The RF output can be switched on and off and the frequency and the amplitude can be changed.
Manual mode can be used for one of the following purposes:
- Examine the performance of an EUT in a small frequency band
- Change the frequency and/or test level and continue with the automated test at this new frequency and/or test level settings.
- Make notes during the test, to record EUT failure (see also “event lists”)
- Verify the functionality of the software and or test system
Entering Manual Data[edit]
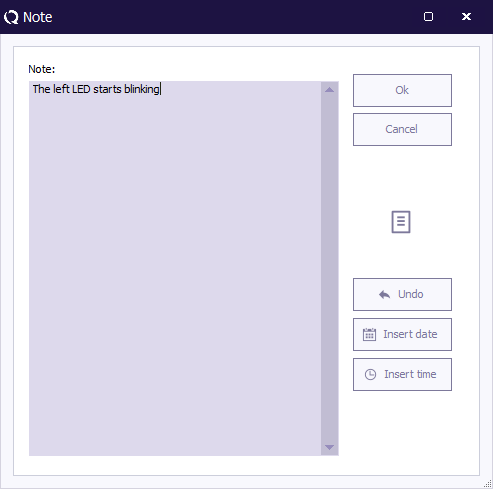
When in manual mode the user can explore the area around the desired frequency point and determine the behavior of the EUT. In case the user wants to store information during a manual mode session the store button should be pushed. A note window appears in which the user can add his observations.
This note together with all relevant data will be stored and showed in the manual data view. Manual data like all other data collected in RadiMation® is available at all times after the test.
Displayed values[edit]
In manual mode, the software will display:
Measured values:
- The (maximal 8) field strength(s) [or current] sensors
- The (maximal 8) A/D channels
- Forward power
- Reflected power
- The current sensor value
Calculated value’s:
- Field strength (or current).
- Net power
- Average field value of the selected field sensors
Calibration file information
- The field strength which was used during the generation of the calibration file
- Signal generator power which was required during the generation of the calibration file (during net power, forward and signal power calibrations)
- Forward power which was required during the generation of the calibration file (only during forward and net power calibrations)
- Net power, which was required during the generation of the calibration file (only during net power calibrations). With this information, the functionality of the software and test set-up can be easily verified. Furthermore, this information can be very useful during investigation of the EUT.
Calculation methods
The calculated values are calculated depending on the calibration type (signal power, forward power or net power), selected in the main test window.
The software will use the following different calculation methods:
Signal power test[edit]
When a signal power substitution test is performed, the software will use the signal generator level, which is recorded during calibration, to resolve the “calculated field” value. If the gain of the amplifier changes after the calibration file is made, the software will not detect this. For this reason, this method will make an error during the calculation of the field, when the gain of the amplifier is changed.
Calculation of the field during modulation:
During a substitution test according to the signal power calibration method, the signal generator power is set to the same value as the signal generator power during calibration. This is always done without modulation. When the modulation is switched on (for example 80% AM, 1000 kHz, without peak conservation), the forward power at the output of the amplifier, will be lower (due to the modulation). The software will derive the “calculated field” from the signal generator power and therefore will not correct for this change in output power. The calculated field can not be derived from the forward power because a power meter is not required during signal generator power calibrations and tests.
Because of this, the software will display a difference between the measured field and the calculated field when the modulation is applied. The calculated field will give the same reading as the field strength indicated in the calibration file, and the measured field strength will indicate the RMS field of the RF signal with the modulation applied.
Forward power test[edit]
When a forward power substitution test is performed, the software will use the forward power level, which is recorded during calibration, to calculate the “calculated field” value. While the forward power is kept constant during this test method, even if the gain of the amplifier changes, the software will calculate the correct value for the “calculated field”
The net power value can not be calculated with a forward power calibration file, and will therefore not be displayed.
Calculation of the field during modulation:
During a substitution test according to the forward power calibration method, the forward power is set to the same value as the forward power during calibration. This is always done without modulation. When the modulation is switched on (for example 80% AM, 1000 kHz, without peak conservation), the forward power will be lower (due to the modulation). The principal of a substitution test requires no correction for this change in forward power.
During manual mode, (while performing a forward power test), changing the test level will change the forward power, generated. Because of this, the software will derive the same value for the “calculated’ and “measured field” as for the “calibration file” field, making it more easy to check the performance of the system.
Due to a high-reflected power level, the calculated field can be inaccurate. This will be especially true if the reflected power is less than 20 dB lower than the forward power. Also, slight differences in the calculated field strength can occur due to field sensor and power meter uncertainties.
Net power test[edit]
When a net power (FWD - RFL) substitution test is performed, the software will use the net power level, which is recorded during calibration, to calculate the “calculated field” value. While the net power is kept constant during this test method, even if the gain of the amplifier changes or more energy is reflected back into the amplifier, the software will calculate the correct value for the “calculated field”
- The calculated signal generator power is directly copied from the signal generator setting in the manual mode control window.
- The calculated forward power in this situation will be copied from the measured forward power window.
- The net power value will be calculated from the measured forward power and reflected power levels.
Calculation of the field during modulation[edit]
During a substitution test according to the net power calibration method, the net power is set to the same value as the net power during calibration. This is always done without modulation. When the modulation is switched on (for example 80% AM, 1000 kHz, without peak conservation), the net power will be lower (due to the modulation). The principal of a substitution test requires no correction for this change in net power.
However, this will result in a lower calculated field as well, because RadiMation® uses the net power to calculate the field.
During manual mode (while performing a net power test), changing the test level will change the net power, generated. Because of this, the software will derive the same value for the “calculated” and “measured field” as for the “calibration file” field, making it easier to check the performance of the system.
In this situation in contradiction to the forward power method, errors in the calculated power, due to a high-reflected power level will not occur.
Slight differences in the calculated field strength can occur due to field sensor and power meter uncertainties.
Changing the current test level[edit]
When the current test level is changed, the RadiMation® software automatically displays the new calculated field strength (or injected current) for this test level. Furthermore the Forward power, net power, measured Field strength and/or AD channels will be shown on the screen (only if the required field sensor(s), AD channels or power meter(s) are selected under the Configuration, test site pull down menu).
In manual mode, depending on the test method (signal generator calibration, forward power calibration or net power calibration) respectively, the signal generator level, forward power or net power will be changed.
The test level can be changed with the mouse button (using the up and down arrows), be typed in using the keyboard or be changed using the up and down arrows on the keyboard. For all methods, the step size of the increments is determined by the “step size” value behind the “test level” field.
When the shift key is pressed together with the up and down arrows, the level will change with a value of the step size divided by 10.
Changing the current test frequency[edit]
During manual mode the test frequency can be changed. The step size for the frequency changes can be altered with the “step size” button. When the frequency is changed, RadiMation® will display the calculated field strength for the new frequency point. Furthermore the Forward power, Reflected power, Transmitted power and measured field strength will be displayed (only if these devices are selected under the Configuration, test site pull down).
The test frequency can be changed with the mouse button (using the up and down arrows), be typed in using the keyboard or be changed using the up and down arrows on the keyboard. For all methods, the step size of the increments is determined by the “step size” value behind the “frequency” field.
When the shift key is pressed together with the up and down arrows, the frequency will change with a value of the step size divided by 10.
Short cut keys in manual mode[edit]
The following short cut keys can be used during manual mode.
Key Function Up Carrier level up. Down Carrier level down. Left Carrier frequency down. Right Carrier frequency up. N,n Set carrier on. F,f Set carrier off. 4.10.8 Continuing a test
Continuing a test at a different test level
When, during manual mode, the test level has been changed, RadiMation® will ask you to continue with the new test level or to continue at the old test level.
Continuing a test at a different frequency
When, during manual mode, the test frequency has been changed, RadiMation® will ask you to continue with the new start frequency or to continue at the old test frequency.
Tolerance[edit]
For every radiated immunity test you can define a tolerance. This tolerance has great effect on the measurement. If you choose the tolerance to large then the test results are not usable, if you choose the tolerance to small then it could be that Radimation has problems performing the test correctly. For example if you define a tolerance of 0.1 dB and your system is only capable of measuring with an uncertenty of 0.2dB than it could be you get a very large event log. So what does it really mean this tolerance? The best way is to explain by using an example. Suppose you are performing a fixed power test, leveling is set on netpower. You have told Radimation to generate 50 dBm with a tolerance of 0.2 dB. When Radimation is leveling the power it will accept any power level between 50 and 50.2 dBm as a correct leveled value, and will continue with the test.



![{\displaystyle P_{mid}(f)[W]={\frac {E_{v}(f)^{2}*h^{2}}{Z(f)}}}](https://wikimedia.org/api/rest_v1/media/math/render/svg/e0aaed03a969f453e05d61eac9d0963d9b09faa1)
![{\displaystyle P_{mid}(f)[W]={\frac {P_{net}[W]+P_{out}[W]}{2}}}](https://wikimedia.org/api/rest_v1/media/math/render/svg/08229641086173a3bfd12f7a682e9f028f89d2e4)

