RadiMation Application Note 130
Contents
How to use the RadiMation Amplifier Control Window
In this application note we explain how the Amplifier Control Window can be configured and used in RadiMation®.
Introduction
RadiMation®is able to remote control amplifiers, if the hardware supports it. In this document we will show you how to configure an Amplifier to be remote controlled with the 'Amplifier Control Window'. We will explain the use and purpose of this manner of remote controlling your amplifier. In addition we will provide some tips and tricks to deal with the advantages and disadvantage of the 'Amplifier Control'.
Why using the Amplifier Control Window?
With the amplifier control window the end-user is now able to manual remote control the amplifier. Normally the amplifier is only controlled during a test. This especially comes in handy when the amplifier is placed in another room. During the use of the amplifier control window the device status is constantly read, so when any warning or error occurs it will be shown.
Amplifier device driver
To make use of the Amplifier control function first step is to create a device driver for the Amplfier you want to be controlled. An existing amplifier device driver is also fine, but the driver must be configured to be able to remote control the amplifier.
Creating a new device driver
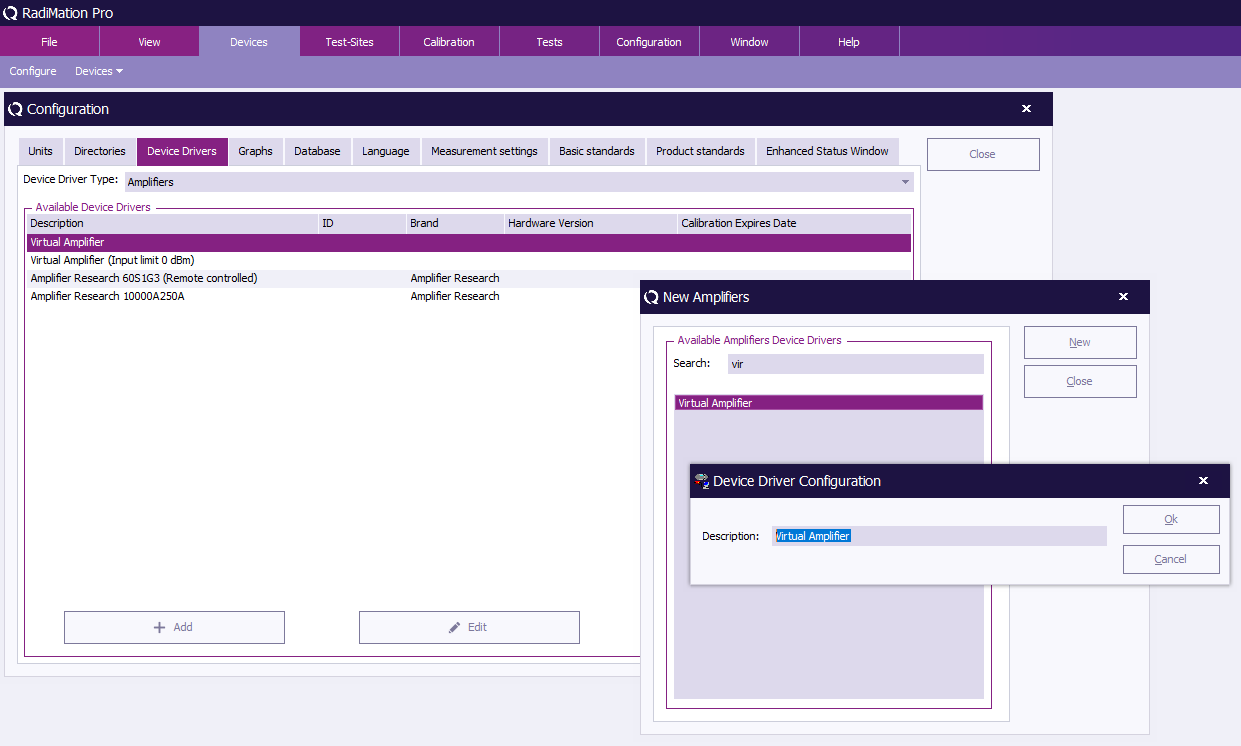
You can create a new driver, as example a virtual one:
- From the main menu go to:
- Select 'Amplifiers' from the drop-down list.
- Click in the bottom on the 'Add' button on the left. A new window will be shown.
- Search for 'Virtual Amplifier'.
- Select the 'Virtual Amplifier' and click the 'New' button. A new window will be shown.
- Then click on the 'OK' button.
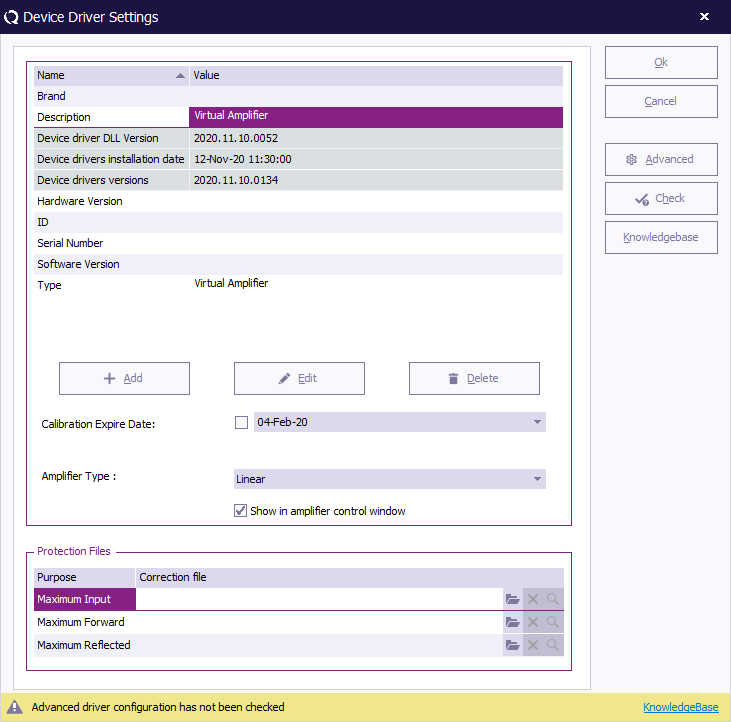
The windows will be closed and the configuration window of this new driver will be shown. Leave it open.
Activate the Amplifier control window
The amplifier control window can't be globally enabled or disabled. The setting can only be enabled for a specific amplifier device driver. Therefore, the shown amplifiers in the amplifier control window are depending on the device drivers which have the setting enabled. As by default a amplifier device driver will have this setting disabled, the device will thus not be shown in the amplifier control window.
At the device driver configuration window you can see the checkbox setting 'Show in amplifier control window'. Tick the checkbox to enable the setting for this driver:
- Click the 'OK' button to close the device driver configuration window.
- Click the 'Close' button to close the device driver configuration
Amplifier Control Window
To open the amplifier control window, which will show all the amplifier device drivers with this function activated:
- From the main menu go to:
[[AmplifierControlWindow.png]
Now, you can manually control your amplifier, having it remote controlled by RadiMation®. For example you can power on and off the amplifier.
- Button 'Power': will toggle the power and will respectively turn the amplifier On/Off.
- Button 'Standby': will change the mode of the device to 'standby'*.
- Button 'Operate': will change the mode of the device to 'operate'*.
- Button 'Fault': default this button is disabled. It will be enabled when a fault condition is retrieved from the device*.
* The way your amplifier is being remote controlled is strongly depending on the supported functions of the hardware and the RadiMation® device driver.
In case the amplifier is not locked when it is being remotely controlled, it is still possible to manually change the amplifier status by using the control panel at the amplifier itself. For instance: turn the amplifier on with RadiMation® and later on turn it manually in operate mode. RadiMation® could now also show the question at a shutdown if any amplifier is still on and should be turned off. This is a result of the activated amplifier control window and is a build-in functionality.
The amplifier control window can be placed anywhere within the RadiMation® main window. The latest position of the window is remembered, thus the window will be shown at the same location after a shutdown and relaunch of RadiMation®. In addition to this, also the window state (opened or closed) is remembered by RadiMation.
Keep in mind that closing the amplifier control window only will NOT disable this function; it remains active. As a result of the fact that the configuration can only be changed within the amplifier device drivers.
This means that even when the amplifier control window is closed, the device driver keeps (trying) communicating with the amplifier e.g. to get status updates (current status, error checking etc.). Also when the amplifier is not in use this will still happen.
Requesting status updates from one or more amplifier control window enabled amplifiers, can cause serious delays and responding issues. These problems can be easily resolved by disabling the 'Show in amplifier control window' option in the device driver again.

