D.A.R.E!! Instruments RPR2006P
General[edit]
Firstly you have to open the advanced device driver configuration window.
-
 Configuration
-
 Configuration
-
-
Now click Device Drivers and then select Power meters from the drop down list. Choose your powermeter (e.g. DARE!! Instruments RPRxxxxX) and click the "Advanced" button. You now have a window with several tabs and the different settings to configure you Powermeter.
| General settings of the Powermeter. |
| Filter settings of the Powermeter. |
| Connection type settings of the powermeter. |
| Communication settings of the powermeter. |
| Firmware update of the powermeter. |
Powermeter[edit]
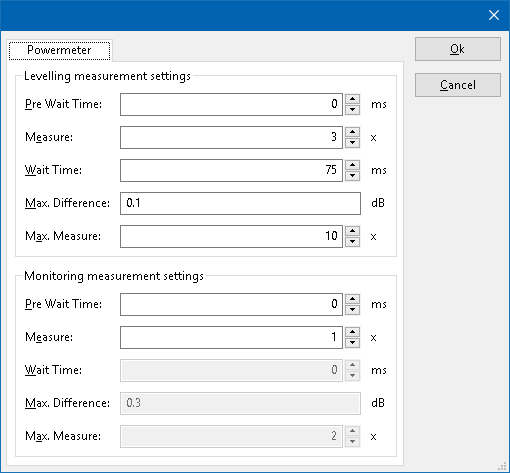
In the first screen it is possible to configure some general settings of the Powermeter. The working of both Levelling and Monitoring settings are exactly the same. The difference between these settings is the timing when the Levelling measurements and the timing when the Monitoring measurements are taking place during the test. This is also depending on which test is performed.
- Pre Wait time: the minimum time that should be waited before the measurements starts
- Measure: the minimum amount of measurements that has to be performed to determine if the <Max. Difference> condition is met
- Wait time: the minimum time that should be waited between each measurement
- Max. Difference: the maximum difference that is allowed between the <Measure> measurement value(s); the highest and the lowest values are compared.
- Max. Measure: the maximum amount of measurements that could be performed, before there is a final measurement value available (which could meet these conditions, or not)
According these settings RadiMation will perform a minimum of three measurements with a maximum of ten with a wait time between measurements with a minimum of 75ms. The following cases are possible:
First case (after the first - minimum amount of - measurements are performed):
The first (<Measure>) 3 measurements are performed and the results are WITHIN the difference of (<Max. Difference>) 0.1dB, then the last measurement value (of those three measurements) is used.
Second case (more measurements are needed): The first (<Measure>) 3 measurements are performed and the results are NOT WITHIN the difference of (<Max. Difference>) 0.1dB, then one new measurement is performed and RadiMation will use again the last three measurements (thus, the first measurement will be neglected) to determine if the results are now within the difference of (<Max. Difference>) 0.1dB. This process will repeat until the third or fourth case;
Third case (after new measurement(s)): The above settings and conditions are met (before the <Max. Measure> value is reached), the measurement value of the last measurement performed is then used as the correct measurement value. Or;
Fourth case (last measurement is done): The above settings and conditions are not met after the last measurement is done (and the <Max. Measure> value is reached), then measurement value of the last measurement performed is used as the correct measurement value.
Frequency range[edit]
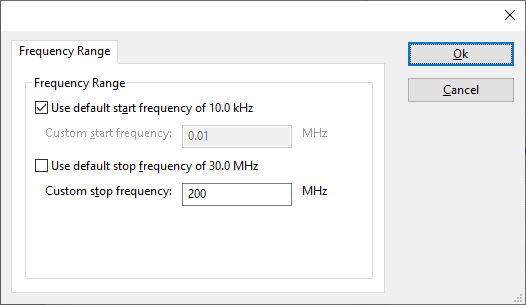
The frequency range of the device provided by the manufacturer is here shown and set as default.
File:Powermeter Tab2 Frequency range.PNG
It is possible for the end-user to overrule these settings and to manual adjust the frequency range to another value. If a change is to be made, just disable the check-box and modify the corresponding frequency. Be careful changing these setting as RadiMation is no longer able to verify if the driver is used outside his specified range and serious damage may occur to your device.
Reference[edit]
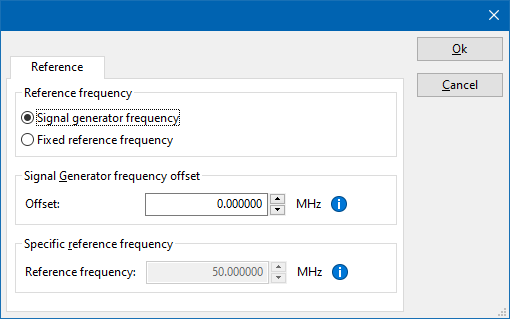
Normally it is desired that the reference frequency is used from the signal generator. So, when during the test the frequency has changed the power meter will measure on this frequency as well. If it is desired to have a fix reference frequency it is possible to overrule the default setting. The end-user should select the Fixed reference frequency and specify a frequency value.
File:Powermeter Tab3 Reference.PNG
Option[edit]
At the second tab you will find the filter selection.
From the drop-down menu you can select the filtering of the Powermeter. If a higher filter is selected then the sampling rate will also be higher. Default the filtering is set to automatic; 'Filter Auto'. The used filter is then depending on the actual power level which is being measured and will normally vary between filter 3 and filter 7.
An overview of the different filters and the corresponding sampling range:
| Filter: | Sampling rate: |
|---|---|
| 1 | 10 |
| 2 | 30 |
| 3 | 100 |
| 4 | 300 |
| 5 | 1000 |
| 6 | 3000 |
| 7 | 5000 |
For more information read the operation manual of your RadiPower device.
RadiCentre[edit]
Here you can set the right connection type of the communication with the Powermeter device.
- If the Powermeter is connected directly to your computer without intervention of a RadiCentre or an other device, you should select "Directly to PC".
- If the Powermeter is connected to a RadiCentre 1, you should select "RadiCentre 1".
- If the Powermeter is connected to an other RadiCentre with multiple slots, you should select "RadiCentre Multi-slot".
Additionally, when you have selected the "RadiCentre Multi-slot" you have to select the right "Device Identification" from the drop down menu, which is corresponding with the used slot and port in the RadiCentre.
Thus, for example for this configuration a RadiCentre USB1004A plug-in card could be used, and is placed in slot 1 with the RadiPower sensor connected to port A. In addition, all commands should use this prefix 1A.
Your Powermeter itself is always connected by USB. However, the communication with the RadiCentre is important when configuring your RadiPower, this will be further explained under communication.
Communication[edit]
The type of communication can here be configured. When your RadiCentre is connected by USB, select "USB" from the list of Communication Streams and click "Ok". Otherwise, choose the correct type of communication used as interface for the RadiCentre.
It is very important when you have connected your device with the USB interface to detect the device identification number. Otherwise, the device will not be recognized by RadiMation. To do so, click 'Configure', you will get the following screen:
File:8 Tab4 Communication 4USB configure.PNG
Click the 'Detect' button and after that confirm with 'Ok'. Your USB communication is now correctly established.
File:6 Tab4 Communication 1GPIB configure.PNG
The Advanced GPIB settings are mainly used to introduce (small) delays in the communication stream with the device. Especially in cases of (very) old equipment this setting is very useful, because the device can't handle the speed of commands RadiMation is sending to it. This setting screen is accessible whenever GPIB communication is possible. It is not always allowed by the end-user to change these configuration settings. When not accessible the settings are not grayed-out, but will just be reset to the default again. Normally, it is best to just keep the default settings if you have successful communication with the device.
File:7 Tab4 Communication 3RS-232 configure.PNG
The default settings for a serial connection can't be changed by the user. Therefore, these settings are grayed out. Logically, the COM port selection is still available for configuration.
File:9 Tab4 Communication 5VISA configure.PNG
Firmware[edit]
It is also possible to update the firmware of your Power meter to a newer version. When you have download and extract the newest version of the firmware you can use the "Browse" button to select the .upd file. Click "Update firmware" to update the firmware and wait for the process to finish.
The D.A.R.E!! Instruments RPR2006P device driver is a Power Meter which is supported by RadiMation®.
Configuration[edit]
The following tabs are available in the advanced configuration of the D.A.R.E!! Instruments RPR2006P:
| Wait time before starting the measurement-loop. Can be used to wait for a signal generator, and or amplifier to stabilize. |
| The minimum amount of measurements in the measure loop. Continues to loop even if power level is stable. |
| The wait time between each measurement is taken, during the measurement-loop. |
| If the measured power between each measurement in the measurement-loop, is less than this value. The measured power is stable. The measurement-loop will then stop. |
| The maximum amount of measure times, for the measurement-loop |
According to these settings, RadiMation® will perform a minimum of 3 power measurements with a wait time between the measurements of 75ms. If all those 3 measurements are within 0.1 dB, the power measurement is assumed to be stable, and RadiMation® will continue to average of the last 3 measurements. If the difference between the measurements is larger than the specified 0.1 dB, an additional power measurement will be performed, and the last 3 samples will be compared to the 0.1 dB difference again. At most 10 measurements will be performed if the difference between the 3 samples will not be within the specified 0.1 dB.
Both for the leveling, and the monitoring these settings can be set individually. The leveling is used, whenever RadiMation® is measuring the power, to regulate the signal generator. If the powermeter is only used as input, without regulating on it, then the monitoring settings are used.
More detailed information on how to achieve a fast and stable power measurement is available in Application Note 106: Powermeter parameter configuration.
The frequency range of the D.A.R.E!! Instruments RPR2006P as provided by the manufacturer is shown and selected as default. It is possible to overrule these frequencies and to manual adjust the allowed frequency range of the D.A.R.E!! Instruments RPR2006P.
| If the checkbox is checked, the default start frequency will be used as the lowest usable frequency in a test for this device. |
| If the Use default start frequency checkbox is unchecked, another start frequency (expressed in MHz) can be specified. The customized start frequency will then be used as the lowest usable frequency in a test for this device. The customized frequency can be a limitation or an extension of the default start frequency. |
| If the checkbox is checked, the default stop frequency will be used as the highest usable frequency in a test for this device. |
| If the Use default stop frequency checkbox is unchecked, another stop frequency (expressed in MHz) can be specified. The customized stop frequency will then be used as the highest usable frequency in a test for this device. The customized frequency can be a limitation or an extension of the default stop frequency. |
Specifying a different frequency range can be useful if for example:
- A device (like a coupler, antenna, injection device, cable, etc...) is still useable (but out of specification) outside the standard suggested frequency range.
- An external mixer is used to measure an extended frequency range.
- An up- or down-convertor is used to shift the frequency range.
- A newer model of a device is present that has an extended frequency range, and still uses the same remote control commands.
Be careful changing these setting as RadiMation® is no longer able to verify if the D.A.R.E!! Instruments RPR2006P is used outside frequency range that is specified by the manufacturer. This may result to serious damage of your measurement device.
The settings on the Reference tab influence the measurement frequency that is communicated to the measurement device. The frequency that is forwarded to the measurement device can for example be used by the device to perform the measurement on the correct frequency, or use the correct internal frequency dependant correction or calibration factor on the measurement result. Normally it is desired that the measurement frequency is the same as the carrier frequency of the signal generator. In some situations it can however be required to communicate a different frequency to the measurement device. In such a situation the settings on the Reference tab can be modified.
| Selects that the actual carrier frequency of the signal generator is communicated to the measurement device. This is the default behaviour. |
| Selects that a fixed frequency (independent of the signal generator carrier frequency) is communicated to the measurement device. |
| An additional offset frequency specified in MHz, that is added to frequency that is communicated to the measurement device. This value can be positive or negative, and defaults to 0.0 MHz. |
| The fixed reference frequency specified in MHz that is communicated to the measurement device, when the Fixed reference frequency option is selected. |
| Warning: | When a different reference frequency is specified and communicated to the measurement device, it is only relevant for the measurement device. A correction file that is attached to the device driver in RadiMation® will still use the correction value that is specified for the actual signal generator carrier frequency. |
Related pages
Links
- Google search: D.A.R.E!! Instruments RPR2006P
- Google image search: D.A.R.E!! Instruments RPR2006P
| This information about an equipment is automatically generated from the list of supported device drivers from RadiMation. |
| If you need more information you can contact radimation-support@raditeq.com. |


