Difference between revisions of "Configurable Amplifier"
| Line 10: | Line 10: | ||
The configurable amplifier device driver can be used to control amplifiers for which no {{RadiMation}} device driver is present yet. By specifying the correct commands, it is possible to send the desired commands to an amplifier. However be aware that this device driver is simple and is not able to perform more complicated tasks. Including delays and sending multiple commands at once is not possible in this device driver, a programmed device driver is needed to achieve that. Also the retrieval of the actual status of the amplifier is not supported by this configurable device driver, as the interpretation of the correct response should be very versatile. | The configurable amplifier device driver can be used to control amplifiers for which no {{RadiMation}} device driver is present yet. By specifying the correct commands, it is possible to send the desired commands to an amplifier. However be aware that this device driver is simple and is not able to perform more complicated tasks. Including delays and sending multiple commands at once is not possible in this device driver, a programmed device driver is needed to achieve that. Also the retrieval of the actual status of the amplifier is not supported by this configurable device driver, as the interpretation of the correct response should be very versatile. | ||
| − | [[Image:ConfigAmpDefault.PNG]] | + | [[Image:ConfigAmpDefault.PNG]] <BR /> |
| − | |||
| − | |||
| + | |||
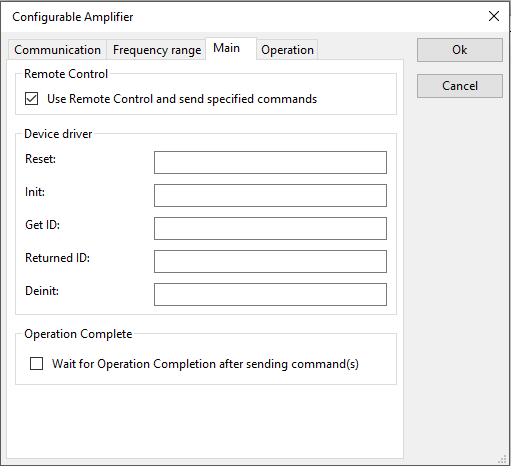
{{ScreenElementDescription|Reset|The code that needs to be send to the device to initialize it in a defined state. When left blank, no command will be send.}} | {{ScreenElementDescription|Reset|The code that needs to be send to the device to initialize it in a defined state. When left blank, no command will be send.}} | ||
{{ScreenElementDescription|Init|The Init code that needs to be send to device. When left blank, no command will be send.}} | {{ScreenElementDescription|Init|The Init code that needs to be send to device. When left blank, no command will be send.}} | ||
| Line 19: | Line 18: | ||
{{ScreenElementDescription|Returned ID|The code that is send back as a return on the Get ID code. When left blank, no check will be performed.}} | {{ScreenElementDescription|Returned ID|The code that is send back as a return on the Get ID code. When left blank, no check will be performed.}} | ||
{{ScreenElementDescription|Deinit|The Deinit code that needs to be send to device. When left blank, no command will be send.}} | {{ScreenElementDescription|Deinit|The Deinit code that needs to be send to device. When left blank, no command will be send.}} | ||
| − | {{ScreenElementDescription| | + | {{ScreenElementDescription|Operation Complete|If the checkbox is checked, every transmitted command will include a check to determine if the exection of the command is finished.}} |
| + | |||
| + | |||
| + | [[Image:ConfigAmpDefaultOperation.PNG]] <BR /> | ||
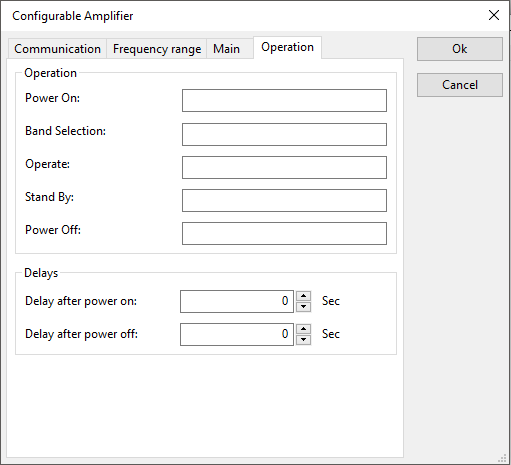
| − | {{ScreenElementDescription|Power On|The power on code that needs to be send to device. When left blank, no command will be send.}} | + | <BR />{{ScreenElementDescription|Power On|The power on code that needs to be send to device. When left blank, no command will be send.}} |
| + | {{ScreenElementDescription|Band Selection|The band select code that needs to be send to device. When left blank, no command will be send.}} | ||
| + | {{ScreenElementDescription|Operate|The operate code that needs to be send to device. When left blank, no command will be send.}} | ||
| + | {{ScreenElementDescription|Standby|The standby code that needs to be send to device. When left blank, no command will be send.}} | ||
{{ScreenElementDescription|Power Off|The power off code that needs to be send to device. When left blank, no command will be send.}} | {{ScreenElementDescription|Power Off|The power off code that needs to be send to device. When left blank, no command will be send.}} | ||
| − | {{ScreenElementDescription| | + | {{ScreenElementDescription|Delay after power on|The time that must be waited after sending the power on command.}} |
| − | {{ScreenElementDescription| | + | {{ScreenElementDescription|Delay after power off|The time that must be waited after sending the power off command.}} |
| − | + | ||
==Example== | ==Example== | ||
| Line 43: | Line 48: | ||
|OUT4 | |OUT4 | ||
|0 = LINE STANDBY <BR />1 = LINE ON | |0 = LINE STANDBY <BR />1 = LINE ON | ||
| + | |- | ||
| + | |Band Selection | ||
| + | |OUT3 | ||
| + | |0 = BAND 1 <BR />1 = BAND 2 | ||
|} | |} | ||
| + | |||
| + | [[Image:ConfigAmpMain.PNG]]<BR /> | ||
| + | <BR /> | ||
[[Image:ConfigAmpOperation.PNG]] | [[Image:ConfigAmpOperation.PNG]] | ||
| + | |||
[[Category:Configurable Drivers]] | [[Category:Configurable Drivers]] | ||
Revision as of 15:30, 4 May 2020
The Configurable Amplifier device driver is a Amplifier which is supported by RadiMation®.
The configurable amplifier device driver can be used to control amplifiers for which no RadiMation® device driver is present yet. By specifying the correct commands, it is possible to send the desired commands to an amplifier. However be aware that this device driver is simple and is not able to perform more complicated tasks. Including delays and sending multiple commands at once is not possible in this device driver, a programmed device driver is needed to achieve that. Also the retrieval of the actual status of the amplifier is not supported by this configurable device driver, as the interpretation of the correct response should be very versatile.
| The code that needs to be send to the device to initialize it in a defined state. When left blank, no command will be send. |
| The Init code that needs to be send to device. When left blank, no command will be send. |
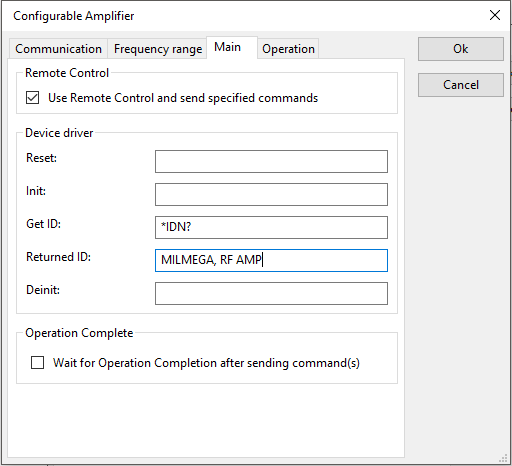
| The code that needs to be send to device to get the identification back. A common used SCPI command is *IDN?. When left blank, no command will be send. |
| The code that is send back as a return on the Get ID code. When left blank, no check will be performed. |
| The Deinit code that needs to be send to device. When left blank, no command will be send. |
| If the checkbox is checked, every transmitted command will include a check to determine if the exection of the command is finished. |
| The power on code that needs to be send to device. When left blank, no command will be send. |
| The band select code that needs to be send to device. When left blank, no command will be send. |
| The operate code that needs to be send to device. When left blank, no command will be send. |
| The standby code that needs to be send to device. When left blank, no command will be send. |
| The power off code that needs to be send to device. When left blank, no command will be send. |
| The time that must be waited after sending the power on command. |
| The time that must be waited after sending the power off command. |
Example
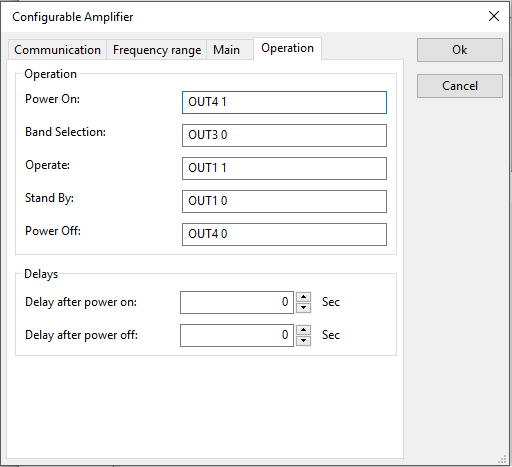
For this example the driver will be used to control the Milmega Controller AC-001.
Summary of control commands of Milmega Controller AC-001
| Description | Command | Parameters |
|---|---|---|
| Standby / Operate | OUT1 | 0 = RF STANDBY 1 = RF ON |
| Power off / on | OUT4 | 0 = LINE STANDBY 1 = LINE ON |
| Band Selection | OUT3 | 0 = BAND 1 1 = BAND 2 |


