The Configurable Amplifier device driver is a Amplifier which is supported by RadiMation®.
Configuration
The following tabs are available in the advanced configuration of the Configurable Amplifier:
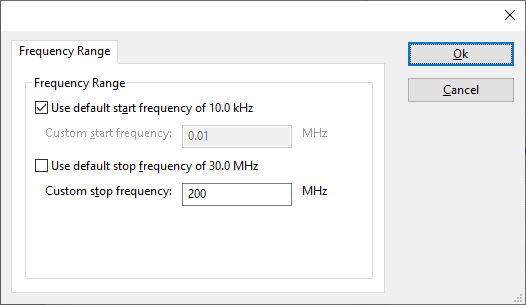
The frequency range of the Configurable Amplifier as provided by the manufacturer is shown and selected as default. It is possible to overrule these frequencies and to manual adjust the allowed frequency range of the Configurable Amplifier.
 Use default start frequency Use default start frequency
|
If the checkbox is checked, the default start frequency will be used as the lowest usable frequency in a test for this device.
|
| Custom start frequency
|
If the Use default start frequency checkbox is unchecked, another start frequency (expressed in MHz) can be specified. The customized start frequency will then be used as the lowest usable frequency in a test for this device. The customized frequency can be a limitation or an extension of the default start frequency.
|
| Use default stop frequency
|
If the checkbox is checked, the default stop frequency will be used as the highest usable frequency in a test for this device.
|
| Custom stop frequency
|
If the Use default stop frequency checkbox is unchecked, another stop frequency (expressed in MHz) can be specified. The customized stop frequency will then be used as the highest usable frequency in a test for this device. The customized frequency can be a limitation or an extension of the default stop frequency.
|
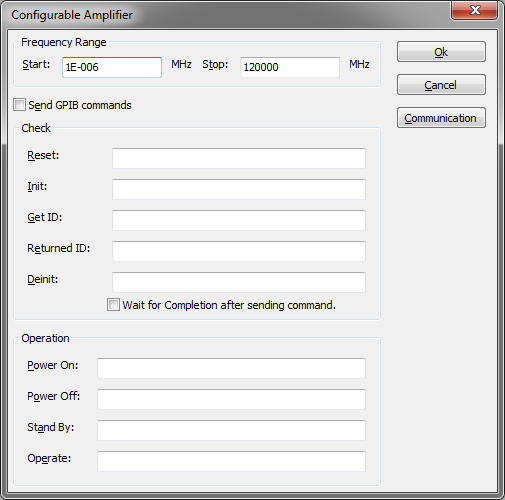
Specifying a different frequency range can be useful if for example:
- A device (like a coupler, antenna, injection device, cable, etc...) is still useable (but out of specification) outside the standard suggested frequency range.
- An external mixer is used to measure an extended frequency range.
- An up- or down-convertor is used to shift the frequency range.
- A newer model of a device is present that has an extended frequency range, and still uses the same remote control commands.
Be careful changing these setting as RadiMation® is no longer able to verify if the Configurable Amplifier is used outside frequency range that is specified by the manufacturer. This may result to serious damage of your measurement device.
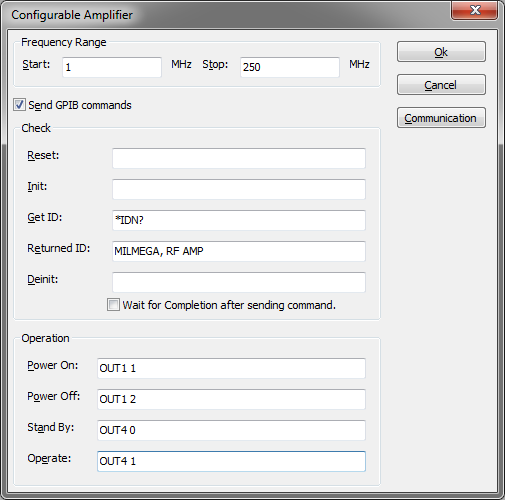
The configurable amplifier device driver can be used to control amplifiers for which no RadiMation® device driver is present yet. By specifying the correct commands, it is possible to send the desired commands to an amplifier. However be aware that this device driver is simple and is not able to perform more complicated tasks. Including delays and sending multiple commands at once is not possible in this device driver, a programmed device driver is needed to achieve that. Also the retrieval of the actual status of the amplifier is not supported by this configurable device driver, as the interpretation of the correct response should be very versatile.
Template:FrequencyRangeConfigurableDevice
| Reset
|
The code that needs to be send to the device to initialize it in a defined state. When left blank, no command will be send.
|
| Init
|
The Init code that needs to be send to device. When left blank, no command will be send.
|
| Get ID
|
The code that needs to be send to device to get the identification back. A common used SCPI command is *IDN?. When left blank, no command will be send.
|
| Returned ID
|
The code that is send back as a return on the Get ID code. When left blank, no check will be performed.
|
| Deinit
|
The Deinit code that needs to be send to device. When left blank, no command will be send.
|
| Wait for completion after sending command
|
If the checkbox is checked, every transmitted command will include a check to determine if the exection of the command is finished.
|
| Power On
|
The power on code that needs to be send to device. When left blank, no command will be send.
|
| Power Off
|
The power off code that needs to be send to device. When left blank, no command will be send.
|
| Standby
|
The standby code that needs to be send to device. When left blank, no command will be send.
|
| Operate
|
The operate code that needs to be send to device. When left blank, no command will be send.
|
Example
For this example the driver will be used to control the Milmega Controller AC-001.
Summary of control commands of Milmega Controller AC-001
| Description
|
Command
|
Parameters
|
| Standby / Operate
|
OUT1
|
0 = RF STANDBY
1 = RF ON
|
| Power on / off
|
OUT4
|
0 = LINE STANDBY
1 = LINE ON
|