Difference between revisions of "RadiMation Application Note 121"
(→Using RadiMation free to read out the PowerMeter) |
(→Using RadiMation free to read out the PowerMeter) |
||
| (15 intermediate revisions by 2 users not shown) | |||
| Line 1: | Line 1: | ||
| − | = Using a | + | = Using a RadiPower powermeter stand-alone with {{RadiMation}} free = |
| − | In this application note we explain how you can | + | In this application note we explain how you can configure {{RadiMation}} free to perform measurements with the RadiPower. |
== Overview == | == Overview == | ||
| − | Our powermeters are intended to be used in | + | Our powermeters are intended to be used in an automated test-setup. And they can also be used in a stand-alone mode to measure power. To use it stand-alone mode you need to install the drivers, install RadiMation free, add the power meter in RadiMation and set it up. This application note will describe all these actions, step by step. |
== Installing the software == | == Installing the software == | ||
=== Download RadiMation free === | === Download RadiMation free === | ||
| − | + | RadiMation is available for download, without requiring a license. Without a license, RadiMation will start in free mode. If RadiMation is running in free mode, will be shown on top of the RadiMation window. | |
| − | RadiMation is available for download, without a | ||
[[File:RadimationFree.png]] | [[File:RadimationFree.png]] | ||
| − | + | In this free mode, the RadiMation functions are limited, but it is possible to use the RadiPower in stand-alone mode. | |
| − | |||
| − | + | A [[Main_Page|download link]] to the latest RadiMation version, is available on our [[Main_Page|support website]]. | |
| − | + | The RadiMation download will also include the driver for the RadiPower. | |
| − | |||
| − | + | === Installing the USB driver for the RPR PowerMeter === | |
| − | + | Use the supplied USB cable to connect the sensor to your computer. Microsoft Windows will prompt that new hardware has been found. | |
| + | The USB-driver for the RadiPower® is Windows certified and will be loaded automatically from the Microsoft Windows update website. | ||
| − | + | If the drivers are not loaded automatically, the drivers can be installed manually from the supplied USBkey. | |
| + | Follow the normal instructions from Windows to install the drivers manually. | ||
| − | + | Additional information regarding installing the RadiPower®, can be found in the [https://www.raditeq.com/raditeq-downloads/radipower-series/ RadiPower manual]. | |
| + | Once the drivers are loaded successfully, the RadiPower® should be shown in Windows Device Manager, under the 'Universal Serial Bus controllers' section. | ||
[[File:device_manager.png]] | [[File:device_manager.png]] | ||
== Configuring the software == | == Configuring the software == | ||
| − | + | After installing the driver and RadiMation Free, some additional configuration of RadiMation needs to be performed, to be able to use the RadiPower device. When executing this step, make sure that the RadiPower device is connected. | |
| − | After installing the driver and RadiMation Free | ||
=== Installing and configuring the driver in RadiMation free === | === Installing and configuring the driver in RadiMation free === | ||
| − | + | Start-up RadiMation® Free. To begin, add the power meters, which will be used for the measurements, in the configuration. From the menu bar select {{ScreenElement|Configuration}} and select {{ScreenElement|Configuration}} again. | |
| − | Start-up RadiMation® Free . To begin, add the power meters, which will be used for the measurements, in the configuration. From the menu bar select | ||
[[File:Config-Config.png]] | [[File:Config-Config.png]] | ||
| − | In the configuration window, select the tab | + | In the configuration window, select the {{ScreenElement|device drivers}} tab and select {{ScreenElement|power meters}} from the drop down box. |
[[File:devicedrivers.png|700px]] | [[File:devicedrivers.png|700px]] | ||
| − | Press the | + | Press the {{ScreenElement|Add}} button. From the list, search for “Raditeq RPRxxxxX” and select this power meter. |
| − | After selecting the type, you need to enter a name. | + | After selecting the type, you need to enter a name. Multiple power meters of the same type brand and model can be used at the same time, however they each need to have a unique name. |
[[File:ConfigList.png|700px]] | [[File:ConfigList.png|700px]] | ||
{{Warning|Make sure that the power meter is detected by windows, and shown in device manager}} | {{Warning|Make sure that the power meter is detected by windows, and shown in device manager}} | ||
| − | A Device Driver Settings window will now appear. Press the advanced button, to open the settings specifically for this device. | + | A Device Driver Settings window will now appear. Press the advanced button, to open the settings specifically for this device. |
| − | Ensure Communication tab is selected. In Communication Streams, select USB. | + | Ensure {{ScreenElement|Communication}} tab is selected. In {{ScreenElement|Communication Streams}}, select {{ScreenElement|USB}}. |
| − | Make sure that only one | + | Make sure that only one RadiPower is connected and press {{ScreenElement|Detect}}. The Device Identifier will be requested, updated in the window, and saved. |
[[File:detect.png]] | [[File:detect.png]] | ||
| + | {{Warning|The USB device is detected, however the PowerMeter will not work until it is specified how the PowerMeter is connected.}} | ||
| − | {{ | + | We now need select the {{ScreenElement|RadiCentre}} tab and select {{ScreenElement|Directly to PC}}. |
| − | |||
| − | |||
[[File:communication.png]] | [[File:communication.png]] | ||
| − | You now may configure additional options | + | You now may configure additional options: |
| − | *Select the | + | * Select the {{ScreenElement|Option}} tab and set the desired filter for CW measurements, for example: Filter 5. |
| − | After configuring, press OK to save and return to the Device Driver Settings Window. | + | After configuring, press {{ScreenElement|OK}} to save and return to the Device Driver Settings Window. |
| − | Perform a final check, by pressing the | + | Perform a final check, by pressing the {{ScreenElement|Check}} button. The RadiPower® should now be ready to be used. |
[[File:check.png]] | [[File:check.png]] | ||
| Line 75: | Line 72: | ||
== Using RadiMation free to read out the PowerMeter == | == Using RadiMation free to read out the PowerMeter == | ||
| + | The software and the hardware are now installed,, and also the device has been added to RadiMation and it is checked that it works. | ||
| + | Now the power meter can be used to measure power and read the measurement. | ||
| − | + | * Go to {{ScreenElement|Devices}} and open {{ScreenElement|Power meters}} | |
| − | + | * Select the power meter you have just configured (In this example we named the driver: "StandAlone PowerMeter") | |
| − | |||
| − | *Go to | ||
| − | *Select the | ||
[[File:DevicesPowermeter.png]] | [[File:DevicesPowermeter.png]] | ||
| − | This opens a device window for the | + | This opens a device window for the power meter: |
[[File:Stanalonepowermeter.png|700px]] | [[File:Stanalonepowermeter.png|700px]] | ||
| − | Make sure that the device is connected to your machine via USB. Click | + | Make sure that the device is connected to your machine via USB. Click on {{ScreenElement|Connect}} to open the connection to the RadiPower. |
| − | The red bar | + | The red bar will become yellow, while it is connecting. When it is connected correctly it changes green and the button displays {{ScreenElement|Connected}}. |
[[File:Powermeterconnected.png|700px]]] | [[File:Powermeterconnected.png|700px]]] | ||
| − | + | Once the powermeter is connected, you can read out the values from the power meter. This can be done manually by hitting the {{ScreenElement|Trigger}} button. | |
| − | This will give you 1 sample of the signal. To measure continuously set the triggering to | + | This will give you 1 sample of the signal. To measure continuously set the triggering to {{ScreenElement|Auto}}. The default interval is 1s, but this can be changed to any other interval. |
[[file:AutoPolling.png|700px]] | [[file:AutoPolling.png|700px]] | ||
== Additional information == | == Additional information == | ||
| + | The power meter has now been successfully set up and the first test was successful. For more information see the links below. | ||
| − | + | * RadiMation Application Note 106: [[RadiMation Application Note 106|Powermeter parameter configuration]] | |
| − | + | * RadiPower product page: [https://www.raditeq.com/raditeq-downloads/radipower-series/ Manuals + Datasheet] | |
| − | |||
| − | |||
| − | * RadiPower product page : | ||
| − | |||
| − | |||
| − | |||
| − | |||
| − | |||
| − | |||
| − | |||
| − | |||
| − | |||
| − | |||
| − | |||
| − | |||
| − | |||
| − | |||
| − | |||
| − | |||
| − | |||
| − | |||
| − | |||
| + | If there are any issues please contact RadiMation support. This can be done by sending an e-mail to {{MailSupport}}. | ||
[[Category:RadiMation Application Note]] | [[Category:RadiMation Application Note]] | ||
[[Category:RadiMation]] | [[Category:RadiMation]] | ||
Latest revision as of 13:24, 27 July 2022
Using a RadiPower powermeter stand-alone with RadiMation® free
In this application note we explain how you can configure RadiMation® free to perform measurements with the RadiPower.
Overview
Our powermeters are intended to be used in an automated test-setup. And they can also be used in a stand-alone mode to measure power. To use it stand-alone mode you need to install the drivers, install RadiMation free, add the power meter in RadiMation and set it up. This application note will describe all these actions, step by step.
Installing the software
Download RadiMation free
RadiMation is available for download, without requiring a license. Without a license, RadiMation will start in free mode. If RadiMation is running in free mode, will be shown on top of the RadiMation window.
In this free mode, the RadiMation functions are limited, but it is possible to use the RadiPower in stand-alone mode.
A download link to the latest RadiMation version, is available on our support website.
The RadiMation download will also include the driver for the RadiPower.
Installing the USB driver for the RPR PowerMeter
Use the supplied USB cable to connect the sensor to your computer. Microsoft Windows will prompt that new hardware has been found. The USB-driver for the RadiPower® is Windows certified and will be loaded automatically from the Microsoft Windows update website.
If the drivers are not loaded automatically, the drivers can be installed manually from the supplied USBkey. Follow the normal instructions from Windows to install the drivers manually.
Additional information regarding installing the RadiPower®, can be found in the RadiPower manual.
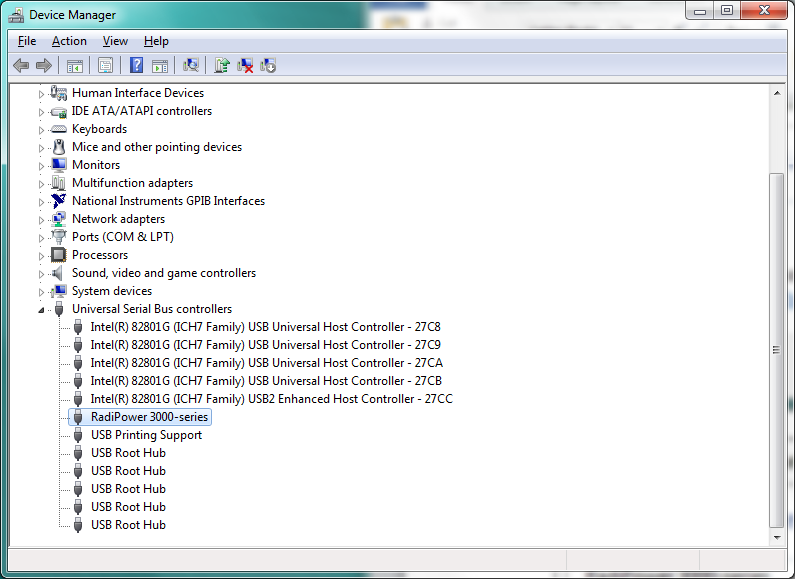
Once the drivers are loaded successfully, the RadiPower® should be shown in Windows Device Manager, under the 'Universal Serial Bus controllers' section.
Configuring the software
After installing the driver and RadiMation Free, some additional configuration of RadiMation needs to be performed, to be able to use the RadiPower device. When executing this step, make sure that the RadiPower device is connected.
Installing and configuring the driver in RadiMation free
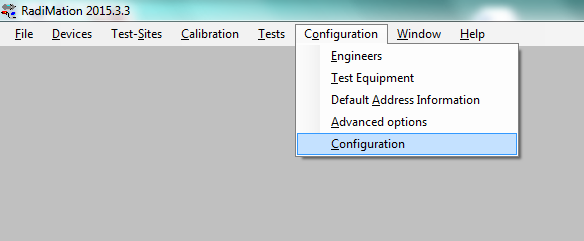
Start-up RadiMation® Free. To begin, add the power meters, which will be used for the measurements, in the configuration. From the menu bar select Configuration and select Configuration again.
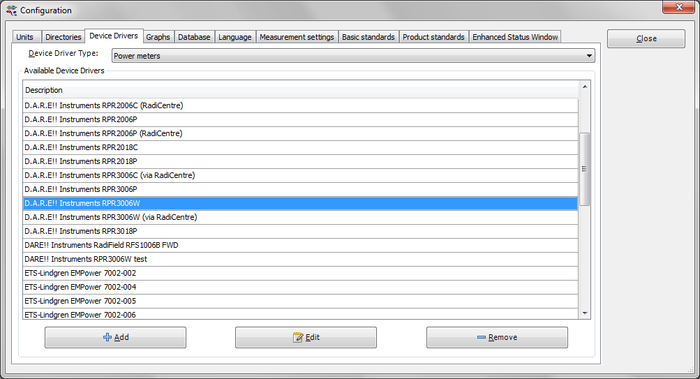
In the configuration window, select the device drivers tab and select power meters from the drop down box.
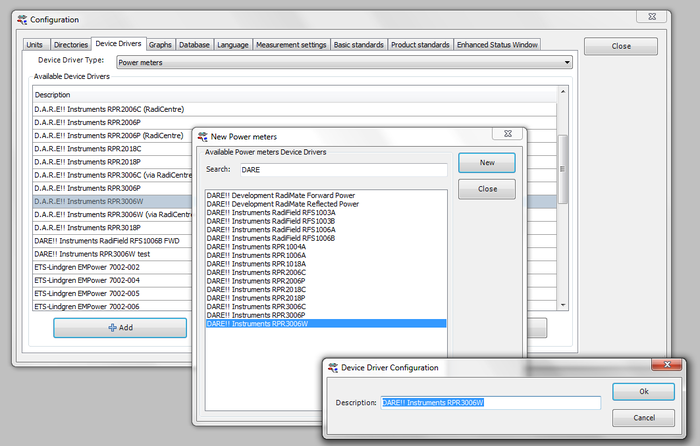
Press the Add button. From the list, search for “Raditeq RPRxxxxX” and select this power meter. After selecting the type, you need to enter a name. Multiple power meters of the same type brand and model can be used at the same time, however they each need to have a unique name.
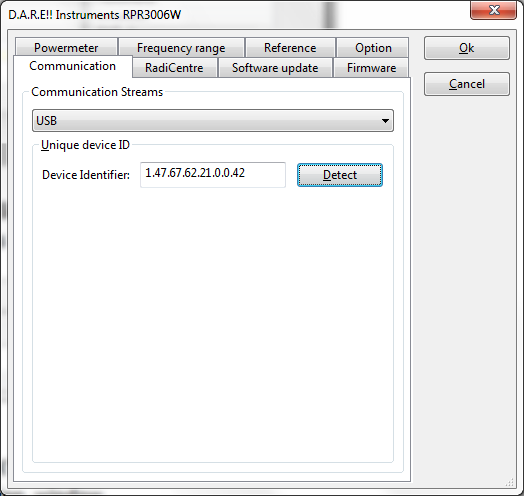
A Device Driver Settings window will now appear. Press the advanced button, to open the settings specifically for this device. Ensure Communication tab is selected. In Communication Streams, select USB. Make sure that only one RadiPower is connected and press Detect. The Device Identifier will be requested, updated in the window, and saved.
|
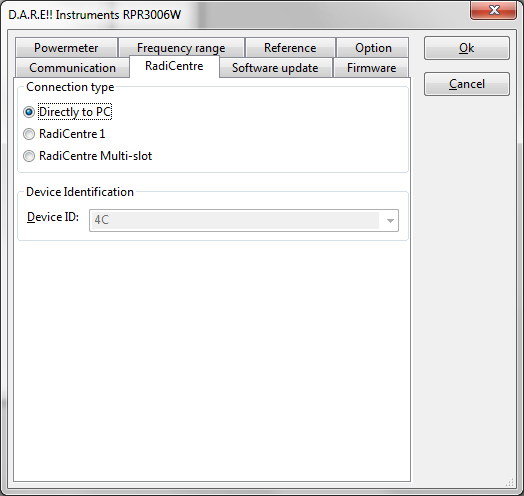
We now need select the RadiCentre tab and select Directly to PC.
You now may configure additional options:
- Select the Option tab and set the desired filter for CW measurements, for example: Filter 5.
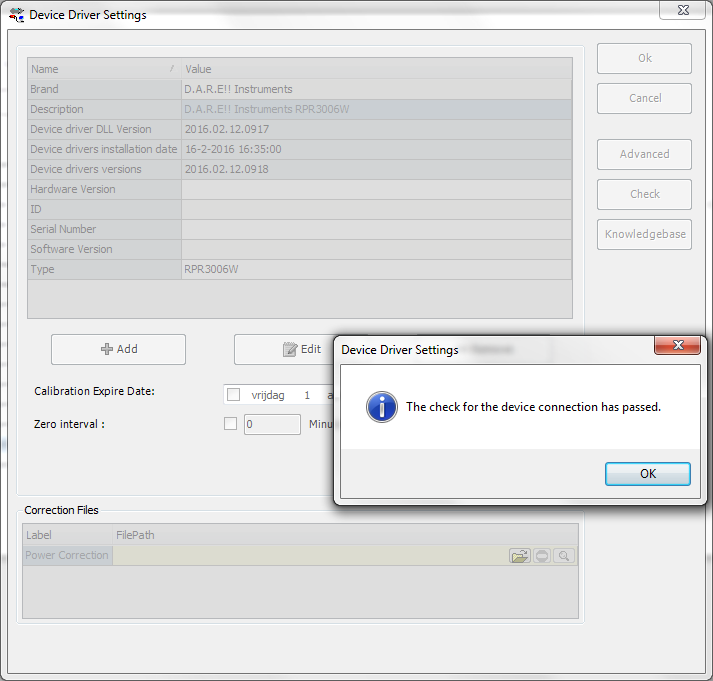
After configuring, press OK to save and return to the Device Driver Settings Window. Perform a final check, by pressing the Check button. The RadiPower® should now be ready to be used.
When the device returns "The check for this device has passed" then the device is correctly configured and RadiMation confirms that the communication is working.
Using RadiMation free to read out the PowerMeter
The software and the hardware are now installed,, and also the device has been added to RadiMation and it is checked that it works. Now the power meter can be used to measure power and read the measurement.
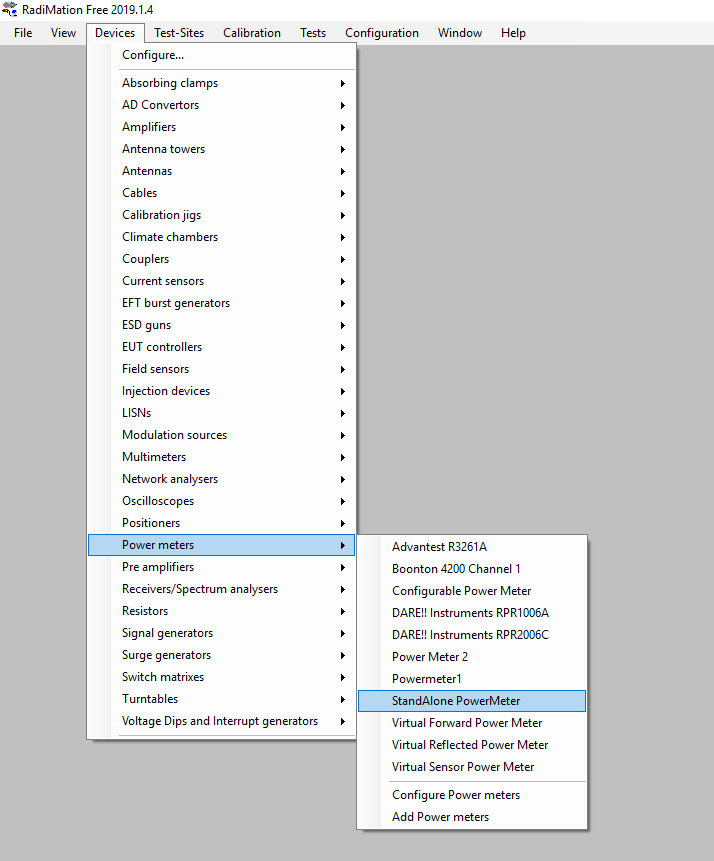
- Go to Devices and open Power meters
- Select the power meter you have just configured (In this example we named the driver: "StandAlone PowerMeter")
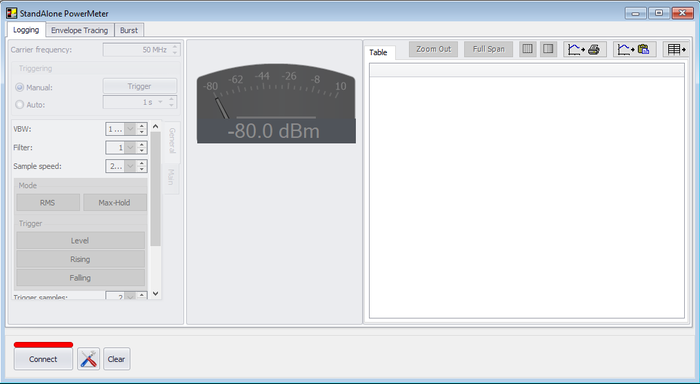
This opens a device window for the power meter:
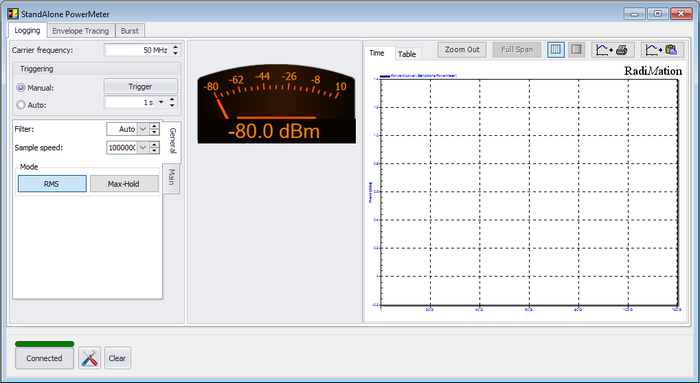
Make sure that the device is connected to your machine via USB. Click on Connect to open the connection to the RadiPower. The red bar will become yellow, while it is connecting. When it is connected correctly it changes green and the button displays Connected.
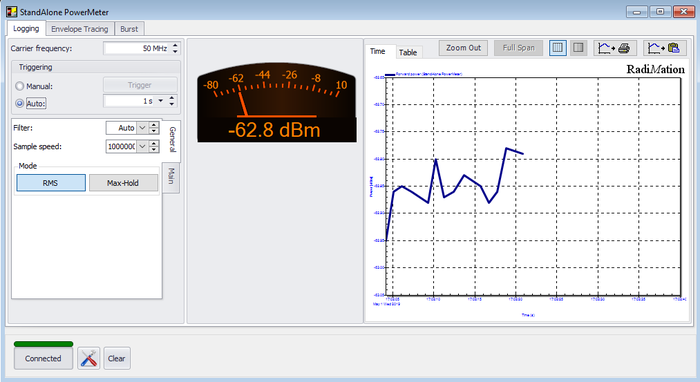
Once the powermeter is connected, you can read out the values from the power meter. This can be done manually by hitting the Trigger button. This will give you 1 sample of the signal. To measure continuously set the triggering to Auto. The default interval is 1s, but this can be changed to any other interval.
Additional information
The power meter has now been successfully set up and the first test was successful. For more information see the links below.
- RadiMation Application Note 106: Powermeter parameter configuration
- RadiPower product page: Manuals + Datasheet
If there are any issues please contact RadiMation support. This can be done by sending an e-mail to radimation-support@raditeq.com.
