Difference between revisions of "RadiMation Application Note 142"
(→Removing and re-installing the drivers) |
(→Removing and re-installing the drivers) |
||
| Line 37: | Line 37: | ||
# If you are asked to actually delete the driver: 'Delete the driver software for this device': Check the box. <BR /> [[File:DeviceManagerUninstallDeviceAndDelete.png]] | # If you are asked to actually delete the driver: 'Delete the driver software for this device': Check the box. <BR /> [[File:DeviceManagerUninstallDeviceAndDelete.png]] | ||
# Restart the PC. | # Restart the PC. | ||
| − | # Start the 'Windows Device Manager' again and check whether all Raditeq and DARE!! related devices are indeed no longer present. If necessary, repeat steps 3 to | + | # Start the 'Windows Device Manager' again and check whether all Raditeq and DARE!! related devices are indeed no longer present. If necessary, repeat steps 3 to 10. |
# Make sure there is a working internet connection on the PC. | # Make sure there is a working internet connection on the PC. | ||
# Connect a Raditeq or DARE!! USB device, and leave it connected. | # Connect a Raditeq or DARE!! USB device, and leave it connected. | ||
Revision as of 09:49, 21 February 2022
|
Investigate and resolve Windows USB driver problems for Raditeq equipment
This RadiMation® application note explains how problems with the Windows USB drivers for Raditeq equipment can be investigated and resolved.
By using the steps described in this application note, the correct drivers for the Raditeq equipment will be installed in the Windows operating system.
Problem
Removing and re-installing the drivers
To solve possible USB driver faults, follow the steps below (of course by a user with sufficient rights):
- Disconnect all Raditeq and DARE!! related USB devices.
- Start the 'Windows Device Manager'.
- From the 'View' menu, activate 'Show Hidden device'.
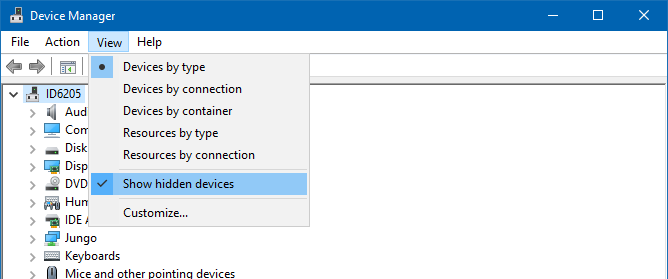
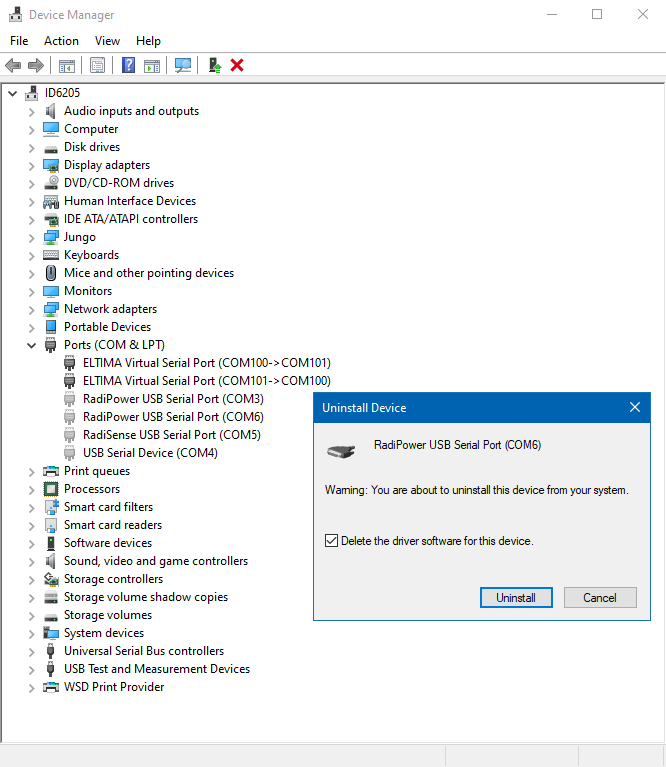
This will show all previously installed and configured devices for devices that are currently not connected anymore to the PC. - Open the 'Ports (COM & LPT)' group.
- All Serial ports related to Raditeq and DARE!! products must be removed. Right click on an item and select 'Uninstall device'. The devices that can be safely removed are named:
- RadiPower USB Serial Port
- RadiSwitch USB Serial Port
- RadiSense USB Serial Port
- RadiCentre USB Serial Port
- ETS USB Serial Port
- RadiGen USB Serial Port
- If you are asked to actually delete the driver: 'Delete the driver software for this device': check the box.
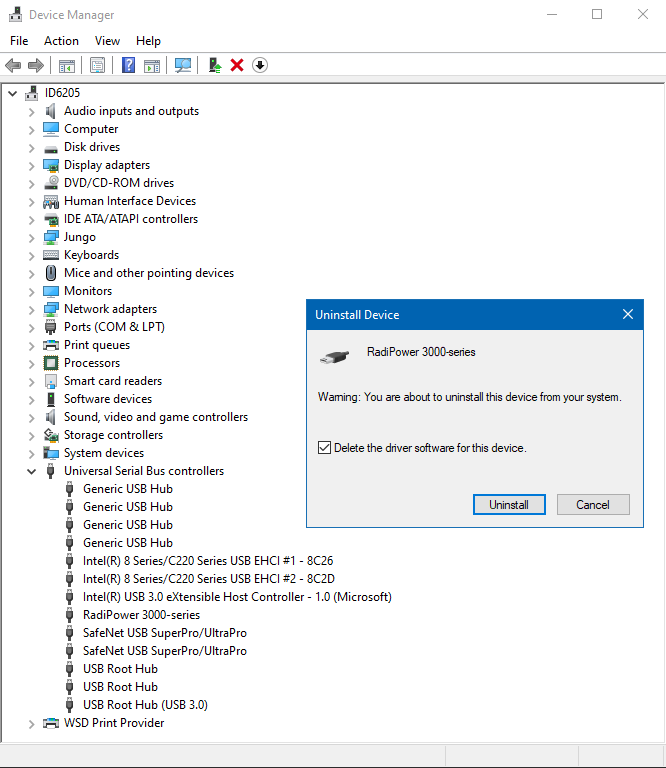
- Open the 'Universal Serial Bus controllers' group.
- All USB devices related to Raditeq and DARE!! products must be removed. Right click on an item and select 'Uninstall device'. The devices that can be safely removed are named:
- RadiPower 2000-series
- RadiSwitch plug-in card
- RadiSense plug-in card
- RadiPower plug-in card
- RadiPower 3000-series
- RadiCentre CTR1004B
- ETS plug-in card
- RadiCentre CTR1009B
- RadiGen plug-in card
- If you are asked to actually delete the driver: 'Delete the driver software for this device': Check the box.
- Restart the PC.
- Start the 'Windows Device Manager' again and check whether all Raditeq and DARE!! related devices are indeed no longer present. If necessary, repeat steps 3 to 10.
- Make sure there is a working internet connection on the PC.
- Connect a Raditeq or DARE!! USB device, and leave it connected.
- Within a few seconds, a Windows notification will appear next to the clock in the taskbar that a device driver is about to be installed.
- After +/- 20 seconds, an additional Windows ntoification will be displayed that a device is about to be installed.
- The 'Windows Device Manager' should now contain a USB driver and sometimes also a Serial Port driver for the Raditeq or DARE!! device.


These steps will very often resolve the problem with a not working USB Raditeq device.
On PC's without an internet connection
When a USB device is connected to the PC the first time, the PC will connect to the Microsoft servers on the internet to download the appropiate drivers. If the PC however is disconnected from the internet, or is restricted by the network administrators to download the drivers, this will not be possible.
The correct Windows USB drivers can also be installed on the PC, by downloading the RadiMation® DRIVERS.EXE from the Wiki website at: https://wiki.radimation.com/wiki/index.php/Device_drivers . This DRIVERS.EXE can be transferred to the actual PC by using for example an USB Memory stick. On the PC, the DRIVERS.EXE can be started by a user with sufficient rights to install the RadiMation® drivers and to update Windows USB drivers.
During the installation of the DRIVERS.EXE it is important to .....
Manual selection of the to be used Windows USB drivers
If the automatic installation of the USB devices is still not working after the installation of the DRIVERS.EXE in the previous step, it is also possible to manually specify the location of the Windows USB drivers that should be used to install for the Raditeq equipment.
In this situation the problematic device is often listed as a device in the 'Other devices' group in the 'Windows Device Manager'.
Use the following steps to perform the manual selection of the drivers:
- Do install the DRIVERS.EXE as described in the previous section
- Start the 'Windows Device Manager'.
- Open the 'Other devices' group.
- Right click on the device, and select ' ......
- Specify
The device should now be recognised and the correct Windows USB drivers will be installed.
If the devices are still not installed correctly
If after these steps, the device is still listed in the Windows Device Manager as an 'Other device' or is still showing warnings or errors for the device, it is best to contact the RadiMation® support at radimation-support@raditeq.com.
Please include the following information in your support request:
- Which Raditeq or DARE!! USB device is connected to the PC
- Which steps of this application note are already performed
- A screenshot of the 'Windows Device Manager', showing the problematic device
- ..... right click on the device, properties, VID/PID hardware path....
Conclusion
Using the steps and instructions as described in this Application Note, it should be possible to correctly install the correct Windows USB drivers for the Raditeq equipment. Also when the PC is not connected to the internet at all. After this the device can be used by RadiMation® or other software programs.