Difference between revisions of "RadiMation Application Note 154"
(→Create correction file for the test level) |
(→Create calibration test setup file) |
||
| Line 125: | Line 125: | ||
=== Create calibration test setup file === | === Create calibration test setup file === | ||
| + | |||
| + | There are three frequency ranges that have to be calibrated with the following settings: | ||
| + | {|class="wikitable" | ||
| + | ! Band || Frequency range || Step size | ||
| + | |- | ||
| + | | Band 1 || 10 kHz - 1 MHz || 5 % | ||
| + | |- | ||
| + | | Band 2 || 1 MHz - 30 MHz || 1 % | ||
| + | |- | ||
| + | | Band 2 || 30 MHz - 200 MHz || 0.5 % | ||
| + | |} | ||
{{Menu|Calibration|System calibration|Conducted immunity}} | {{Menu|Calibration|System calibration|Conducted immunity}} | ||
| + | |||
| + | Create three test setup files, this example shows the settings for band 1. | ||
== Verification == | == Verification == | ||
Revision as of 15:14, 16 October 2023
How to perform a MIL-STD CS114, Conducted susceptibility, bulk cable injection test
This application note explains how the MIL-STD CS114, Conducted susceptibility, bulk cable injection test can be performed with RadiMation®
The exact requirements and test methods for the CS114 are specified in the MIL-STD-461.
Necessary equipment
The following devices are necessary to execute this test:
- Signal generator
- Amplifier
- Coupler
- Forward power meter
- Reflected power meter (optionally)
- Current sensor
- Sensor power meter / Analyser
- 50 Ohm load
- 50 Ohm attenuator
- LISN
- Current injection device
- Current injection calibration jig (Calibration fixture)
- Cable drivers with corrections
Configuration of the test sites
Calibration
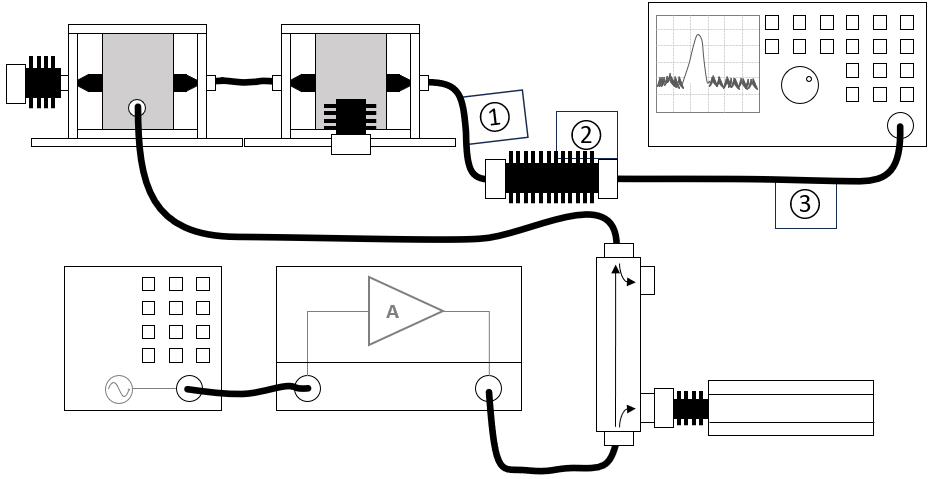
The configuration of the calibration test site should contain the following devices:
| Device name | Tab in testsite configuration window | note |
|---|---|---|
| Signal generator | Devices 1 | The signal generator to use |
| Amplifier | Devices 1 | The amplifier to use |
| Coupler | Devices 1 | The coupler to use |
| Forward power meter | Devices 1 | The forward power meter to use |
| Reflected power meter | Devices 1 | The reflected power meter to use (optionally) |
| Sensor power meter | Devices 2 | The power meter or analyser to use for measuring the current |
| Current sensor | Devices 2 | The current sensor to use with transfer factor attached to the driver |
| Injection device | Devices 2 | The injection clamp to use |
| Jig | Devices 2 | The jig to use |
| Cable current -> power meter | Cables | Cable (1) with a correction file specified for the cable loss |
| Cable current -> power meter | Cables | Cable (2) with the specified loss of the used attenuator |
| Cable current -> power meter | Cables | Cable (3) with a correction file specified for the cable loss |
Verification
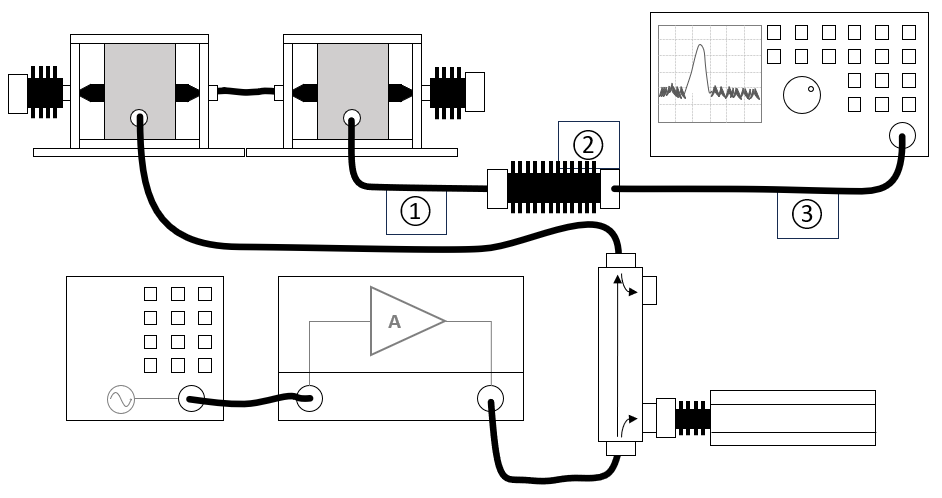
The configuration of the verification test site should contain the following devices:
| Device name | Tab in testsite configuration window | note |
|---|---|---|
| Signal generator | Devices 1 | The signal generator to use |
| Amplifier | Devices 1 | The amplifier to use |
| Coupler | Devices 1 | The coupler to use |
| Forward power meter | Devices 1 | The forward power meter to use |
| Reflected power meter | Devices 1 | The reflected power meter to use (optionally) |
| Sensor power meter | Devices 2 | The power meter or analyser to use for measuring the current |
| Current sensor | Devices 2 | The current sensor to use with transfer factor attached to the driver |
| Injection device | Devices 2 | The injection clamp to use |
| Cable current -> power meter | Cables | Cable (1) with a correction file specified for the cable loss |
| Cable current -> power meter | Cables | Cable (2) with the specified loss of the used attenuator |
| Cable current -> power meter | Cables | Cable (3) with a correction file specified for the cable loss |
EUT Testing
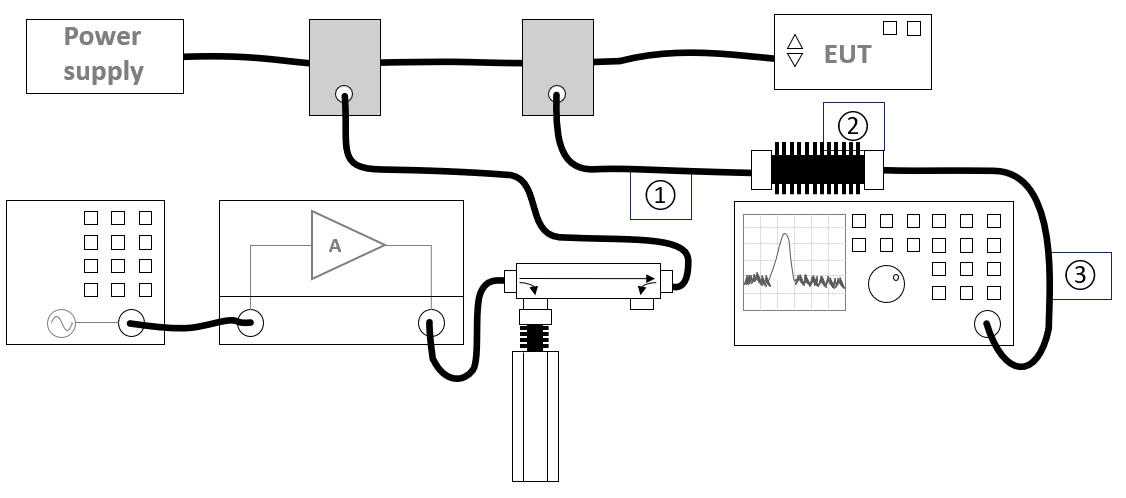
The configuration of the eut test site should contain the following devices:
| Device name | Tab in testsite configuration window | note |
|---|---|---|
| Signal generator | Devices 1 | The signal generator to use |
| Amplifier | Devices 1 | The amplifier to use |
| Coupler | Devices 1 | The coupler to use |
| Forward power meter | Devices 1 | The forward power meter to use |
| Reflected power meter | Devices 1 | The reflected power meter to use (optionally) |
| Sensor power meter | Devices 2 | The power meter or analyser to use for measuring the current |
| Current sensor | Devices 2 | The current sensor to use with transfer factor attached to the driver |
| Injection device | Devices 2 | The injection clamp to use |
| Cable current -> power meter | Cables | Cable (1) with a correction file specified for the cable loss |
| Cable current -> power meter | Cables | Cable (2) with the specified loss of the used attenuator |
| Cable current -> power meter | Cables | Cable (3) with a correction file specified for the cable loss |
Calibration procedure
Create correction file for the test level
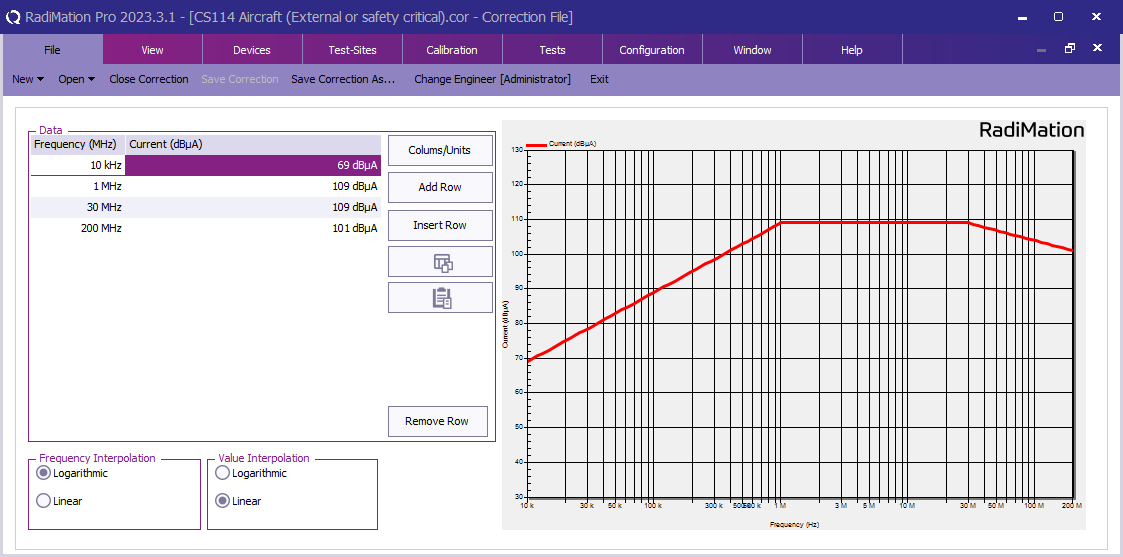
First create a correction file in RadiMation® and specify the applicable test level (See 'TABLE IV CS114 limit curves.' and 'FIGURE CS114-1. CS114 calibration limits.'). In this example the limits for 'Aircraft (External or safety critcal) / Curve 5 are configured.
Make sure to remove the Correction column and add the Current column with the unit set to dBuV.
Create calibration test setup file
There are three frequency ranges that have to be calibrated with the following settings:
| Band | Frequency range | Step size |
|---|---|---|
| Band 1 | 10 kHz - 1 MHz | 5 % |
| Band 2 | 1 MHz - 30 MHz | 1 % |
| Band 2 | 30 MHz - 200 MHz | 0.5 % |
Create three test setup files, this example shows the settings for band 1.


