RadiMation Application Note 101: Difference between revisions
| (5 intermediate revisions by one other user not shown) | |||
| Line 1: | Line 1: | ||
= Optimize Height and Optimize Angle = | = Optimize Height and Optimize Angle = | ||
This Application Note will explain how the Optimize Height and Optimize Angle settings can be configured in RadiMation. | This Application Note will explain how the Optimize Height and Optimize Angle settings can be configured in RadiMation. | ||
| Line 110: | Line 108: | ||
[[Image:AN101 Optimize Angle Settings TSF.png]] | [[Image:AN101 Optimize Angle Settings TSF.png]] | ||
The above settings imply that a total area of 90 degrees will be scanned, which means half of the area left of the current peak angle and half of the area right of the current peak angle. During the optimization of the angle only the peak detector will be used during the measurements. | The above settings imply that a total area of 90 degrees will be scanned, which means half of the area left (-45 degrees) of the current peak angle and half of the area right (+45 degrees) of the current peak angle. During the optimization of the angle only the peak detector will be used during the measurements. It is possible to choose the same detector(s) as used during the pre-measurement, final measurement or a totally different detector configuration. | ||
So, let's say that the original peak was found at 180 degrees. When the optimize angle is performed it will then measure from | |||
So, let's say that the original peak was found at 180 degrees. When the optimize angle is performed it will then measure from 135 degrees (180 - 45) until 225 degrees (180 + 45) with a step size of 30 degrees. Measurements will take place at: 135, 165, 195 and 225 degrees). With these settings it is possible to widen or narrow the area around the peak and to adjust the used amount of steps (measurements). | |||
One of the reasons why steps are implemented - instead of a continuous measurement method - is that using fixed steps will guarantee that the measurement is performed at the stepped degrees positions, as it is no longer turning during the measurement at this position. A continuous measurement method is heavily depending on the used settings and therefore it for example unsure if the measurement is performed at a certain position (or was already moved to the next position), causing measurements errors. | |||
== How to show the graph in Polar Plot? == | == How to show the graph in Polar Plot? == | ||
Latest revision as of 15:47, 29 January 2019
Optimize Height and Optimize Angle[edit]
This Application Note will explain how the Optimize Height and Optimize Angle settings can be configured in RadiMation. It is used when performing the Radiated Emission measurements.
Table of Contents[edit]
- Introduction
- How to perform a basic Radiated Emission test?
- How to use the Continuous Measure method?
- How to use Optimize Angle?
Introduction[edit]
In this application note detailed explanation of the specific functionality ‘Optimize Angle’ and ‘Optimize Height’ is described. The main purpose it to convey how it can be used during a test or to further optimize the performance of a test. The objective is to present the measurement tips and procedures to be used in practice. When applying this application note in practice we advise to use at least RadiMation 2013.x or 2014.x versions. A valid Software Protection Key with the Radiated Emission module installed is required to perform the tests. Expected end-user skill level is rated beginner or novice.
How to perform a basic Radiated Emission test?[edit]
We will describe briefly, but step by step, how to start a basic Radiated Emission test.
Step 1: Adding drivers[edit]
First we will explain how to add (virtual) device drivers. Select from the RadiMation® main Menu:
-
 Configuration
-
 Configuration
-
 Device Drivers
-
-
-
Select the desired Device Driver Type from the drop-down menu and create the new driver.
| Note: |
Additional information during this step: http://wiki.dare.nl/wiki/index.php/Chapter_2#Device_driver_configuration |
Step 2: Create Test-site[edit]
Configure also a new Test Equipment for the Radiated Emission test.
-
 Test-Sites
-
 Configure...
-
 Add
Add
-
-
-
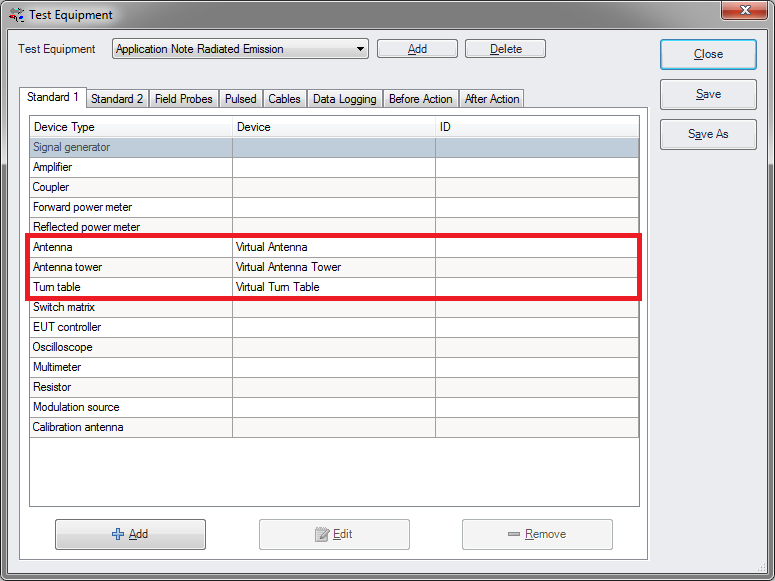
Enter a new name and click Ok. The minimum of device types we need for to be added to this equipment is: Antenna, Antenna Tower, Turn Table and a Spectrum Analyser or Scanning Receiver. When finished click Save and click Close.
| Note: |
Additional information during this step: http://wiki.dare.nl/wiki/index.php/Chapter_2#Test_equipment_list_configuration |
Step 3: Create EUT[edit]
Create a new EUT for this Application Note. Choose from the RadiMation main Menu:
-
 File
File
-
 New
New
-
 EUT
EUT
-
-
-
Step 4: Start new test[edit]
Enter a new name and click Save. Do not close the EUT window after it is created. Start a new Radiated Emission test of the type Multiband. Open from the RadiMation main Menu:
-
 Tests
Tests
-
 Radiated Emission
-
 Multiband
-
 New
New
-
-
-
-
Step 5: Configure TSF[edit]
Select from the opened Test Setup File (TSF) window the desired Frequency Range to be measured.
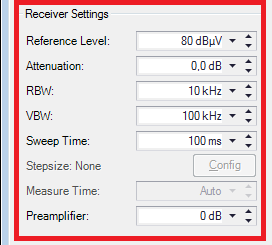
Configure the Receiver Settings for example like this:
Select for the Traces configuration the Peak detector during this measurement.
Enter for the Number of Sweeps the amount of 50.
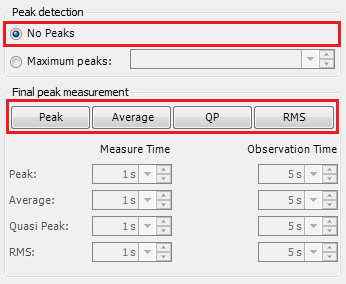
In this application note we disable the automatic peak search and are not selecting any final detectors.
Remark: this will speed up the test, but after the pre-measurement the automatic button will therefore not trigger a final measurement.
Select the appropriate Test Equipment (created during Step 2) from the drop down menu.
Step 6: Save TSF[edit]
Save your test, but leave the TSF window open during the next chapter.
-
 File
File
-
 Save TSF
-
-
Enter a name - e.g. 'Basic Emission test' - for the test and click Ok.
How to use the Step Measure method?[edit]
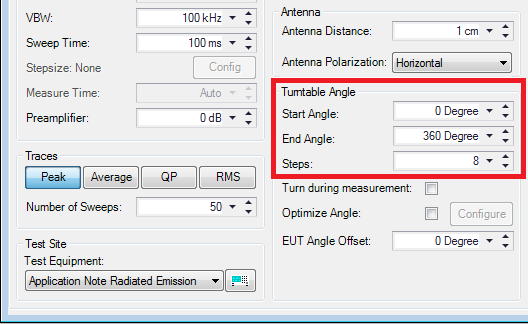
For example we want to measure after each 45 degrees. To obtain this, we configure the Turntable Angle to turn a full round, Start Angle 0 degree and End Angle at 360 degrees in 8 Steps. Use 'Save As' and store this TSF as the 'Step Measure method'. Press start to perform the test.
How to use the Continuous Measure method?[edit]
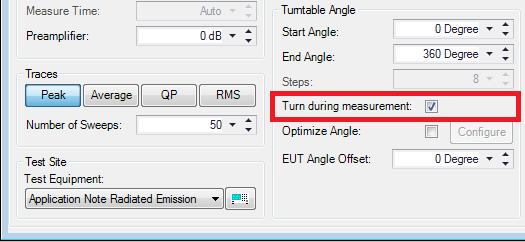
Load the 'Basic Emission test' TSF file. When the TSF window is opened again we now activate the Turn during measurement functionality in this TSF:
We can see that the steps settings are automatically being deactivated. This is because when the measurements are performed during the test, obviously no steps are used.
Using this functionality we want to have a resolution as high as possible. This implies that it is desired to let the Turntable turn as slow as possible, make the measure time as low as possible and have a high number of sweeps. This will make sure that many data points will be created during turning. Use 'Save As' and store this TSF as the 'Continuous Measure method'. Press start to perform the test.
How to use Optimize Angle?[edit]
Load the 'Basic Emission test' TSF file.
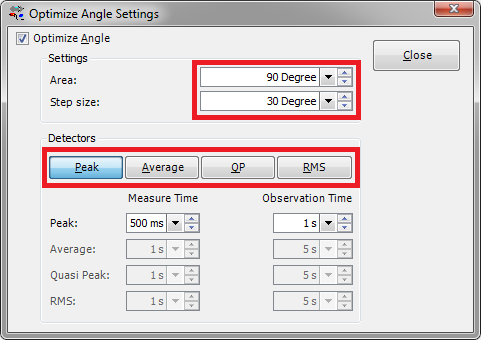
When we want to optimize the Angle around the peak, we can select the Optimize Angle Settings. Open and click the button 'Configure', this will show the following window.
Note: The configuration of this setting can be found at two locations. It can also be found (after the pre-measurement has been finished) in the Multiband Manual Mode Window. Click the button 'Peak Actions' and select 'Configure' -> 'Optimize Angle' and click. To start click again 'Peak Actions' and select 'Optimize Angle' to start optimizing the angle of the selected peaks in the table.
The above settings imply that a total area of 90 degrees will be scanned, which means half of the area left (-45 degrees) of the current peak angle and half of the area right (+45 degrees) of the current peak angle. During the optimization of the angle only the peak detector will be used during the measurements. It is possible to choose the same detector(s) as used during the pre-measurement, final measurement or a totally different detector configuration.
So, let's say that the original peak was found at 180 degrees. When the optimize angle is performed it will then measure from 135 degrees (180 - 45) until 225 degrees (180 + 45) with a step size of 30 degrees. Measurements will take place at: 135, 165, 195 and 225 degrees). With these settings it is possible to widen or narrow the area around the peak and to adjust the used amount of steps (measurements).
One of the reasons why steps are implemented - instead of a continuous measurement method - is that using fixed steps will guarantee that the measurement is performed at the stepped degrees positions, as it is no longer turning during the measurement at this position. A continuous measurement method is heavily depending on the used settings and therefore it for example unsure if the measurement is performed at a certain position (or was already moved to the next position), causing measurements errors.
How to show the graph in Polar Plot?[edit]
By default the selected tab is the frequency. Select the Polar Plot by selecting the Angle tab:
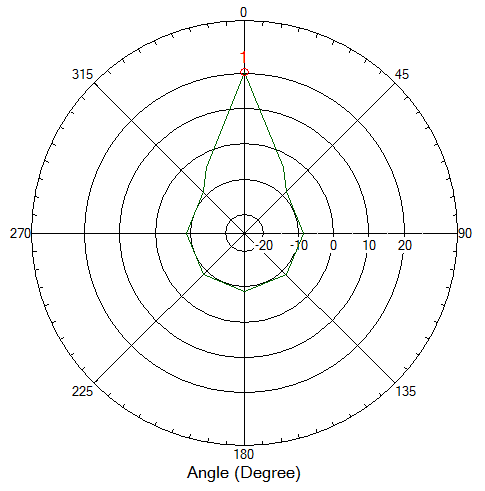
When the tab Angle is selected we can now see the Polar Plot of the Optimize Angle measurements:
Note: In this polar plot both the original as the final peak were found at 0 degree and the final measurement value was 20,2 dBuV/m.
How to use Write and Max-hold during the Continuous Measure method?[edit]
Load and start the 'Basic Emission test' TSF file.
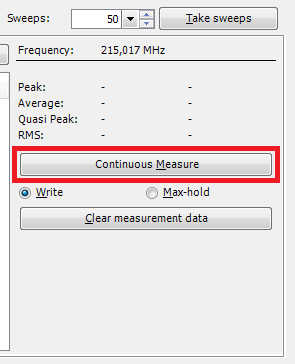
After the pre-measurements has been finished the Multiband Manual Mode Window has a relatively large 'Continuous Measure' button at the middle right of the screen. Now, click this button and RadiMation will start taking measurement. This is a heavy process and it is normal when more CPU is used by the computer.
There are two modes during these measurements:
- Write: each new measurement will overwrite the previous measurement data.
- Max-hold: only higher new measurement values will overwrite the previous measurement data.
The results will be displayed in the frequency plot. However, when the Angle plot is selected and the turntable is manual controlled (by using the control at the left in this window) this can be seen as a manual optimize Angle method.
