EditingTips
This page contains several tips and suggestions when editing pages on this RadiWiki website.
Internal MediaWiki links[edit]
When you are referring to another page within the RadiWiki website, it is best to use a short links.
The disadvantages of the long link are:
- The writing of the text is more confusing
- When the link to the website changes, the long links are not working anymore
- An external link icon is shown behind the link
Not: [http://wiki.dare.nl/wiki/index.php/RadiMation_Application_Note_107   RadiMation Application Note 107]
But: [[RadiMation Application Note 107]]
will result in:
Not: RadiMation Application Note 107
But: RadiMation Application Note 107
RadiWiki Templates[edit]
The RadiWiki site provides a lot of usefull templates. A template can be included by using double-curly-braces. See some often used templates below.
RadiMation[edit]
The 'RadiMation' template will show RadiMation® correctly formatted. For example:
{{RadiMation}}
will result in:
RadiMation®
MailSupport[edit]
A linked URL to support@radimation.com can be included using the 'MailSupport' template. The advantage of this Template is that it also will also use the name of the RadiWiki page as the subject of the e-mail. For example:
{{MailSupport}}
will result in:
radimation-support@raditeq.com
Note[edit]
A note box with some text can be created using the 'Note' template. For example:
{{Note|Be aware that the 'Note' template is used!}}
will result in:
| Note: | Be aware that the 'Note' template is used! |
Menu[edit]
The menu-entries can be created using the 'Menu' template. For example:
{{Menu|Configuration|Configuration|Tab-name|Element}}
will result in:
-
 Configuration
-
 Configuration
-
 Tab-name
-
 Element
-
-
-
-
Hide the Table of Contents[edit]
On several pages it is not desired to also have the Table of Contents (TOC) being shown. The Table of Contents can be hidden on a page, by including the 'Magic keyword': __NOTOC__ on the first line of the Wiki-text.
This is a standard MediaWiki template, and not specific to the RadiWiki.
No article/page not found text[edit]
When a page is non existent wiki normally offers you to create a new page. We use this page to show general support information so the customer at least gets re-directed to support. There are two pages that are displayed when a article is not found. One for the users that have permission to edit and one fo users that don't.
Because our users can't edit the pages we need to change http://wiki.dare.nl/wiki/index.php/MediaWiki:Noarticletext-nopermission
When you change this text it will be displayed when a page does not exist.
Editing formula's[edit]
Formula's can be entered in a text notation, where they are rendered into the corresponding graphical notation. See displaying a formula for a detailed description.
For example:
<math>Z{t} = \frac{V{p}}{V{in}}</math>
will result in:
Numbered lists[edit]
A numbered list can be created by placing "#" before each row which must be numbered.
For example:
- List entry 1
- List entry 2
- List entry 3
- List entry 4
Images within a numbered list[edit]
When for example a numbered list is used to communicate step by step instructions in which also images are used. The tag "< BR >"(without the spaces) can be used to add a new line within the numbered list on which the image can then be inserted.
For example:
Hiding automaticly generated sections[edit]
An automaticly generated section on a page can be hidden from view by passing "|HideAutoData=1" to the macro which adds the generated text.
For example:
" The Rohde & Schwarz NRX device driver is a Power Meter which is supported by RadiMation®.
Configuration[edit]
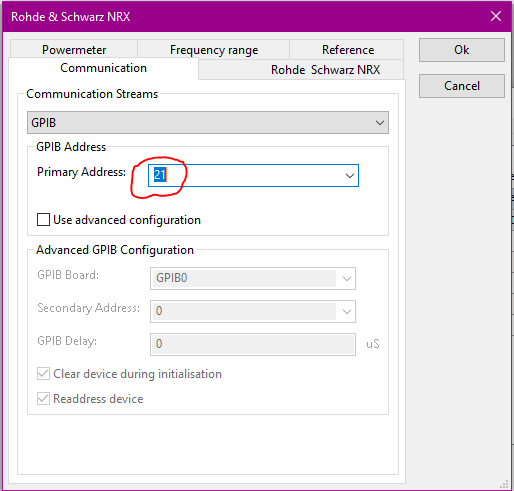
The following tabs are available in the advanced configuration of the EditingTips:
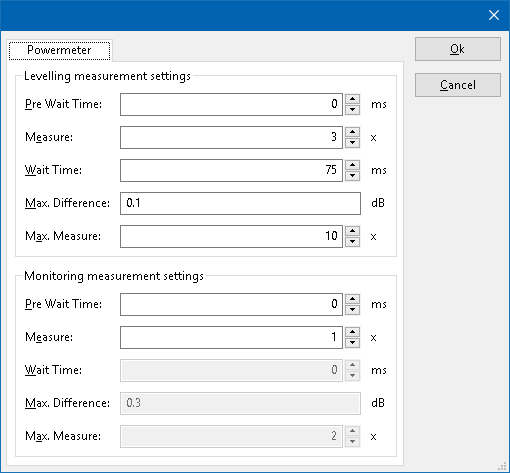
| Wait time before starting the measurement-loop. Can be used to wait for a signal generator, and or amplifier to stabilize. |
| The minimum amount of measurements in the measure loop. Continues to loop even if power level is stable. |
| The wait time between each measurement is taken, during the measurement-loop. |
| If the measured power between each measurement in the measurement-loop, is less than this value. The measured power is stable. The measurement-loop will then stop. |
| The maximum amount of measure times, for the measurement-loop |
According to these settings, RadiMation® will perform a minimum of 3 power measurements with a wait time between the measurements of 75ms. If all those 3 measurements are within 0.1 dB, the power measurement is assumed to be stable, and RadiMation® will continue to average of the last 3 measurements. If the difference between the measurements is larger than the specified 0.1 dB, an additional power measurement will be performed, and the last 3 samples will be compared to the 0.1 dB difference again. At most 10 measurements will be performed if the difference between the 3 samples will not be within the specified 0.1 dB.
Both for the leveling, and the monitoring these settings can be set individually. The leveling is used, whenever RadiMation® is measuring the power, to regulate the signal generator. If the powermeter is only used as input, without regulating on it, then the monitoring settings are used.
More detailed information on how to achieve a fast and stable power measurement is available in Application Note 106: Powermeter parameter configuration.
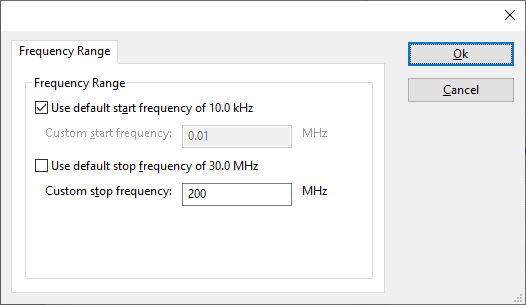
The frequency range of the EditingTips as provided by the manufacturer is shown and selected as default. It is possible to overrule these frequencies and to manually adjust the allowed frequency range of the EditingTips.
| If the checkbox is checked, the default start frequency will be used as the lowest usable frequency in a test for this device. |
| If the Use default start frequency checkbox is unchecked, another start frequency (expressed in MHz) can be specified. The customized start frequency will then be used as the lowest usable frequency in a test for this device. The customized frequency can be a limitation or an extension of the default start frequency. |
| If the checkbox is checked, the default stop frequency will be used as the highest usable frequency in a test for this device. |
| If the Use default stop frequency checkbox is unchecked, another stop frequency (expressed in MHz) can be specified. The customized stop frequency will then be used as the highest usable frequency in a test for this device. The customized frequency can be a limitation or an extension of the default stop frequency. |
Specifying a different frequency range can be useful if for example:
- A device (like a coupler, antenna, injection device, cable, etc...) is still usable (but out of specification) outside the standard suggested frequency range.
- An external mixer is used to measure an extended frequency range.
- An up- or down-convertor is used to shift the frequency range.
- A newer model of a device is present that has an extended frequency range, and still uses the same remote control commands.
Be careful changing these settings as RadiMation® is no longer able to verify if the EditingTips is used outside frequency range that is specified by the manufacturer. This may result in serious damage to your measurement device.
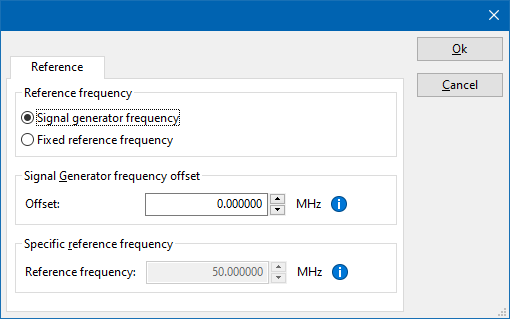
The settings on the Reference tab influence the measurement frequency that is communicated to the measurement device. The frequency that is forwarded to the measurement device can for example be used by the device to perform the measurement on the correct frequency, or use the correct internal frequency dependant correction or calibration factor on the measurement result. Normally it is desired that the measurement frequency is the same as the carrier frequency of the signal generator. In some situations it can however be required to communicate a different frequency to the measurement device. In such a situation the settings on the Reference tab can be modified.
| Selects that the actual carrier frequency of the signal generator is communicated to the measurement device. This is the default behaviour. |
| Selects that a fixed frequency (independent of the signal generator carrier frequency) is communicated to the measurement device. |
| An additional offset frequency specified in MHz, that is added to frequency that is communicated to the measurement device. This value can be positive or negative, and defaults to 0.0 MHz. |
| The fixed reference frequency specified in MHz that is communicated to the measurement device, when the Fixed reference frequency option is selected. |
| Warning: | When a different reference frequency is specified and communicated to the measurement device, it is only relevant for the measurement device. A correction file that is attached to the device driver in RadiMation® will still use the correction value that is specified for the actual signal generator carrier frequency. |
"
Using fixed width font to include formatted text[edit]
When adding formatted text such as code examples, the first character on a new line must be a whitespace. This shall keep the original formatting of the code from being changed.
For example:
int DeterminePaddingAmount(void) {
    int requiredAmountOfPadding = 0;
    requiredAmountOfPadding = (int)m_PreviousTextString.length() - (int)m_ReplacedTextString.length();
    return requiredAmountOfPadding;
Instead of:
int DeterminePaddingAmount(void) {
   int requiredAmountOfPadding = 0;
   requiredAmountOfPadding = (int)m_PreviousTextString.length() - (int)m_ReplacedTextString.length();
   return requiredAmountOfPadding;


