FAQ/Immunity
This page contains all the Frequently Asked Questions related to Radiated Immunity and Conducted Immunity module of RadiMation®
Does RadiMation support the linearity check that is described in the EN 61000-4-3 standard?[edit]
In RadiMation® it is fairly easy to verify that the amplifier is used in its linear range (and thus not saturated).
The EN 61000-4-3 2006 version specifies that the calibrations in the Uniform Field Area should be performed on electrical field strength that is at least 1.8 times higher than the field strength that will be used during the substitution test. It is also required that it is ensured that the amplifier is used in a range in which it is not in saturation. To be able to perform a substitution test on 10 V/m, it is thus necessary that the calibrations are performed on at least 18 V/m. The Uniform Field Area calculation can be performed as it is described in Chapter 12. After the the complete calculation has been performed, and a final calibration file has been created, it has to be ensured that the amplifier will not be used in saturation.
The easiest way to confirm that the amplifier is not used in saturation, is:
- Configure a Radiated Immunity substitution test with the calibration file that was the result of the Uniform Field Area calculation. Ensure that the substitution test is configured with the correct settings:
- use the signal generator calibration method.
- the forward power input should be activated, because the forward power should be measured.
- level to an electrical field strength that is exactly 1.8 times lower than the field strength that was calibrated. This will result in a 5.1 dB lower signal generator power.
- use the same frequency range and frequency steps, as was used during the calibration.
- use the same testsite as was used during the calibration.
- Start the substitution test and wait until it is finished.
- Now the forward power that is used during the substitution test, and the forward power during the calibration should be compared. It is the most easiest to do this in Microsoft Excel. Start Microsoft Excel, and create an empty sheet.
- Open the calibration file that was the result of the Uniform Field Area calculation.
- Open the forward power graph, and copy the data (table) of the forward power to the clipboard.
- Paste the forward power of the calibration file into the Microsoft Excel worksheet (for example on cell A6)
- Open the results of the substitution test, open the forward power graph, and copy the data (table) of the forward power to the clipboard.
- Paste the forward power of the substitution test into the Microsoft Excel worksheet (for example on cell D6)
- Compare the data of the forward power of the calibration and the forward power during the substitution. The forward power of the substitution should be 5.1 dB lower then the forward power of the calibration file. The comparison is very easy, by inserting the formula '=B6-E6' in cell H6. The formula can then be copied down for all other frequencies.
- The EN 61000-4-3 standard assumes that the amplifier is not in saturation if the difference between the forward power values on all frequencies is within +3.1 dB to +5.1 dB.
An example Microsoft Excel file, can be downloaded here, which can be used for the calculations.
Another possibility to ensure that the amplifier is not used in saturation, is to limit the generated power of the amplifier to its 1 or 2 dB compression point. The amplifier limitation feature of RadiMation® can be used to limit the generated power of the amplifier.
Why are the Uniform Field Area calculations of expired standards not removed?[edit]
The calculation methods for the old standards (like EN 61000-4-3:1995) cannot be removed from RadiMation® due to the following reasons:
- A number of product standards do mention basic standards and there year of issue, for the way of performing radiated immunity tests. As long as the product standards are not changed one should use the 'old' basic standard as well. Although many lab's do use the latest version of the basic standard for all product standards (while it is much more convenient to use only one version of the EN61000-4-3), when there is doubt about the test results, one should use the harmonized standard and it's associated basic standard as mentioned in the product standard.
- A number of customers simply require the old methods, for the reasons mentioned above, or while they want to be able to perform verification tests on old products
Is RadiMation® using the correct method for the Uniform Field Area calibration?[edit]
The latest EN 61000-4-3 standard describes two methods to perform a "field homogeneity verification" (also called 'Uniform Field Area calculation') (the constant field method and constant power method). RadiMation® supports the constant field method while this will result in the highest accuracy (With this procedure, the linearity error of the field probe is not influencing the calibration accuracy. While the linearity of a power meter is much better than the linearity of a field probe, this method is, from an accuracy point of view, the better solution). Although RadiMation® does not support both methods, this does not mean RadiMation® can not be used for field homogeneity verification, because according to the standard, both methods should result in the same calibration file.
Why is an immunity test trying to control a field sensor, if no field sensor is selected in the used testsite?[edit]
RadiMation® does not automatically disable a setting in a TSF file, if certain equipment is not selected in the selected testsite.
It can be possible that measurements procedures require that a field sensor is used during an immunity measurement. The fieldsensor is then activated in the Fieldsensor Inputs window of the TSF file. If however, due to circumstances the fieldsensor is not available in a certain situation, it is unacceptable that RadiMation® silently decides to not use the activated fieldsensor. The TSF that defines the exact measurement procedure should not be silently modified, because this can lead to unexpected results in future measurements. It is of course allowed that the test engineer modifies the TSF to disable the usage of the field sensor during a specific measurement, but in that case it is a thoughtful action by and the responsibility of the test engineer. RadiMation® does not silently perform adjustments to the configuration in a TSF file.
Signal generator is going to -100 dBm and RadiMation is reporting that it can not go any lower[edit]
If the signal generator is going to -100 dBm during a test, then there is something wrong in the hardware configuration or the software configuration.
Possible causes and solutions:
- Verify that the hardware configuration is the same as the software configuration. It is possible that an attenuation is not included in the test-site configuration. It is also possible that a coupler with another attenuation was selected in the test-site configuration. Adjust the configuration of the test-site in such a way that the hardware configuration and the software configuration are equal.
- Check the noise level of the powermeter, so the minimum power level which can be measured with the used power meter is known. The problem can be caused by a combination of the noise level of the used powermeter and the attenuation in front of the powermeter, which is in total higher then the requested power level during the test.
Why is a power delivery test performed, even if Forward power levelling is not selected?[edit]
When RadiMation® is instructed to use the forward power meter it will always perform a power delivery test.
The following situation will cause a forward power measurement:
- Forward power amplifier protection was activated.
- The forward power or net power is measured as an input.
- Forward power or Net power calibration method is selected.
In all these cases, also a power delivery test is performed.
Why is the signal generator carrier level limited to 0 dBm?[edit]
By default the input of an amplifier is limited to 0 dBm. This is a level that most amplifier can handle without breaking. If a higher or lower amplifier input level is needed, the amplifier input protection should be configured to that specific level. More information regarding the configuration of amplifier power protection can be found in Chapter 14 of the RadiMation® end-user manual.
Can I get the average or calculated field strength on the CAN bus?[edit]
There is an interface between RadiMation® and the CANoe/CANalyser software. More information is available on the CANoe page.
When the RadiMationInterface.can file is include in the CAPL project, you need to implement the functions:
- Test_Calculated_Field, for the calculated field.
- Test_Average_Field, for the average field.
These functions will be called when the information of the calculated or average electrical field is changing within RadiMation®.
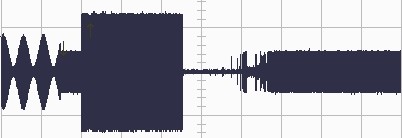
I get a peak on the oscilloscope after the amplitude modulation is turned off[edit]
This effect has been reported before, the problem is caused by measurement errors with a D.S.O. Due to aliasing problems.
Please read the explanation below.
The screen shot of the oscilloscope looks like:
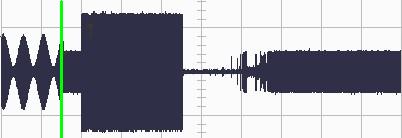
In order to understand the problem we put in a green line to determine where the modulation was turned off. At first sight it looks like the part on the left and the first part of the right are correct. The amplitude during modulation should be 1.8 times higher then the CW value with 80% depth.
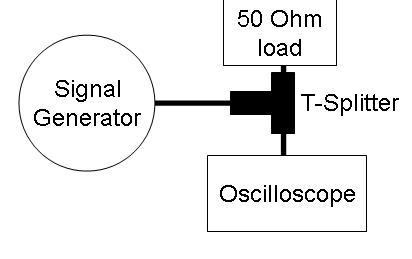
First check if the amplitude is correct, in a 50 Ohm system this can be calculated very easily. If the amplitude values are not what is expect there may be an aliasing problem with the oscilloscope. There is a very easy set up to check if this is the problem.
The 50 Ohm load is to make sure that you are measuring in 50 Ohm. When the oscilloscope has an 50 Ohm input impedance select this impedance and connect directly to the signal generator.
Follow the steps and compair the values by hand:
- set the signal generator to 0 dBm, no modulation at 100 MHZ.
- measure the peak voltage.
- set the signal generator to 0 dBm, with 80% modulation at 100 MHz.
- measure the peak voltage.
For the AM modulation the peak is 1.8 times higher so:
When the measured values are not what is expected, try increasing the number of samples on the oscilloscope, when is it no possible lower the carrier frequency until you do get the correct reading.
The definition of measured field, measured voltage and measured current[edit]
From RadiMation version 4.3.9 and upward, the measured field, measured voltage and measured current are always displayed as corresponding non-modulated test-levels. The measured values are corrected for the applied modulation and the possible applied modulation conservation.
The reason for the displaying of corrected measurement data is caused by the specification of test levels in the standards. Every standard is specifying the testlevel in the unmodulated CW-values. When also modulation should be applied, this is separately specified in the standard. A more specific requirement for voltage or power conservation of the modulation can also be specified. If modulation and possibly conservation is applied, this will result in a different measurement value which will be displayed in the graph. In that situation the graphs will show a higher or lower test-level compared to the test-level specification from the standard. When the measured values are corrected for the applied modulation and the possible applied conservation, the displayed values in the graphs will be corresponding CW values, which will be directly comparable to the test-level specifications from the standard. The displaying of the corrected measurement values will thus prevent a lot of confusion between the measurement values and the test-level specification in the standards.
An example: in a radiated immunity substitution test with no modulation with a test-level of 10 V/m, the measured field strength will be 10 V/m, and this value will also be displayed. If the same test is performed with 80% AM Modulation, a field strength of 18 V/m will be measured. In this case the software will however display 10 V/m, because that is the requested test-level. The displayed values are still measured values, but the measured values are corrected for the applied modulation. The graphs are also corrected to show the the relevant level if conservation of the modulation is used. So if during the above example also voltage conservation of the modulation is selected, the carrier level will be 5.1 dB lower. The measured field strength will be 10 V/m again, and the graph will also display 10 V/m. As a result of this implementation, in an optimal situation, the values of calculated field, measured field and specified test-level should be displayed at the same values in the graphs.
Also the graphs for the current, voltage and power levels are corrected for the applied modulation and conservation. The corrections on the measured values are depending on the ability of the used measuring device to correctly measure a value when modulation is applied. If for example a field strength sensor makes an error during the measurement of the electrical field when modulation is also applied, the corrected and displayed value of the measured field strength will also not be accurate.
The CDN calibration is about 10 dB too high what is going wrong?[edit]
Check the calibration jig factor in the driver of the calibration jig. this is probably 0, the most common value is 9.6 dB.
The amplitude modulated field measurement is higher then the CW test, how is this possible?[edit]
The peak of the generated field is depending on the depth of the modulation. For example, with 80% modulation the field is increased 1.8 times, so 10 V/m is then 18 V/m at the peak of the modulation. The field sensor is based on a voltage measurement instead of a true RMS measurement. The current generation field sensors is fast enough to partly follow the modulated signal. When looking at the display of the read out unit of the field sensor one may see that the field is fluctuating when the modulation is applied. Some field sensors also perform averaging to increase the accuracy of measurement, but this decreases the measuring speed and the following of the actual field. When for example the modulation of 80% is turned off and the field sensor is measured directly after, you may see that the measured field is higher then the continuous wave value.
I have found a problem. What should I do?[edit]
If you have found a problem in the RadiMation® software, it is best to report it to us, using the Error Report tool in RadiMation®. We will categorize the reported issue, register it in our ticket database, and investigate the problem. When a workaround or solution is available, we will report this back to you.
I have another question, that is not answered yet[edit]
Just submit your question on the RadiMation® forum or use the Error Reporting tool that is integrated in RadiMation®. And we will give you an answer.


