Chapter 2: Difference between revisions
| Line 370: | Line 370: | ||
In {{RadiMation}}, the device drivers only need to be configured to the customer requirements once. During the configuration of the device driver, information such as the IEEE address or RS232 COM-port has to be entered. | In {{RadiMation}}, the device drivers only need to be configured to the customer requirements once. During the configuration of the device driver, information such as the IEEE address or RS232 COM-port has to be entered. | ||
You can configure the device drivers in the configuration screen. This screen can be accessed in two | You can configure the device drivers in the configuration screen. This screen can be accessed in two ways, either through the Configuration tab or through the Devices tab. | ||
[[Image:Config configuration.png]] | [[Image:Config configuration.png]] | ||
Revision as of 11:49, 14 September 2015
Getting started[edit]
Software overview[edit]
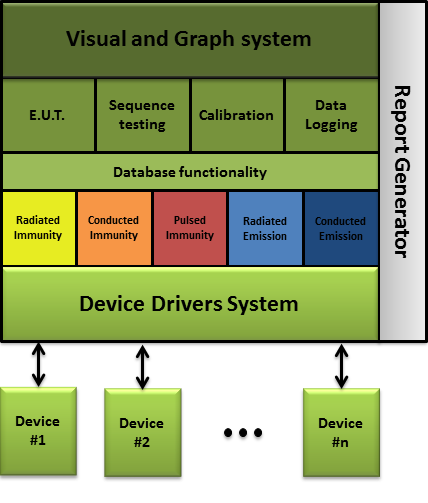
RadiMation® consists of a software core and 7 complementing software modules. It can be used to perform 5 different types of EMC tests, calibrations, sequence testing and has an automatic report generation function.
An overview of the RadiMation® software is visible in the figure below:
The RadiMation® Core consists of the following components:
- The Visual and Graph System
- The EUT data management System
- Sequence Testing
- Calibration
- Data Logging
- Database Functionality
- The Device Driver System
Depending on the requirement, one ore more modules can be added to the RadiMation® Core.
The different modules are integrated in one single software package. The separate modules are:
- Radiated immunity testing (RI)
- Conducted immunity testing (CI)
- Pulsed immunity (ESD, EFT, Surge)
- Radiated emission testing (RE)
- Conducted emission testing (CE)
- Report generator
- Excel Exporter
The implementation of different modules in one software package has a number of advantages compared to other software:
- Easy to use because all the modules have the same "look & feel".
- Seamless data exchange between the different modules.
- Calibration functionality enables an easy exchange of the calibration files.
- Different types of tests can be performed, fully automatic, after each other (Sequence testing).
- Fast automatic report generation, made possible by one data repository for all test data.
Hardware and software requirements[edit]
There are certain requirements that the PC(-environment, used to perform the EMC tests) needs to comply with to run RadiMation®.
Hardware requirements[edit]
The RadiMation® software makes extensive use of data calculations, bus interactions (to control the test equipment) and screen interactions (for the use of graphs). Because of this the processor performance is very important and a dedicated PC for RadiMation® is required. Running other programs on the same computer can cause compatibility problems and is not supported. Programs which are supported are the programs used by RadiMation®, such as Word, Excel and MySQL.
To use the software to its full extent the following hardware configuration is required:
- Processor type: 2 GHz minimum, > 3 GHz recommended
- Free RAM memory: 512 MB minimal, > 1 GB recommended
- Free hard disk space: 1 GB minimal
- Monitor: SXGA (1280 x 1024) or larger (at least 1280 pixels wide and at least 900 pixels high)
- IEEE card: Any GPIB Card that is supported by the National Instruments NI-488.2 Software Library
Memory[edit]
RadiMation® needs a considerable amount of memory to perform at its best. We recommend that you have at least 512 MB (Mega Bytes) of free memory available, but more if possible. Free memory is defined as the amount of free RAM without having to use the swap file. Thus, not the specification of the total amount of memory that the machine has. The following steps to help you determine the amount of free memory in your PC:
- Cold boot your machine from power off, not from hibernate or restart.
- Determine the total amount of memory put into the computer.
- Start the windows task manager and determine the commit charge.
- Calculate the amount of free memory by subtracting the amount of memory of the commit charge from the amount of memory put in the computer.
If the amount of free memory is less then 512 MB, there are several options to obtain more free memory. Depending on the configuration and situation, the following options are available:
- Insert additional memory modules into the machine.
- Remove/uninstall programs with large memory usage that do not involve measuring, for example VNC viewers.
- Prevent programs from starting automatically during the booting of the computer.
GPIB card[edit]
The GPIB hardware and software needs to be installed correctly before RadiMation® is installed. DARE!! is not responsible for any additional costs or delays that may occur if this card is not installed prior to the installation of RadiMation®. The GPIB Card has to be supported by the National Instruments NI-488.2 software library.
Software requirements[edit]
The RadiMation® software will operate (and is tested) with Microsoft Windows 7 (32-bit and 64-bit) and Microsoft Windows 8 (32-bit and 64-bit) operating systems. It is required to have Microsoft Office Word installed on the PC because RadiMation® uses Microsoft Office Word to generate and print the printout's.
Microsoft office[edit]
The components of the Microsoft office suite must be fully installed and working, so they can be used for report generation. The RadiMation® report generator can create reports in the following formats:
- Microsoft Word
- Microsoft Excel
Installation[edit]
During the installation of RadiMation® a network/PC administrator from the IT department must be available. This person must be able to grant rights (for one day or more) and have sufficient knowledge of the (local) network. DARE!! is not responsible for any additional costs or delays that may occurs if this support is not provided.
When RadiMation® is installed for the first time, it needs to be installed with administrator rights. Upgrades have no need for full rights (although rights to perform installations are required). To update RadiMation® the following rights needs to be set:
- Read rights to the 'C:\' drive
- Full rights to the installation directory (e.g. 'C:\Program Files\Dare Development' or 'C:\Program Files\Dare Instruments', please note that the path may be different depending on the used OS and language)
Conventions[edit]
RadiMation® uses the Windows structure of pull down menu’s. In this manual the pull down menu’s are visualized as followed:
-
 File
File
-
 Open
Open
-
 EUT
EUT
-
-
-
The example above shows that, to show the file open selection window, the File item from the menu bar should be selected first, followed by the Open item and then the EUT item.
A screenshot of these menu items is visible below:
Software installation[edit]
First time software installation[edit]
To install the RadiMation® software, please insert the RadiMation® CD in the CD-ROM drive of your computer. The setup program of RadiMation® should start automatically. If the program does not start automatically, run E:\setup.exe from the CD (where E:\ is the letter of your CD-ROM drive). The Installation Wizard will guide you through the installation process. After installation the computer must be restarted before running RadiMation®. Please read User rights and installation about the user rights and information that is required for first time installation.
Software installation on a network[edit]
In a network environment multiple computers are connected with each other though a shared communication medium. This provides several advantages compaired to a local installation. One of these benefits is that data can be shared between the connected computers. The RadiMation® software is designed to optimally use this advantage. All the data that is used or generated by RadiMation® can also be shared on the network. In most cases we recommend the use a of network configuration over a local configuration.
| Note: | When RadiMation® is using a network configuration the program itself will still be executed from the local computer. It is therefore neither cached nor running directly from the network. |
To fully use the functionality of data sharing, the configuration of RadiMation® should be changed slightly. Make the necessary alterations by following the steps below:
- Create a shared network directory (with the appropriate rights) on one of the Network Servers. Your Network Administrator can help you with this. This directory will be called <NetworkDir> from now on.
- Create a drive assignment for this specific <NetworkDir>. This will avoid the use of excessive path depths. Your Network Administrator can also help you with this step.
- Create a sub-directory with the name <Setup> in the <NetworkDir>.
- Copy the RadiMation® setup.exe file from the CD-ROM (or, if you downloaded RadiMation®, directly from local disk) to the <Setup> directory in the <NetworkDir>.
- Install RadiMation® on one of the network computers. This can be done by launching the setup.exe program. Use the installation procedure as described in the previous section.
- In the <NetworkDir>, create the following sub-directories:
- CAL_File
- CONFDVDR
- COR_File
- EUT_File
- LLF_File
- Printout
- RGO_File
- RGT_File
- SEQ_File
- TSF_File
- Start the installed RadiMation® program and open the Configuration window. On the Directories tab, change the location of the Device Driver Configuration directory to the CONFDVDR directory in the <NetworkDir>. (Note: do not change the other directories yet.)
- Restart the RadiMation® program.
- Open the Configuration window again and on the Directories tab, change the location of all the other directories to the corresponding directories in the <NetworkDir>.
- Restart the RadiMation® program again.
- The RadiMation® program will use the <NetworkDir> as its main data directory from now on.
- Start the Configuration of the RadiMation® software as described in the remaining part of this chapter. The complete configuration will be written to the <NetworkDir>.
When the RadiMation® software is installed on another computer in the network, the following steps can be used:
- Install the RadiMation® software from the <Setup> sub-directory in the <NetworkDir>. Use the installation procedure as described in the previous section.
- Start the installed RadiMation® program and open the Configuration window. On the Directories tab, change the location of the Device Driver Configuration directory to the CONFDVDR directory in the <NetworkDir>.
- Restart the RadiMation® program.
The newly installed RadiMation® will now use the already configured <NetworkDir>.
Installing software updates[edit]
Software updates can be distributed on CD or downloaded from our website at http://www.dare.eu/instruments/emc-test-software/download.
To install the downloaded RadiMation® update, please execute the startup program.
To install the RadiMation® update from a CD, please insert the CD in the CD-ROM drive of your computer. Run the installation program (i.e. E:\setup.exe, where E:\ is the CD-ROM drive letter). The setup program will detect that a previous version of RadiMation® has already been installed on your PC. The setup program will install the new RadiMation® version at the same location as the previously installed version. A back up of this older version will automatically be copied to the backup directory. All the settings of the older version will also be used for the newly installed RadiMation®. If problems should occur with the newly installed RadiMation®, the old version of RadiMation® can be recovered.
| Note: | We strongly advice that a you make a complete backup of all your files and directories (e.g. TSF/Sequence/Correction/Calibration and EUT) before installing a RadiMation® update. |
| Warning: | Do NOT uninstall RadiMation®!! This will cause removal of all user settings, TSF, sequence, calibration and correction files. This is unrecoverable. |
If the already installed RadiMation® version was installed from a network directory, the new setup file can be copied to the <Setup> sub-directory of the <NetworkDir>. The new RadiMation® version can then be installed on each computer from this directory.
User rights and installation[edit]
This chapter describes the rights a user must have to install or upgrade RadiMation® software.
New installation[edit]
A new installation can only be performed with administrator rights. When installed without administrator rights a successful installation is not guaranteed.
Upgrade[edit]
To upgrade the RadiMation® software, the user must have the rights to read and write in the RadiMation® folder, which is normally located in the C:\Program Files (x86)\DARE Instruments\ directory.
Software configuration[edit]
In the main menu, under the configuration pull down menu, a number of standard configurations can be made. The selected and/or entered configurations will be used as the default settings for future use.
The next paragraphs will explain the required configurations.
Password protection[edit]
RadiMation® allows you to protect a number of configurations with a password. The password is standard turned on for the default used test engineer 'Administrator'. The default password is Radimation.
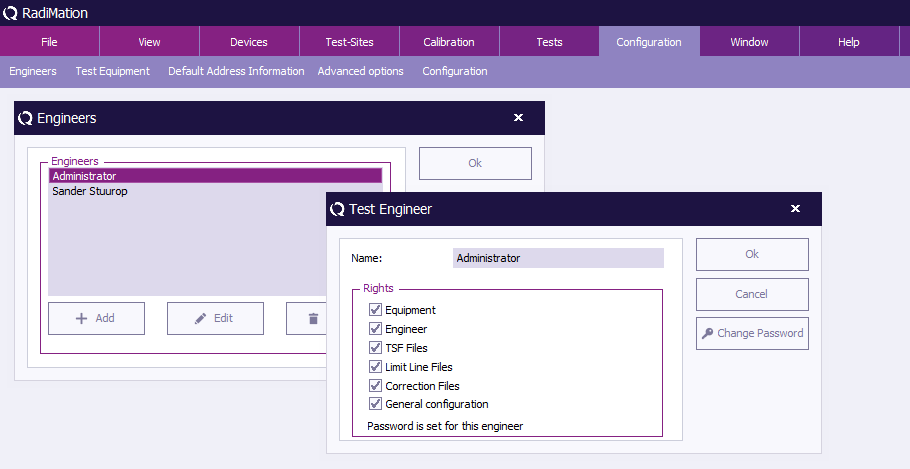
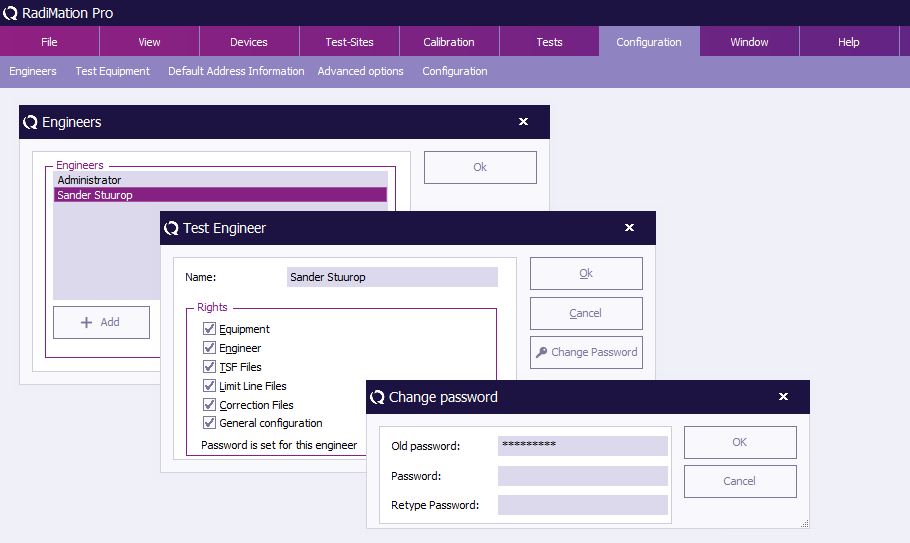
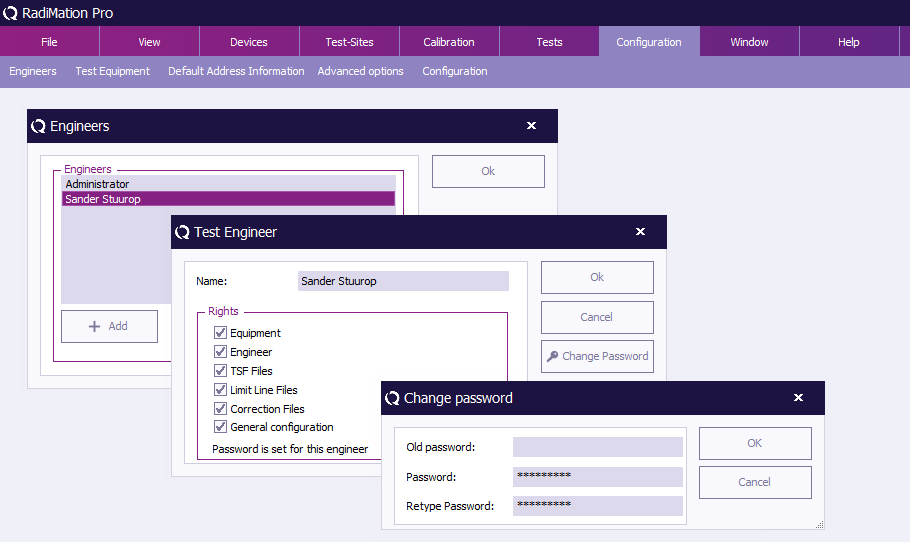
To change the password protection settings, go to the Engineers window in the Configuration tab.
Select the Administrator Engineer and click ‘Edit’.
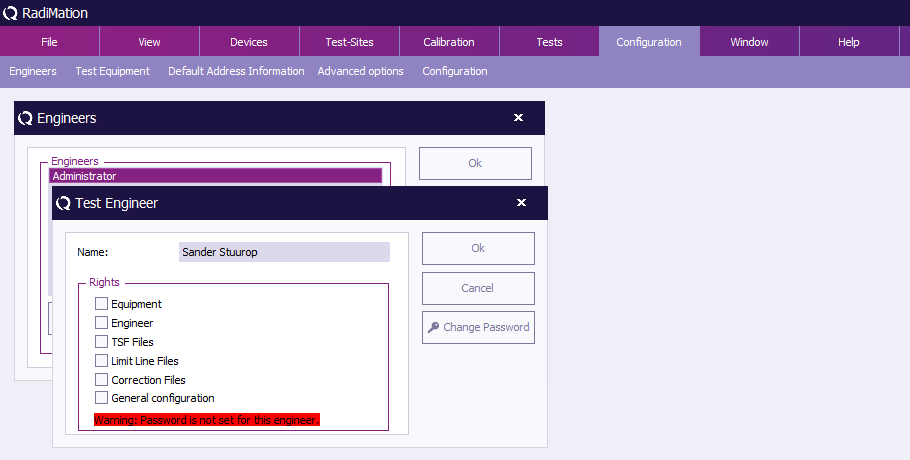
In the (Administrator) Test Engineer window the password can be enabled, disabled or changed. The current password setting for the selected engineer is displayed at the bottom of the window. This will indicate whether a password has been ‘set’ or ‘not set’.
In addition, the protection can be enabled or disabled for the following items.
| Prevents unauthorized changes to test equipment configuration. |
| Prevents unauthorized changes to test engineers configuration. |
| Prevents unauthorized changes to Test Setup Files (TSF) files. |
| Prevents unauthorized changes to Limit Line Files (LLF) files. |
| Prevents unauthorized changes to correction files. |
| Prevents unauthorized changes to the general configuration. |
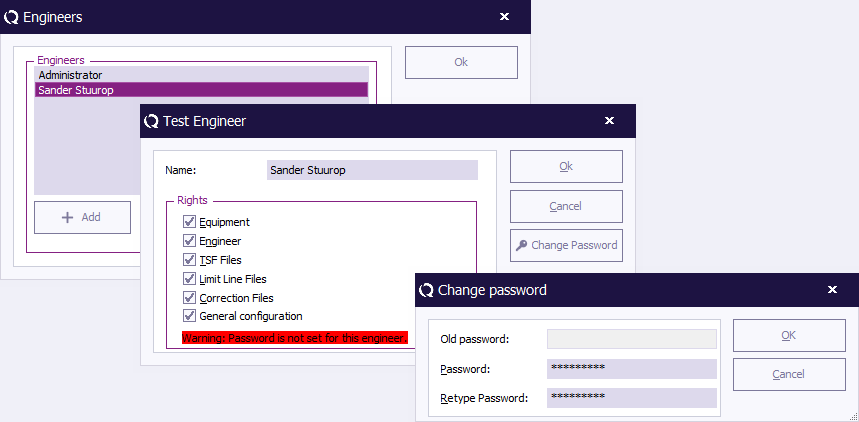
To enable, disable or change the password, click 'Change Password'.
To change the password, enter the old password and the new password (twice), then click ‘OK’. You will be returned to the Test Engineer window.
To disable the password, enter the old password and leave the other two fields empty, then click ‘OK’. You will be returned to the Test Engineer window. (The password indication will change to: “Warning: Password is not set for this engineer.”)
To enable the password, enter the new password (twice), then click ‘OK’. You will be returned to the Test Engineer window. (The password indication will change to: “Password is set for this engineer.”)
To leave the Engineers window, click ‘OK’.
Test engineers[edit]
For each test, the name of the test engineer performing the current test can be entered.
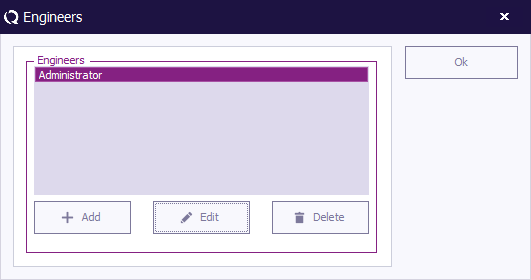
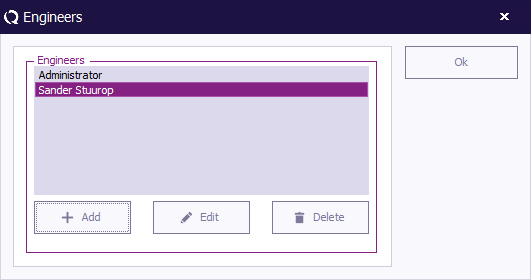
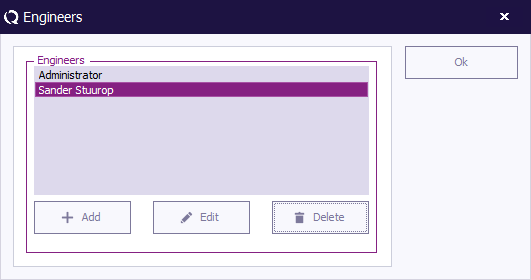
To add, delete or edit (the names of) test engineers, go to the Engineers window in the Configuration tab.
The Engineers window will show the current configured list of engineers. To leave the Engineers window, click ‘OK’.
To add a new test engineer, click ‘Add’.
Enter the name and set the rights of the new engineer, then click ‘OK’. You will be returned to the Engineer window.
The new engineer will not have a protection password (yet), this can be enabled by clicking 'Change Password'. Please read Password protection for more information.
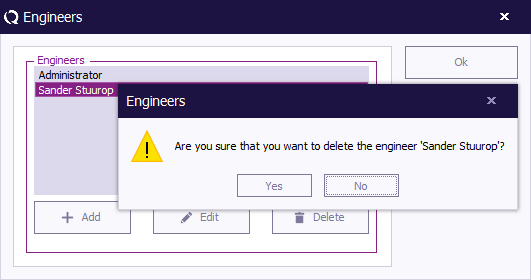
To delete a test engineer, select the engineer and click ‘Delete’.
To confirm that you want to delete the engineer from the configuration list, click ‘Yes’. If you do not want to delete this engineer from the list, click ‘No’ or ‘Cancel’. You will be returned to the Engineer window.
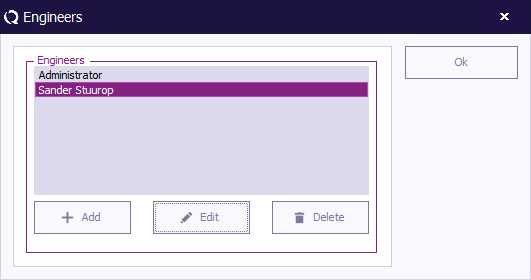
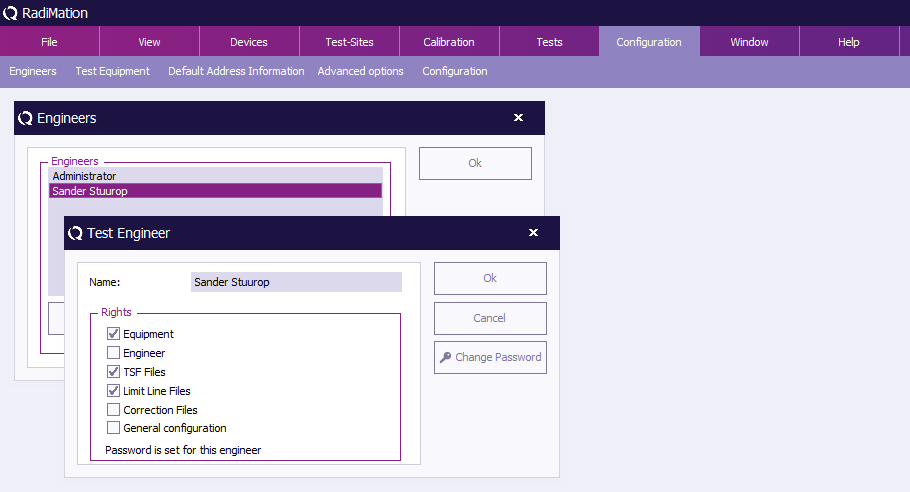
To edit the name, rights and/or password of an engineer, select the engineer and click ‘Edit’.
Make the desired changes in the Test Engineer window and click ‘OK’. If you want to undo or cancel your changes, click ‘Cancel’. You will be returned to the Engineer window.
Default address information configuration[edit]
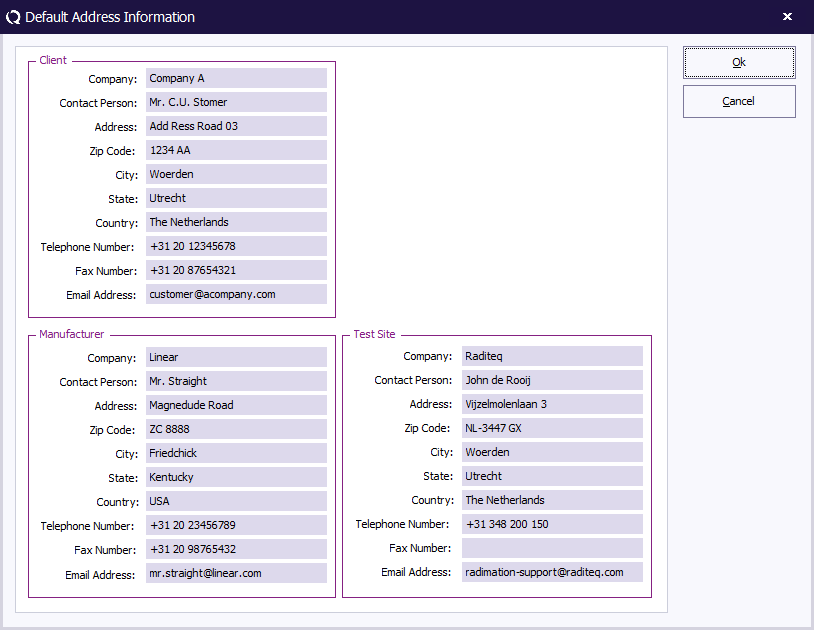
When you make a new EUT file the name and address information of the producer, test house and client can be entered separately. In many situations one or more of this information will be the same for different EUT files (i.e.: when a test house owns the software, the test house data will always be the same).
To prevent users from having to enter repetitive data input, RadiMation® provides the option to set default address information for:
- The default client
- The default manufacturer
- The default test site
Data entered under Default Address Information, will automatically be entered in the EUT window and therefore only needs to be entered once.
To add, modify or delete the default address information, go to the Default Address Information window in the Configuration tab.
Enter the desired information as shown in the example below. To confirm the data input, click ‘OK’, to cancel the data input, click ‘Cancel’. The Default Address Information window will close.
Default Units[edit]
RadiMation® allows the user to define the default units. These units are used throughout the software package and can be changed at any time during measurements and viewing.
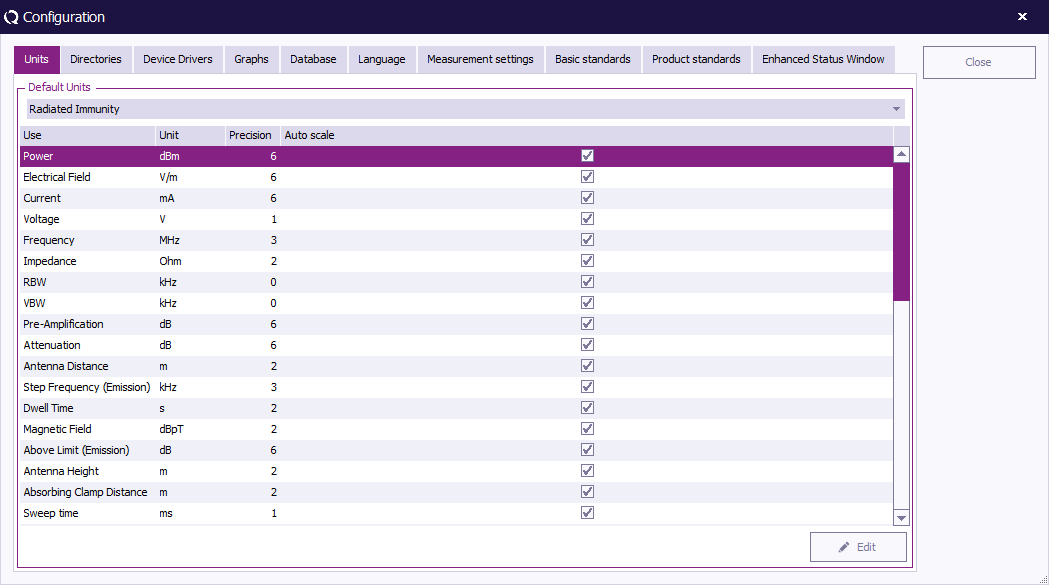
To configure the unit settings, go to the Configuration window in the Configuration tab.
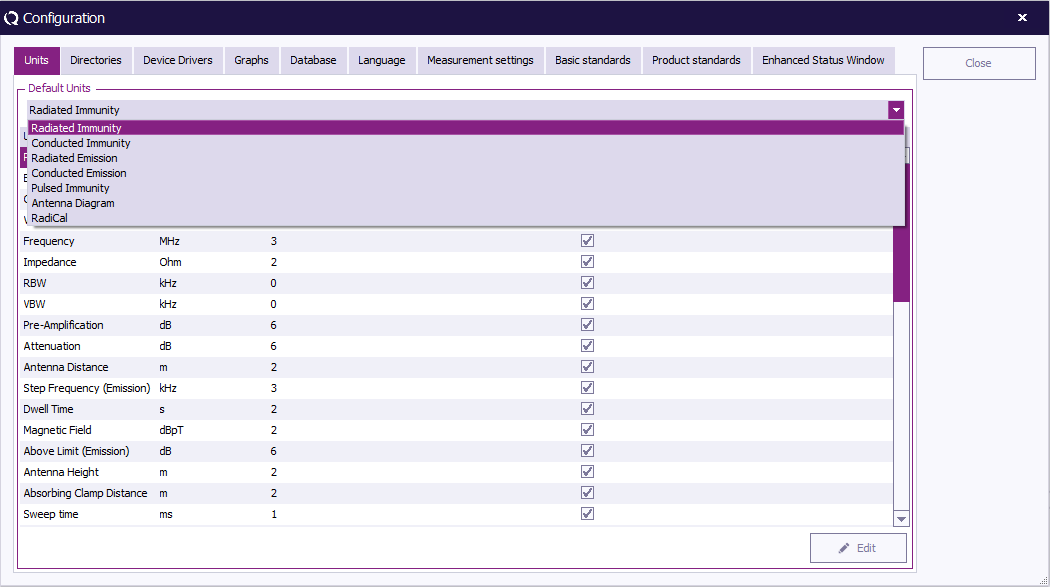
The default settings for the different units can be set in the Units tab. It is possible to define different units for different tests. The following can be selected:
- Radiated Immunity
- Conducted Immunity
- Radiated Emission
- Conducted Emission
- Pulsed Immunity
- Antenna Diagram
- RadiCal
To change the settings of a unit, choose the desired test (e.g. Radiated Immunity) from the drop down menu in the Units tab.
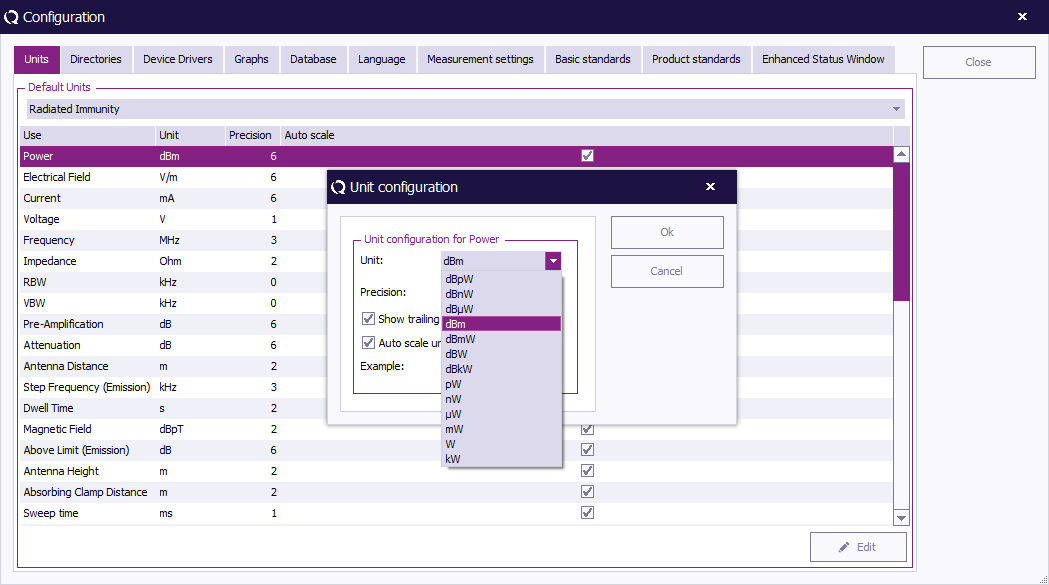
Select the measurement (e.g. Power) and click the ‘Change’ button.
The Unit configuration window will appear, allowing you to change the parameters of the unit. To confirm your changes, click ‘OK’, to cancel your changes, click ‘Cancel’. You will be returned to the Configuration window.
Click ‘Close’ to leave the Configuration window.
Default directories configuration[edit]
The RadiMation® software can use different directories to store different data file types. The location of the following file types can be specified:
- Equipment Under Test Data files (*.EUT files),
- Correction files (*.COR files)
- Calibration files (*.CAL files),
- Configuration files (*.TSF files),
- Sequence files (*.SEQ files),
- Limit line files (*.LLF files).
- Printout files (*.DOC files).
The different file types are described in Chapter 18 “RadiMation® file types and locations”.
For each data type the default location can be entered through the configuration. The path name can link to a directory on a local or network drive. Selecting a network drive will allow you to store data (e.g. EUT data) on a computer network, making it more accessible.
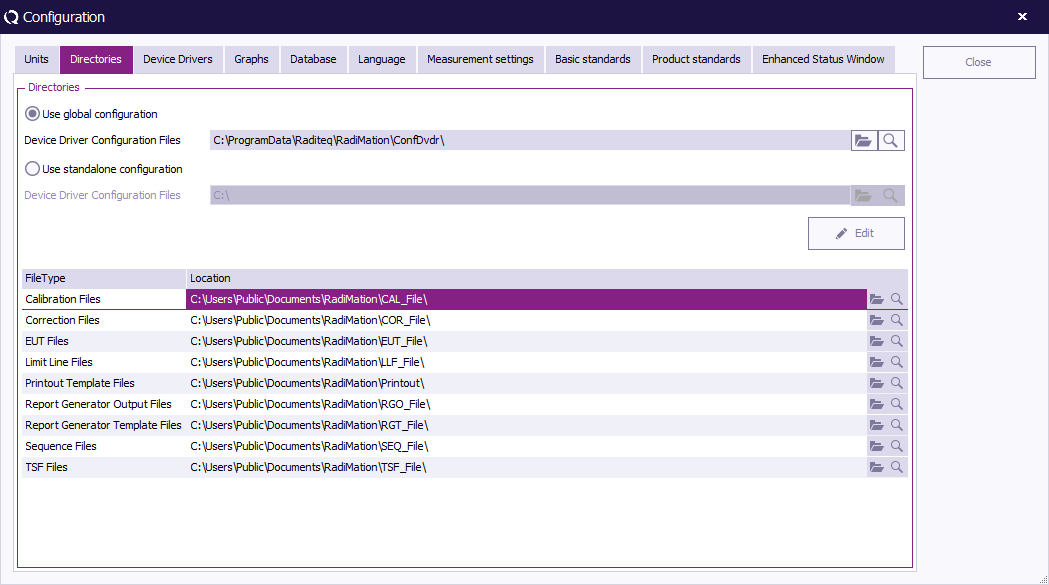
To modify a path name, go to the Configuration window in the Configuration tab.
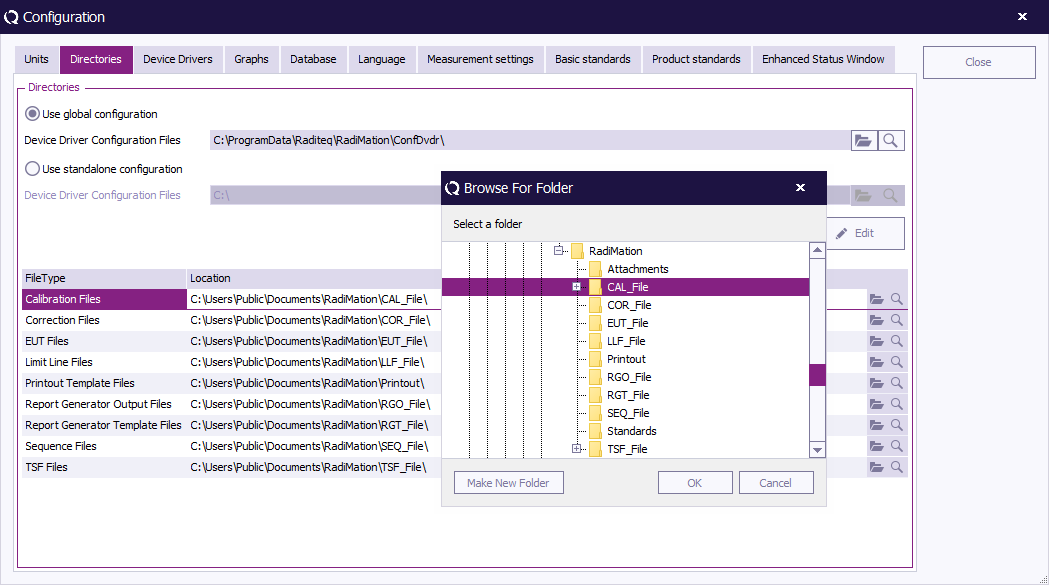
Go to the Directories tab, select the directory that you wish to change and click the ‘Change’ button.
The Browse For Folder window will appear, allowing you to select (or make) a new folder in your directory. To confirm your change, click ‘OK’, to cancel your change, click ‘Cancel’. You will be returned to the Configuration window.
Click ‘Close’ to leave the Configuration window.
Device driver configuration[edit]
Device drivers let your software know which equipment has to be used and controlled during EMC tests.
In RadiMation®, the device drivers only need to be configured to the customer requirements once. During the configuration of the device driver, information such as the IEEE address or RS232 COM-port has to be entered.
You can configure the device drivers in the configuration screen. This screen can be accessed in two ways, either through the Configuration tab or through the Devices tab.
You can select the type of device you want by the drop-down menu that is situated at the top. The big window will display all currently configured device drivers, like in the picture all configured Signal Generators.
| Different types of devices are available in RadiMation®. Only the created device drivers of the type that is selected for Device Driver Type will be shown in the list |
| Shows a list of all the available device drivers for the selected Device Driver Type |
| Creates a new RadiMation® device driver for a specific device. It is only possible to create a new device driver for the selected Device Driver Type. |
| To edit the configuration of a device, select the device in the list and press Edit. This allows to change the configuration of the selected device driver from the list of Available Device Drivers |
| Removes the configuration of the selected device driver from the list of Available Device Drivers. Please note that this driver will then not be available anymore in the test sites. Even if a new device driver is created with the exact same name, it will not automatically reappear in the test sites. |
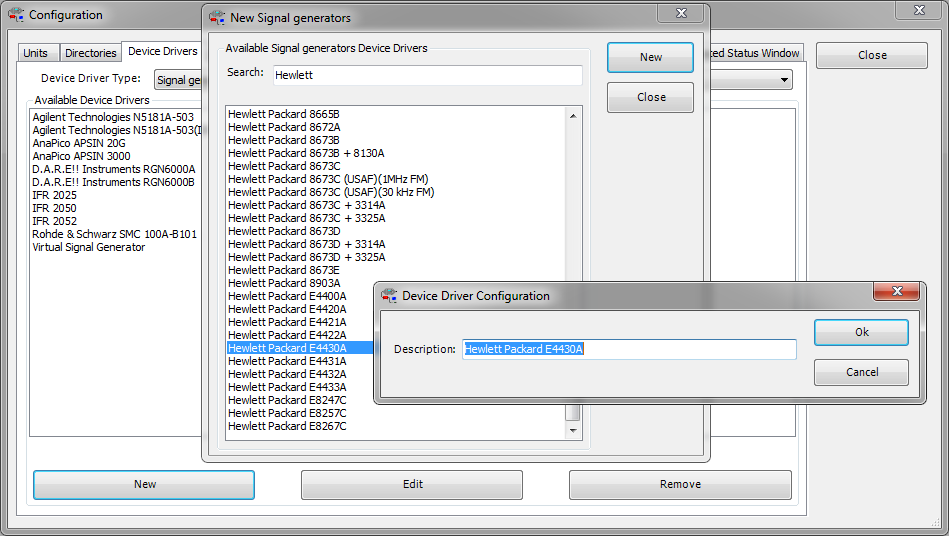
When the New button is pressed, a list of all supported device drivers will be shown.
The required device driver can be searched in or directly selected from this list. The search will start instantly when typing in this 'Search' field. Therefore, the length of the list results will probably get shorter during typing, depending on the keyword(s). The new device driver will then be created when New button is pressed. At that moment it is possible to use the default name of the device driver, or to change it to another (eg. more specific) name.
If you do not whish to create a new device driver press Cancel.
Virtual device drivers[edit]
Virtual device drivers are added for testing and demonstration purposes. These virtual device drivers act as normal devices but do not control actual hardware.
Virtual device drivers do not have the same limitations as normal device drivers (frequency Band, max power, etc.).
Graphics configuration[edit]
RadiMation® allows you to customise the way graphics are displayed on your screen.
To configure the style of the shown graphs, please select:
-
 Configuration
-
 Configuration
-
-
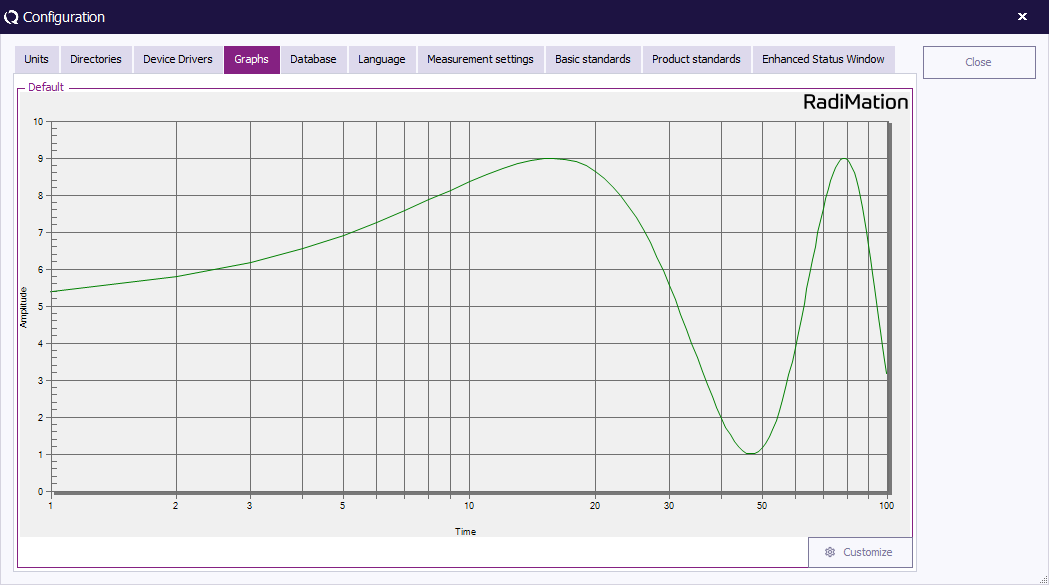
Then select the Graphs tab.
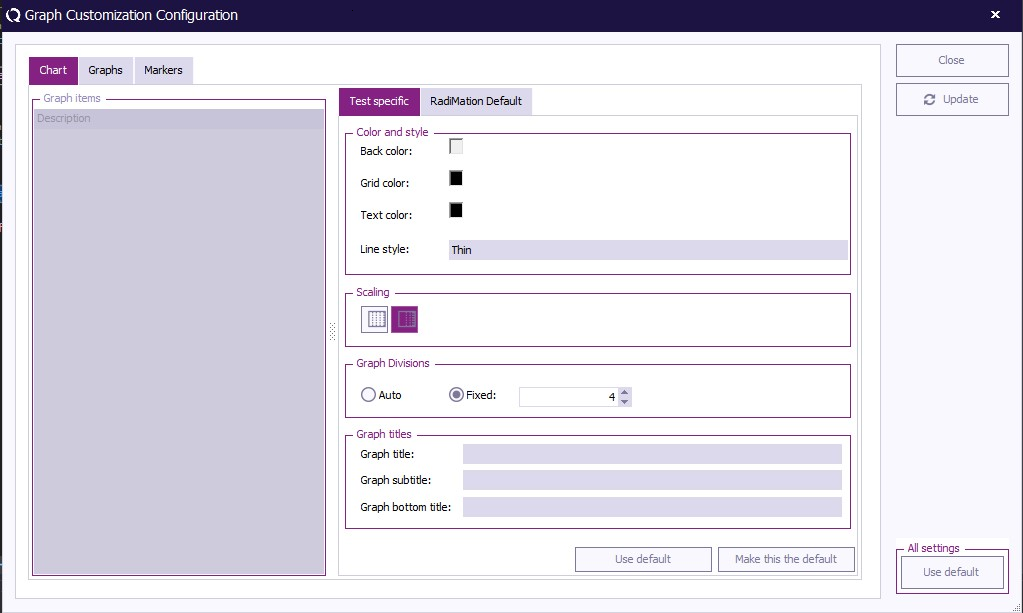
An example graph is shown that is created with the currently selected graph settings. When the Customize button is pressed, the Graph Customization Configuration window is shown, which allows to change the look of all graphs.
The following configurations can be made:
| Shows the currently selected color for the back(ground) of the graph. The color can be changed by clicking on the color itself. |
| Shows the currently selected color for the grid of the graph. The color can be changed by clicking on the color itself. |
| Shows the currently selected color for the text around the graph. The color can be changed by clicking on the color itself. |
Shows the currently selected type of style that is used for the grid of the graph. Possible line styles are:
|
| Determines if the initial x-axis scaling of the graph should be shown linear or logarithmic |
The selected settings in this Graph Customization Configuration window are used as the RadiMation® default settings. It is still possible to overrule these settings in each test to more specific settings.
Database Configuration[edit]
Introduction[edit]
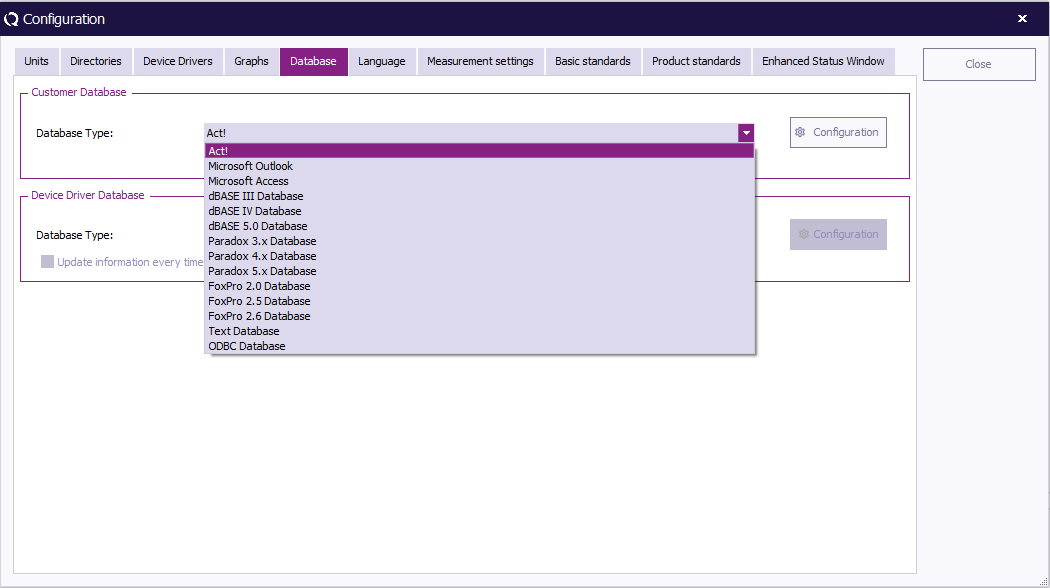
RadiMation® can retrieve customer information (such as name and address) from external databases, for example from your company's customer relationship management (CRM) database. This option is called Customer database and will reduce the need to manually enter large amounts of customer information in RadiMation®.
Customer database can interface with several external databases, such as:
Changing the customer database driver[edit]
To configure RadiMation® to support your customer database, go to the 'Configuration' window in the 'Configuration' tab.
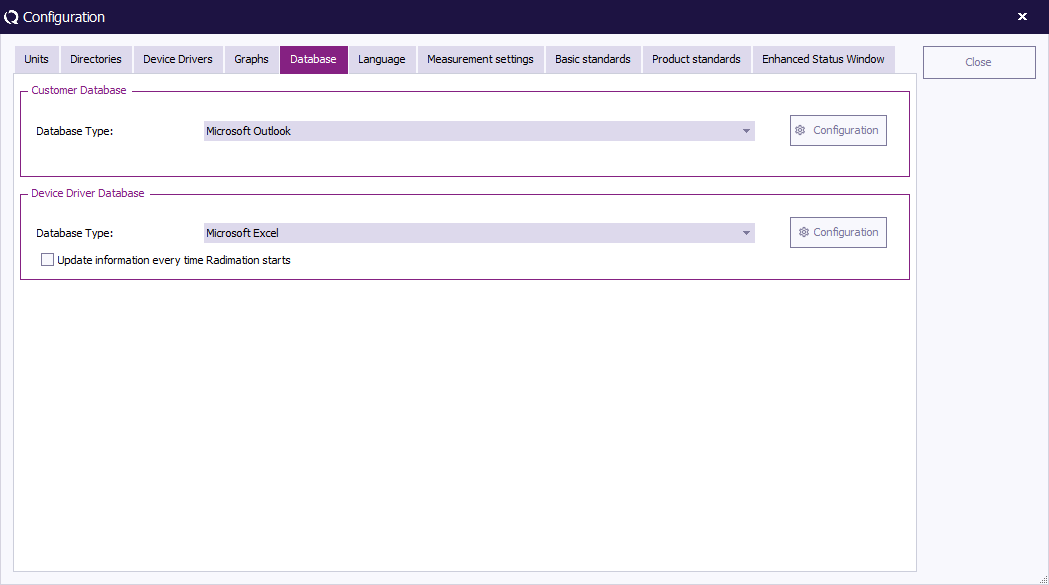
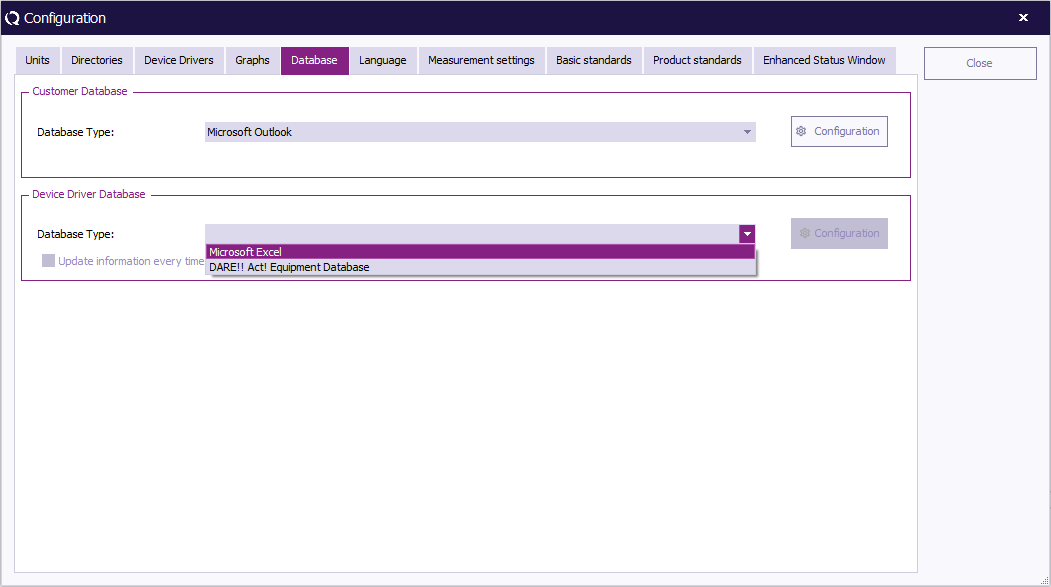
Go to the 'Database' tab to select and/or change the Customer Database and Device Driver Databases.
To select a Customer Database, select a database type from the pull-down menu.
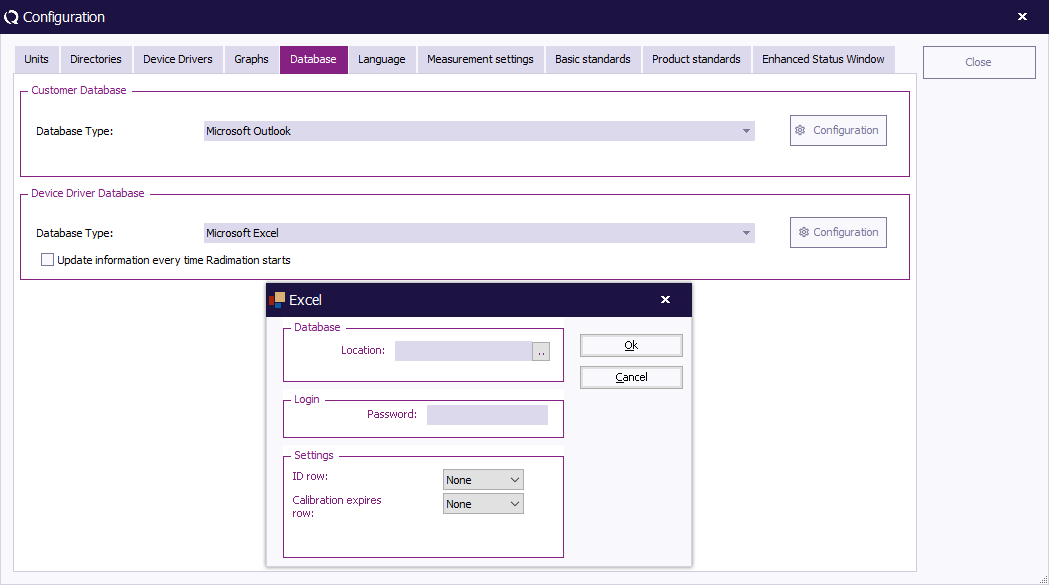
To see and/or change more detailed settings (of the selected database type), click 'Configuration' .
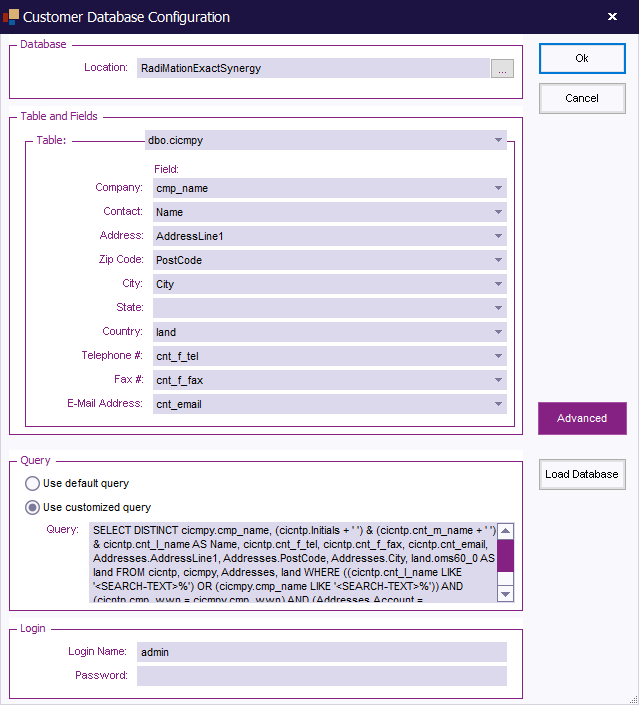
The 'Customer database configuration' window will appear. (This window can differ depending on the selected database type).
To confirm your changes, click 'OK' , to cancel your changes, click 'Cancel' . You will be returned to the 'Configuration' window.
For more detailed information on the Database Configuration settings, go to Chapter 14 “Database Configuration”. Information on the settings of the different database types can be found in the paragraphs that follow “Database Configuration”.
To select a Device Driver Database, select a database type from the pull-down menu.
To see and/or change more detailed settings (of the selected database type), click 'Configuration' . A dedicated window will appear. (This window can differ depending on the selected database type).
To confirm your changes, click 'OK' , to cancel your changes, click 'Cancel' . You will be returned to the 'Configuration' window.
Click 'Close' to leave the 'Configuration' window.
Language Selection[edit]
RadiMation® supports multi-language operation. This means that the software package can be operated in any language. Further more, the multi- language support allows easy translation from English to virtually every other language. Please contact your local reseller for the availability of the language driver you require.
The default language of RadiMation® is English. If you want to change the language it must be selected from the list of available languages. To configure the language, please select:
-
 Configuration
-
 Configuration
-
-
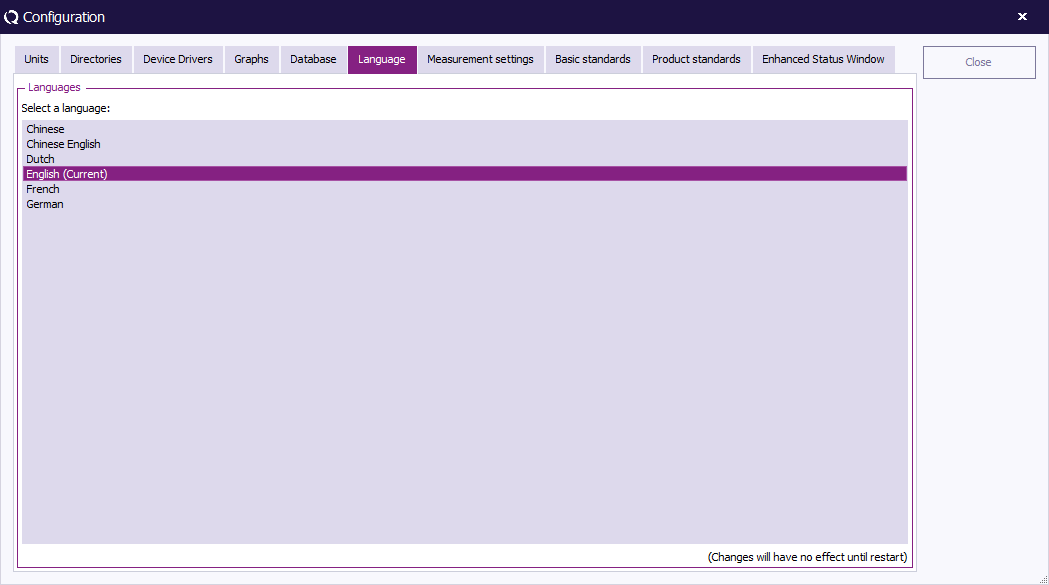
Then select the Language tab:
The currently selected language is marked with the text ' (current) ' appended. If another language should be used in RadiMation®, one of the other languages can just easily be selected. The selected language will only be active after the RadiMation® package is restarted.
| Note: | Not all languages are currently available. Please contact your local reseller for language availability. |
Product Standard[edit]
Introduction[edit]
Product Standards describe which tests have to be performed on a specific type of product. There are many product standards, roughly one for each type of product. There (probably) is a product standard for:
- Washing machine
- Hair dryer
- Car radio
- Television
Very often the product standards refer to multiple basic standards.
A basic standard describes a type of test that should be performed. For each test there is a basic standard. Also for each basic standard, one single TSF could be generated which is configured to perform the test described in the basic standard.
A Product standard describes all the tests that should be performed on a EUT, a basic standard only describes one single test.
Adding a Product Standard[edit]
To add a Product Standard to RadiMation®, please select
-
 Configuration
-
 Configuration
-
-
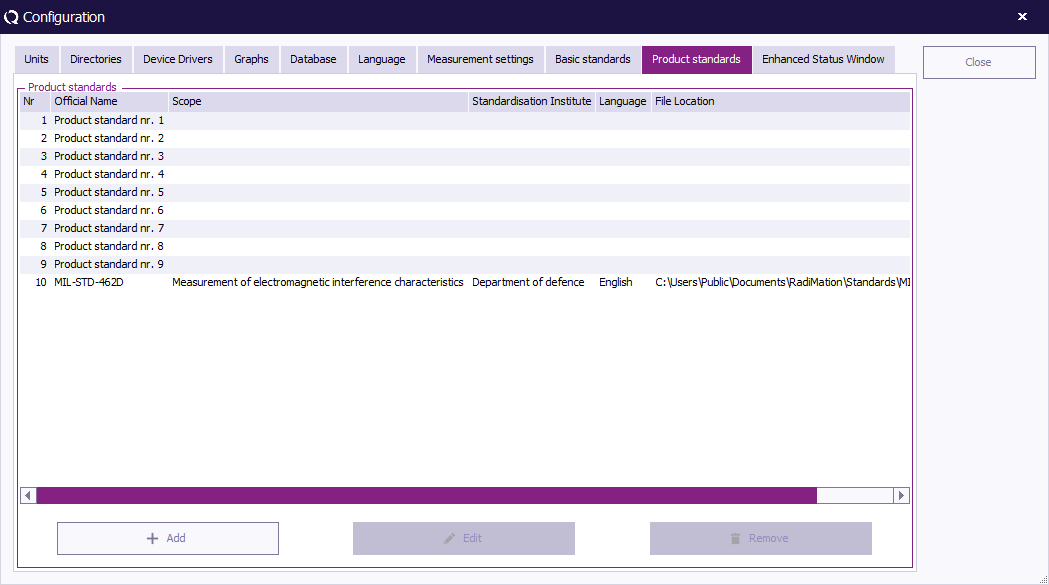
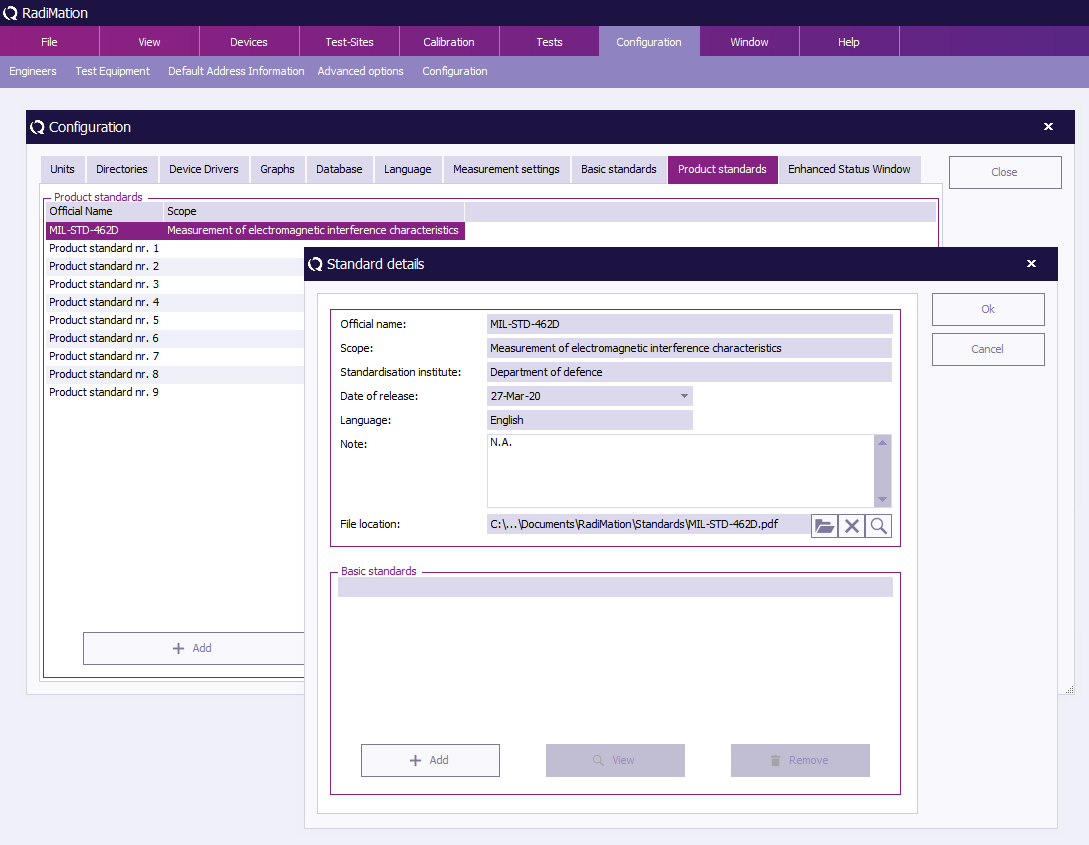
And then select the Product standards tab:
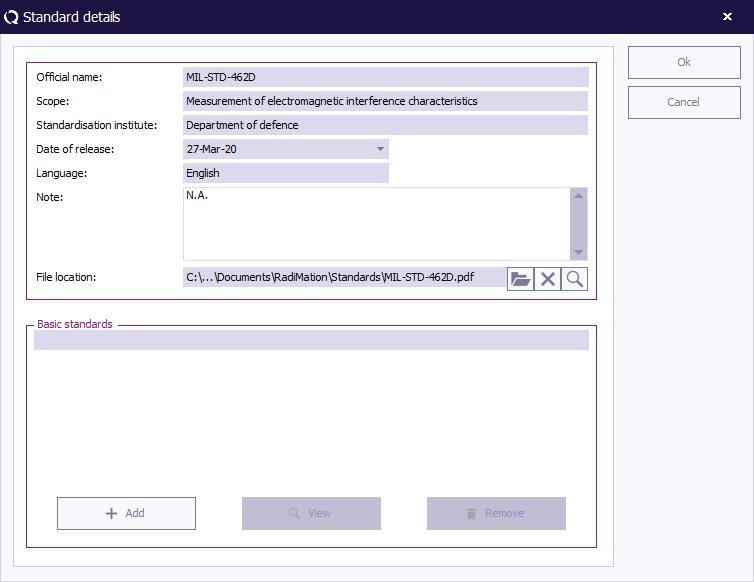
After pressing Add the end-user can insert all necessary information.
Please note that the Official name can only be inserted the first time and has to be unique. All fields speak for themselves, except for the File location. In the File location field, it is possible to associate a file to this standard. For example a PDF, DOC or HTML file that describes the standard. RadiMation® will open the file, with the default reader for this file type, when the engineer selects the magnifying glass.
Add(ing) Basic Standard(s)[edit]
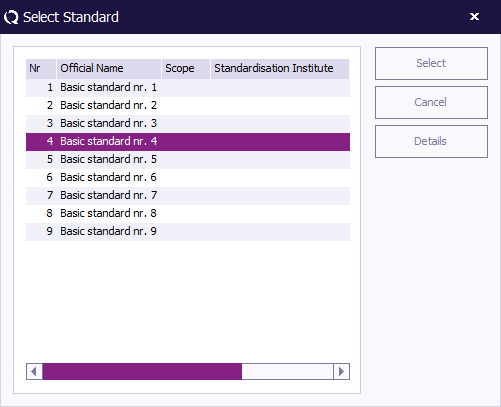
Adding a basic standard to the product standard can be done simply by pressing the Add button. The following window will appear:
It is possible to select multiple items by selecting the top item, then hold the 'shift' key and selecting the lowest items. Holding the 'Ctrl' key allows you to select or deselect one or more items. Double clicking on an item will display the item details in a new window.
| Note: | When on the EUT window, a product standard is selected, or added, the data of the standard is copied into the EUT Document. At that moment a copy of the data of the standard from the configuration is made. This means that if the configuration of a standard in the Configuration window of RadiMation® is changed, the data in the EUT file will still have the old data of the standard!!! This behaviour is correct, because it is the information of the standard that is used at the time that the EUT was tested. |
Basic Standard[edit]
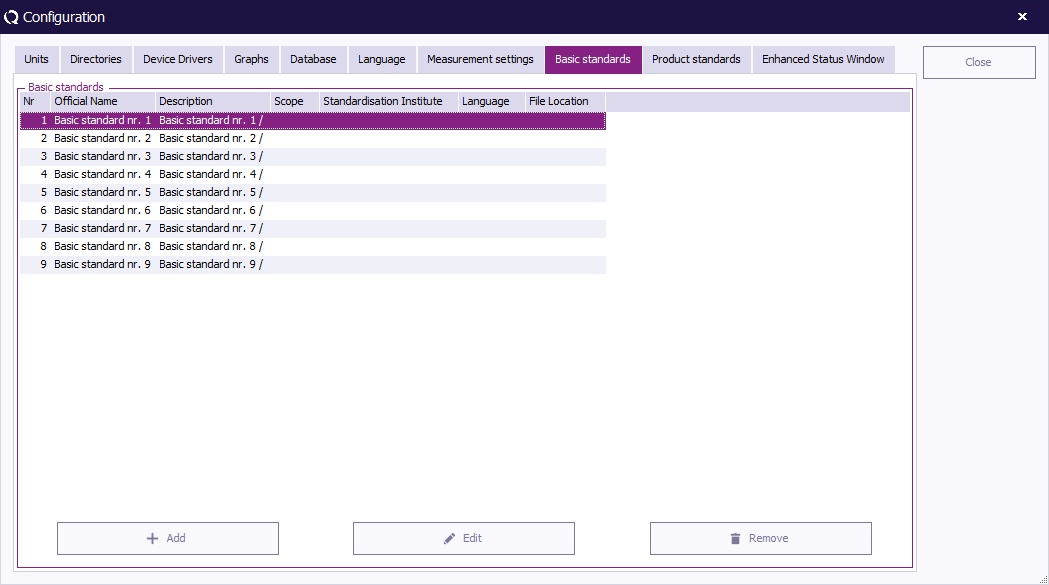
The information of a basic standard is the same as a Product Standard. The difference is that when configuring a basic standard, an engineer is not allowed to refer to another basic standard.
Please note that removing a basic standard and opening a product standard that refers to this basic standard, will cause the basic standard to be removed from the list of referred basic standards.
After pressing Add the end-user can insert all necessary information.
Please note that the Official name can only be inserted the first time and has to be unique. All fields speak for themselves, except for the File location. In the File location field, it is possible to associate a file to this standard. For example a PDF, DOC or HTML file that describes the standard. RadiMation® will open the file, with the default reader for this file type, when the engineer selects the magnifying glass.
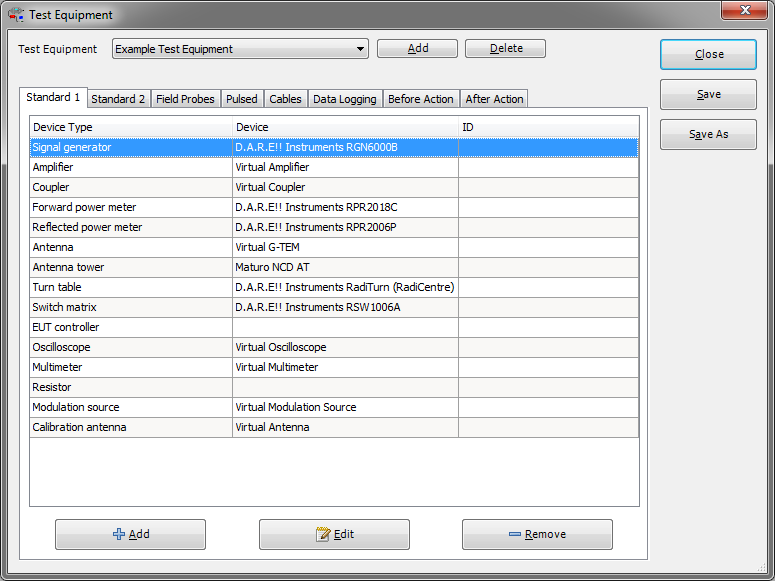
Test equipment list configuration[edit]
The test equipment configuration contains a list of all test equipment, used during a test. From this list, the software knows which device drivers to use to control the test equipment. RadiMation® allows you to configure different test equipment lists for each type of test or even different sets of test equipment for the same kind of tests. (This will be useful if you have, for example, more than one signal generator to perform conducted immunity tests). In the test configuration window, one can select which set of test equipment will be used. During the generation of a calibration file, the software records the test equipment configuration together with the calibration data. When a substitution test is started, the software checks the currently selected equipment (from the selected test equipment list) with the test equipment used during calibration. If the equipment does not match an error message will be displayed.
The error message window will ask you to abort the test or to ignore the error message and continue the test with different test equipment. Of course, to achieve maximum accuracy, one should use the same test equipment during the calibration and during the substitution tests. However, in some circumstances, changing test equipment between calibration and test will not have any influence on test results. This is for example true when a RI substitution list is made using FWD power calibration file. Changing the amplifier won’t change test results as long as the new amplifier covers the required frequency range and can deliver the required output power.
To add, modify or delete test equipment lists, select:
-
 Configuration
-
 Test Equipment
-
-
User configurable device drivers[edit]
RadiMation® allows the user to create its own device drivers for test equipment, which is (not yet) implemented in the standard device driver list.
User configurable device drivers are available for nearly all types of test equipment. However, device drivers for spectrum analysers and measurement receivers can not be made with user configurable device drivers because the complexity (and differences between suppliers) of these devices is too high.
To make your own device driver, open the configuration window:
-
 Configuration
-
 Configuration
-
-
and select the Device drivers tab.
- In the device driver’s menu, select the required device driver type.
- Press the New button.
- Select the driver called Configurable <XXX> (i.e. if you want to make a signal generator device driver you would select the Configurable signal generator device driver).
- Enter a description for the device driver (for example the type number of the generator) and press Ok.
- The name of the device driver will be added in the available device driver’s list.
- Select the new device driver from the available device device’s list.
- Press the Edit button.
- A configuration screen for the device driver will appear. All required control commands for the device must be entered. Refer to the operating manual of the equipment for these codes.
After all codes are entered, the device driver is ready for use.
The custom-made device driver can be used as any other device driver by selecting the driver in the Equipment list.
| Note: | Passive equipment such as antenna’s, current probes, cables etc. do also need a device driver. The reason for this is that RadiMation® has to know a number of parameters of these devices. Among others the following information is relevant:
|
EUT files[edit]
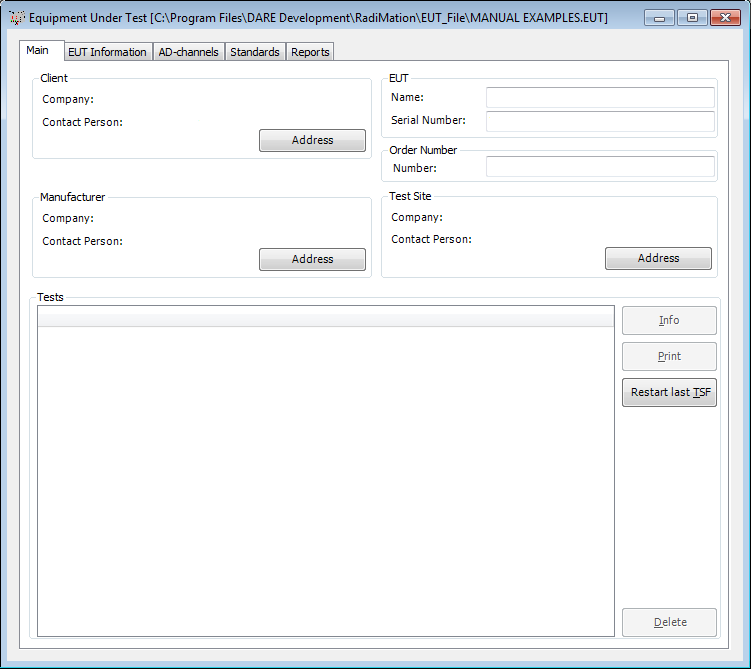
During the development of RadiMation® it became clear to us that not the EMC tests itself, but the Equipment Under Test (EUT) plays a central role for EMC automation software.
Because of this, in contradiction to most other software packages, in the RadiMation® software the EUT must be defined prior to any test. Defining an EUT consists of “Creating a new EUT file”, specifying EUT information, client information and producer information.
After an EUT has been defined, a test window can be opened and a test can be started. Because of this approach, different types of tests can be performed from the same EUT window which all test data for the EUT will be started in the same EUT file.
All collected test data will be stored under the same EUT file name (see also “Viewing test data”). When, at a later time, tests on the same EUT are to be performed, the old EUT file can be opened, and the new test results can be stored under the same EUT window.
Creating a new EUT file[edit]
When a new device must be tested, first a new EUT file must be created. This can be done from the main window, through the:
-
 File
File
-
 New
New
-
 EUT
EUT
-
-
-
When you open a New EUT file, the software will ask you to specify the file name for this new EUT file.
All test data for this EUT will be stored under this EUT file name.
Opening an existing EUT file[edit]
When one wants to perform tests on an EUT which has been tested in the past, the existing EUT file can be opened through the:
-
 File
File
-
 Open
Open
-
 EUT
EUT
-
-
-
The new test data will be appended to the old test data in the same EUT file.
Through this method, different types of tests (R.I., C.I., R.E., C.E. and pulsed immunity tests) can be performed, using different sets of test equipment, while the test results will be stored in the same EUT file.
When a network is used to store data, tests can be performed at different locations as well.
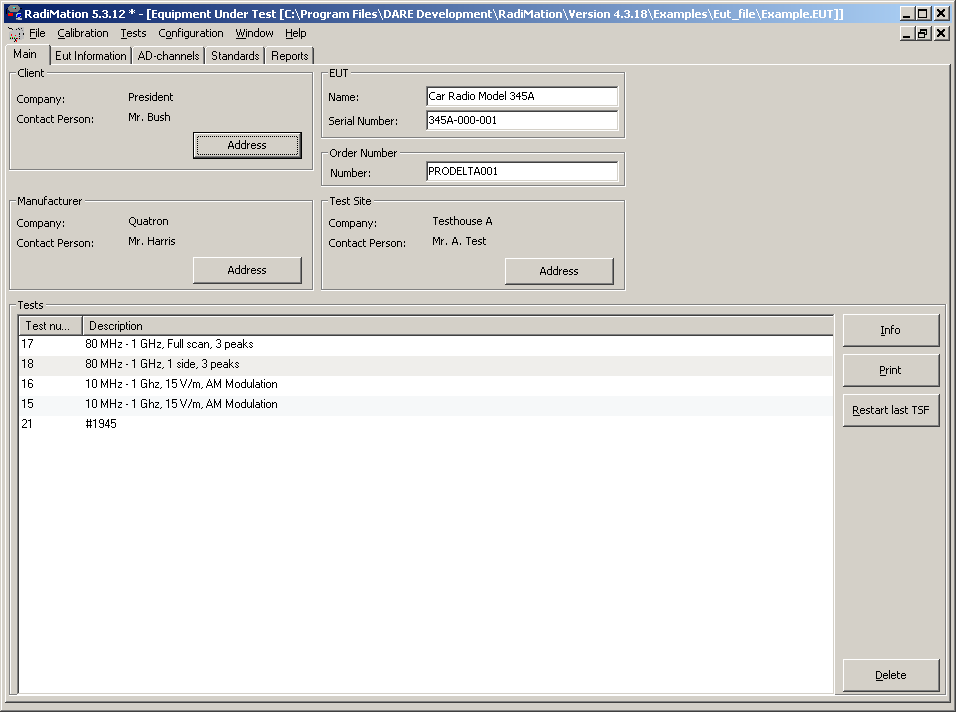
After performing several test you wil have window like the one showed below
The first column displays the testnumber. The second column displays the description of the test. The third column shows the notes you inserted. The three columns can be sorted one at a time. This can be done by pressing the desired column header. If you wish to sort on testnumbers, press the first column header. If you wish to sort by note press the third column header. Pressing a column header twice will reverse the sorting order. For example the first time you press the third column header the notes will be sorted ascending, the second time you press the header the notes will be sorted descending. This pertains to all the columns.
Cable information of the EUT[edit]
RadiMation® is capable of storing a lot of EUT related information. One of these items is the cables connected to the EUT. You can specify them by selecting the EUT Information tab in the EUT window. On the bottom of the window you will find a control looking like the one below.
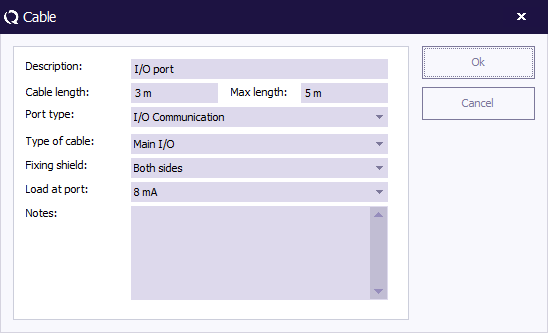
You can specify every cable of the EUT, pressing Add or Edit will popup the following window:
In this window the information of the cable will be displayed. You can edit every item, the first item also has some default items that can be selected. Pressing Ok will confirm the changes. Pressing Cancel will discard the changes made.
Limit line files[edit]
Limit line files are used during Radiated and Conducted emission tests. The operator can define limit line files in accordance to the applicable standard and select them when starting an emission test.
Creating limit lines[edit]
To create a limit line file, select
-
 File
File
-
 New
New
-
 Limit line
-
-
-
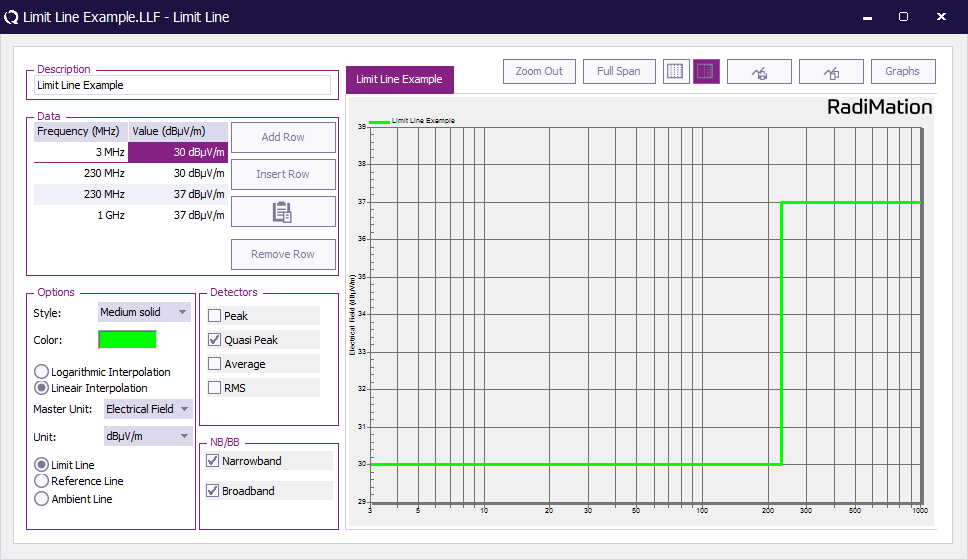
The window below will be displayed:
The user can enter a file description to the limit line in the Description field.
Entering data points[edit]
To enter data point, press the Insert button. A new line will appear and you can enter frequency and level. When entering data points, the limit line will be drawn directly in the graph. This makes it easy to check if the limit line is entered correctly.
When a data point in incorrect, it can be removed by selecting the data point and pressing the Remove button.
| Clicking on the coloured box behind the Color selection box will change the line color. The selected line colour will be used during emission tests. |
| In between the specified frequency points, the correct value of the limit line will be calculated by using a logarithmic interpolation over the frequency axis. This choice is depending on the requirements of the applicable standard. |
| In between the specified frequency points, the correct value of the limit line will be calculated by using a linear interpolation over the frequency axis. This choice is depending on the requirements of the applicable standard. |
| During emission tests, RadiMation® will check if the measured emissions are below the limit line(s). To perform this check in the correct way, the software must know for which detector(s) the limit line is valid. In the Detectors menu the operator can select for which detector(s) the limit line is valid. |
Saving limit line files[edit]
To save the new limit line file please select:
-
 File
File
-
 Save Limit line
-
-
RadiMation® will prompt you for a filename for the new limit line file. This can be the same or a different filename as the limit line Description field.
Correction files[edit]
Correction files can be used to correct the frequency response of cables, generators, clamps, antenna’s, couplers etc. When the frequency response of a device is known, the operator can create a new correction file and assign it to the device.
Creating correction files[edit]
To create a correction file, select
-
 File
File
-
 New
New
-
 Correction
-
-
-
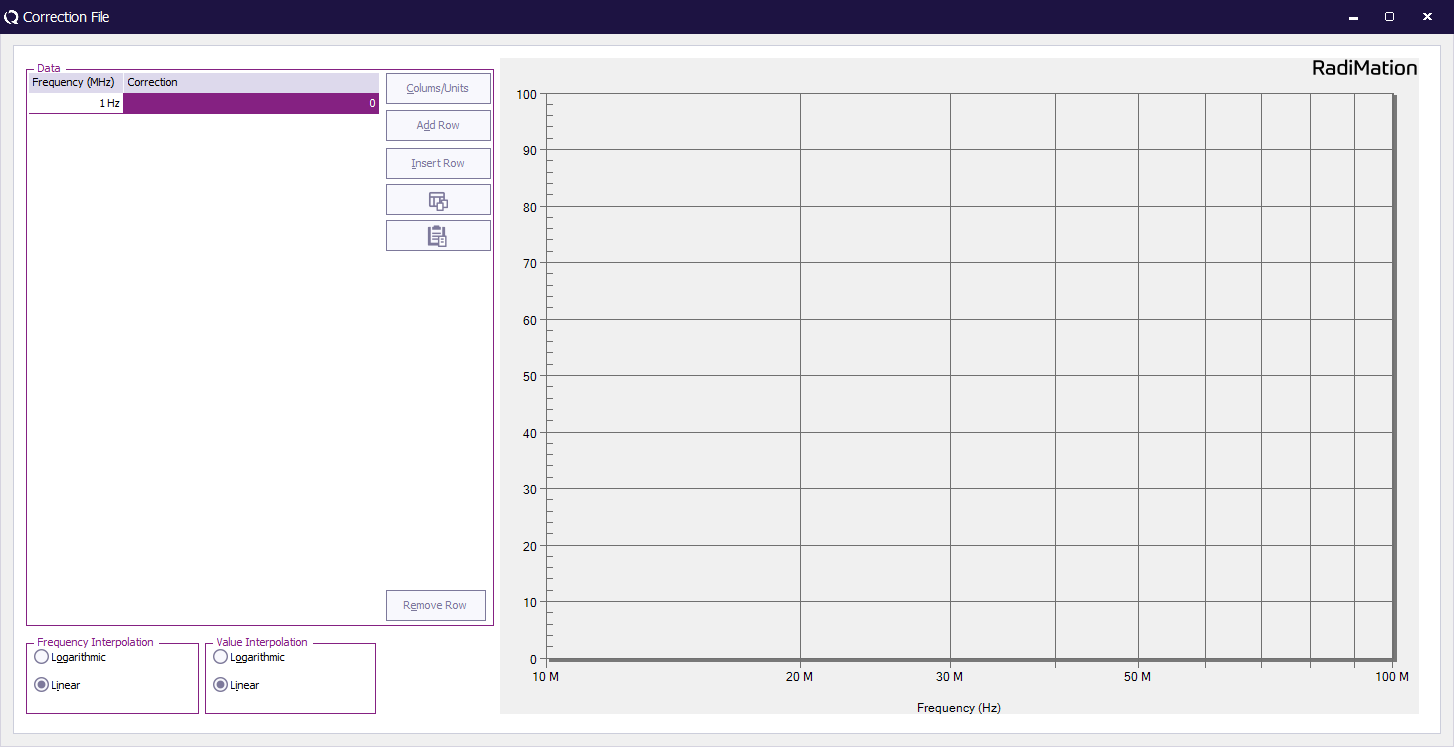
The window below will be displayed:
The first step is to define the columns in the table by pushing the Columns/Units button. A selection box appears and columns can be added or removed. Based on the use of the correction file the proper columns should be selected. For example an amplifier correction file will have two columns one frequency column and one power column. In the case of a radiated emission test three columns are required specifying frequency, correction, angle and height.
| To enter data points, press the Add Row button. A new line will appear and you can enter frequency and level. |
| When a data point is incorrect, it can be removed by selecting the data point and pressing the Remove Row button. |
| In between the specified frequency points, the correct value of the limit line will be calculated by using a logarithmic interpolation over the frequency axis. This choice is depending on the requirements of the applicable standard. |
| In between the specified frequency points, the correct value of the limit line will be calculated by using a linear interpolation over the frequency axis. This choice is depending on the requirements of the applicable standard. |
Saving correction files[edit]
To save the new correction file please select:
-
 File
File
-
 Save correction
-
-
RadiMation® will prompt you to enter a filename for the correction file.
Using Test Setup Files (TSF)[edit]
RadiMation® is a modular integrated test software package, which, in its full configuration, can perform full automatic EMC tests. The software package includes Radiated immunity tests [R.I.], Conducted immunity tests [C.I.] as well as Radiated emission tests [R.E.] and Conducted emission tests [C.E.]. (See also "software overview").
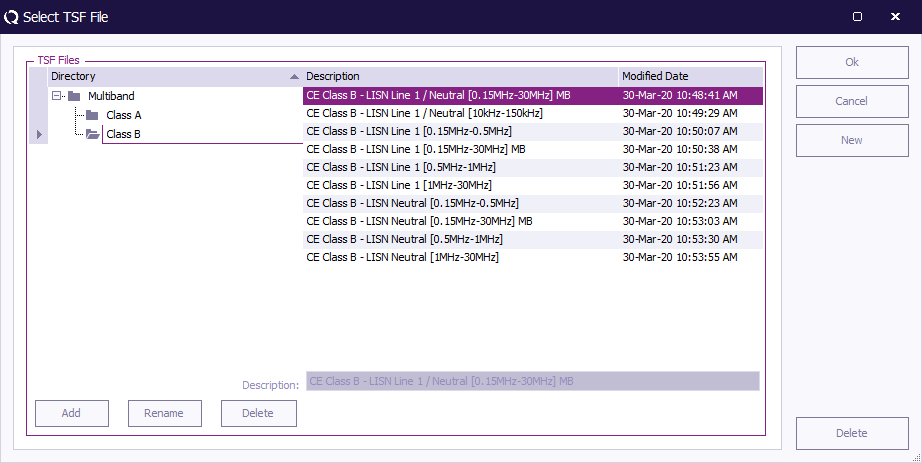
For each kind of test, the test configuration data (start/stop frequency, test level, dwell time etc.) can be saved in a Test Configuration File (*.TSF). Separate from the test configuration data, the TSF file also stores the calibration file and test site information. The description of the TSF file can be 40 characters max. When the same kind of test must be performed, one can simply load the TSF file and start the test.
In order to organise the different TSF files RadiMation® enables the user to create a directory tree thus enabling the user to store the TSF files in a structured manner.
A more sophisticated use of TSF files can be found during sequence testing. In a sequence, different TSF files (even from different types of tests) can be placed after each other, and started without the intervention of a test engineer (See also “Sequence testing”)
Viewing test data[edit]
RadiMation® stores all test results for the corresponding EUT in the EUT file. To view test data, open the corresponding EUT file through the File, Open, EUT pull down menu.
The EUT window will show a list of all performed tests for the selected EUT. To view the extended data from a single test, select the test from the list and press the view button. The following data will be displayed:
- Time and date of the test.
- Equipment used during the test (Including serial numbers).
- Test engineer.
- Test configuration data.
- All graphs of AD channels used Field graphs (If used).
- Current graph (If used).
- Notes.
- Signal generator level graph (Used for fault diagnoses only).
- Forward power level graph (If applicable).
- Reflected power level graph (If applicable).
- Net power level graph (If applicable).
- Ambient information:
- Temperature graph (If used).
- Pressure graph (If used).
- Relative humidity graph (If used).
- Calibration file used during the test (If applicable).
In the view mode, the Note field can be edited, changed or deleted.
Printing test data[edit]
Test data can be printed in several different ways:
- When only a part of the test data needs to be printed, select the desired test, then select view and select the graph you want to print. The graph will be displayed on the screen. Above the graph you will find a print button. This print button will only print the current selected graph.
- From the list of performed tests, a single test can be selected. When all data of this test must be printed, simply press the print button at the right side of the list.
- When you want to print the data of more than one test, select the tests to print while holding down the shift button. All selected tests will be printed when the print button is pressed.
| Warning: | All print jobs from RadiMation® will be printed on the default Windows printer. To use another printer, please change the default printer in your Windows environment. |
Report generation[edit]
RadiMation® can also use the information of the performed tests, to automatically generate a report, or export all the data to Microsoft Excel. The Report Generator and Excel Exporter can be used to perfrom these tasks. See Chapter 13 for a detailed description.
Ambient information[edit]
During EMC tests, ambient temperature, air pressure and relative humidity can influence test accuracy. For this reason, most EMC standards at least define the temperature range in which EMC tests must be performed.
Each test configuration menu allows you to enter a value for the temperature, pressure and relative humidity at the start of the test. However, a more sophisticated method can be used as a well. If, under the configuration, test site pull down menu a weather station is selected under the test site used, the temperature, pressure and relative humidity will be measured for each test point. The collected data will be stored together with the other test data and can be displayed in the three graphs as a function of the test frequency (see also “viewing test data”).
