Chapter 14
Configuration[edit]
In the main menu, under the configuration pull down menu, a number of standard configurations can be made with regards to the engineers, test equipment, etc. The selected and/or entered configurations will be used as the default settings for future use.
The next paragraphs will explain the required configurations.
| Warning: | To prevent unauthorised individuals from changing the system configurations, a password protection can be used. The password is activated by default with the password: “RadiMation®”. This password protection can be switched off, changed and configured under:
|
Engineers[edit]
For each test, the name and password settings of the test engineer performing the current test can be entered.
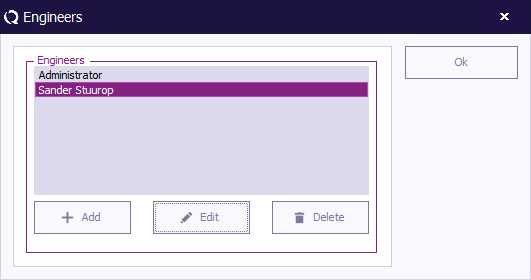
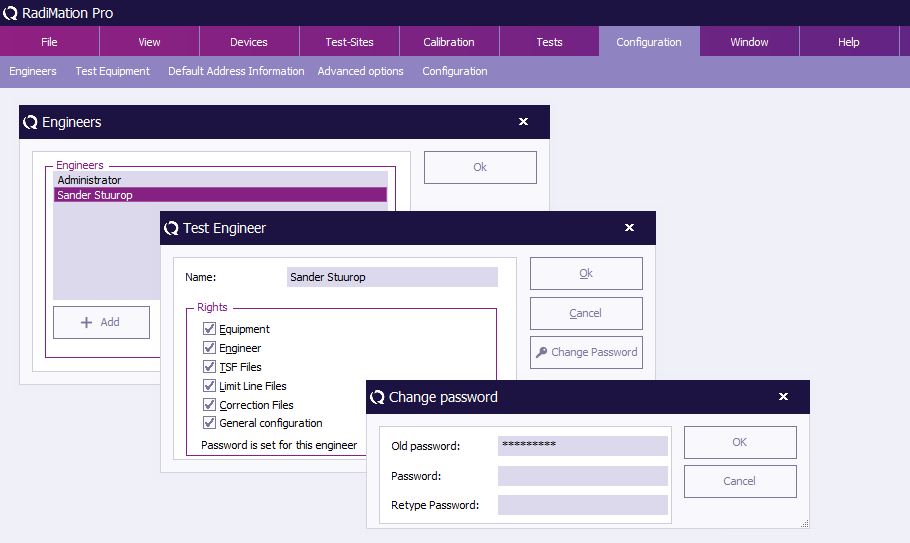
To add, delete or edit (the names and settings of) the test engineers, go to the 'Engineers' window in the 'Configuration' tab.
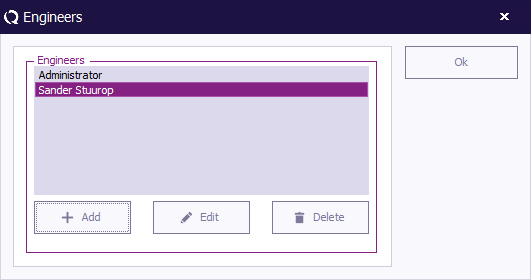
The Engineers window will open and show the current configured list of engineers. To leave the 'Engineers' window, click 'OK' .
Test engineer settings[edit]
Adding an engineer[edit]
To add a new test engineer to the configuration, click 'Add' (in the 'Engineers' window).
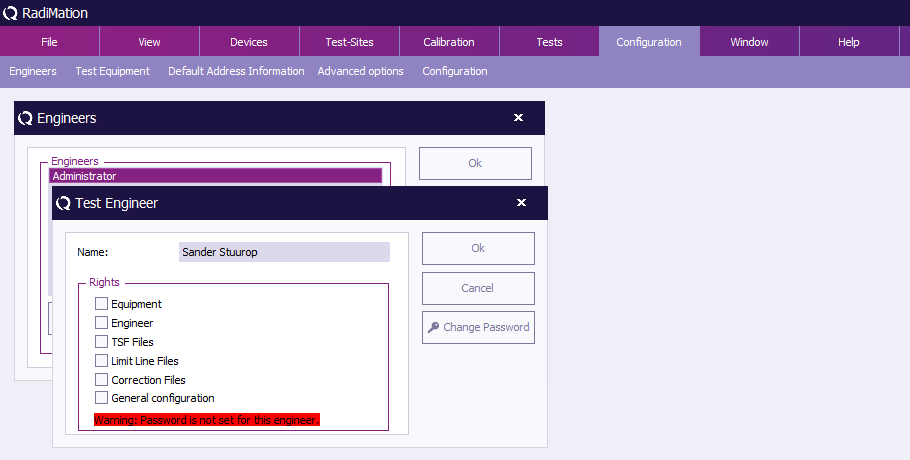
Enter the name and set the rights of the new engineer, then click 'OK' . You will be returned to the 'Engineers' window.
The new engineer will not have a protection password (yet), this can be enabled by clicking 'Change Password' . Please read the paragraph 'Password protection' (located further down) for more information.
Deleting an engineer[edit]
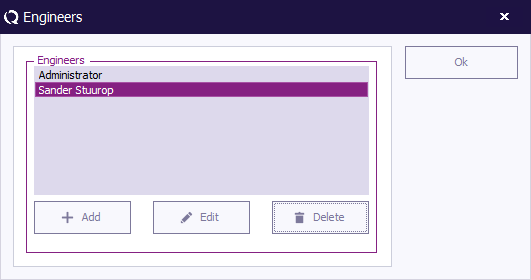
To delete a test engineer from the configuration, select the engineer and click 'Delete' (in the 'Engineers' window).
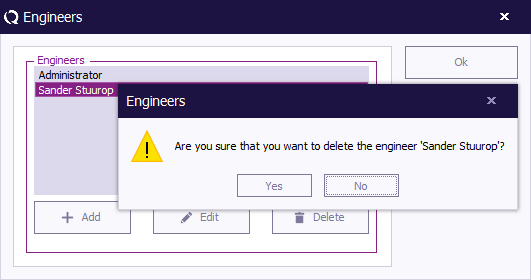
To confirm that you want to delete the engineer from the configuration list, click 'Yes' .
If you do not want to delete this engineer from the list, click 'No' or 'Cancel' . You will be returned to the 'Engineers' window.
Editing engineer settings[edit]
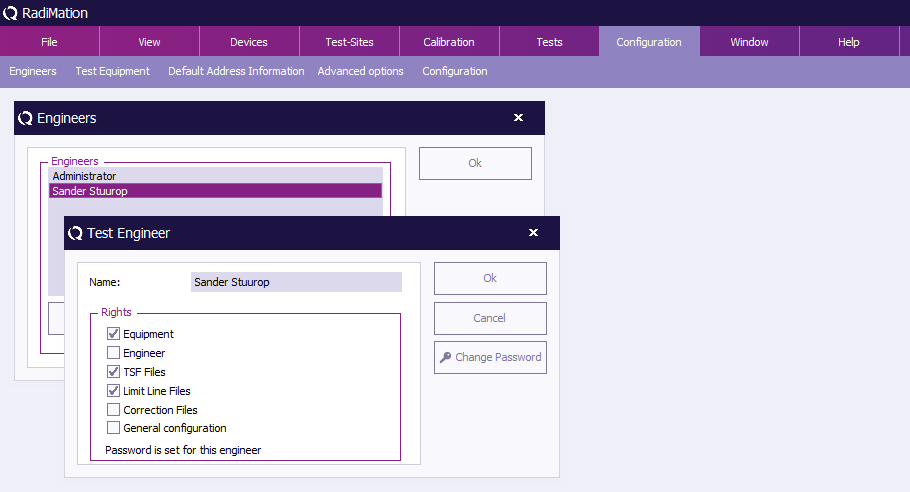
To edit the name, rights and/or password of an engineer in the configuration, select the engineer and click 'Edit' (in the 'Engineers' window).
Make the desired changes in the 'Test Engineer' window and click 'OK' .
If you want to undo or cancel your changes, click 'Cancel' . You will be returned to the 'Engineers' window.
Password protection[edit]
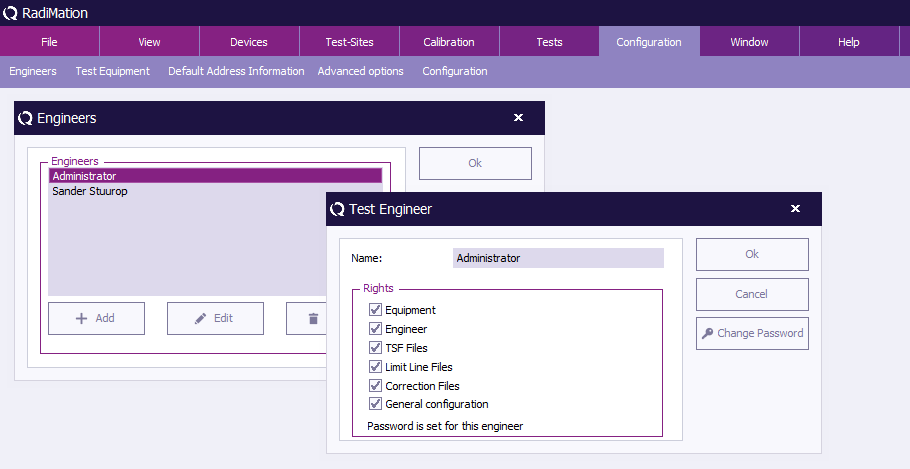
RadiMation® allows you to protect a number of configurations with a password. This password can be enabled, disabled or changed in the 'Test Engineer' window.
- The password is standard turned on for the default used test engineer 'Administrator'.
- The default password is Radimation.
The current password setting for the selected engineer is displayed at the bottom of this window. This will indicate whether a password has been 'set' or 'not set'.
Rights[edit]
The password protection can be enabled or disabled for the following items.
| Prevents unauthorized changes to test equipment configuration. |
| Prevents unauthorized changes to test engineers configuration. |
| Prevents unauthorized changes to Test Setup Files (TSF) files. |
| Prevents unauthorized changes to Limit Line Files (LLF) files. |
| Prevents unauthorized changes to correction files. |
| Prevents unauthorized changes to the general configuration. |
Change password[edit]
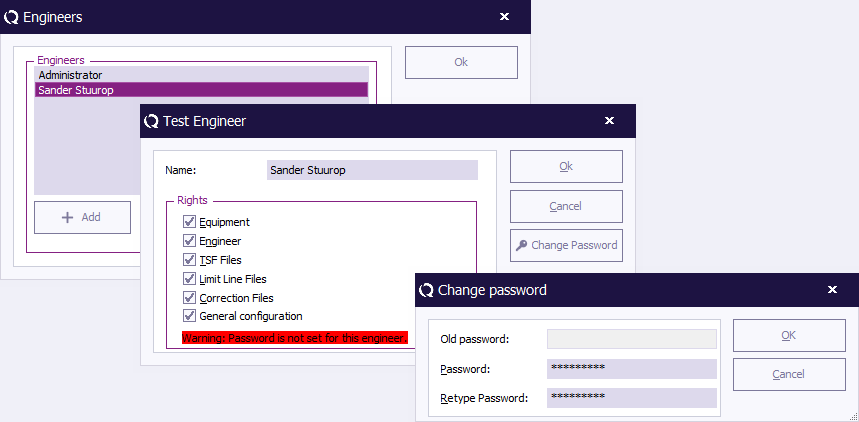
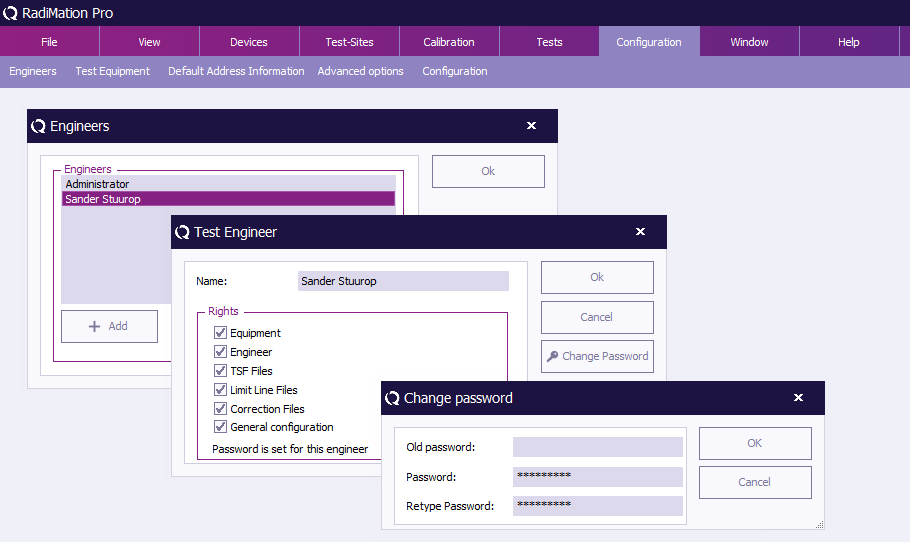
To enable, disable or change the password, click 'Change Password' (in the 'Test Engineer' window).
To change the password, enter the old password and the new password (twice), then click 'OK' . You will be returned to the 'Test Engineer' window.
To disable the password, enter the old password and leave the other two fields empty, then click 'OK' . You will be returned to the 'Test Engineer' window.
(The password indication will change to: “Warning: Password is not set for this engineer.”)
To enable the password, enter the new password (twice), then click 'OK' . You will be returned to the 'Test Engineer' window.
(The password indication will change to: “Password is set for this engineer.”)
To leave the 'Engineers' window, click 'OK' .
Test Equipment[edit]
The test equipment configuration contains a list of all the test equipment used during a test. The software uses this list to determine which device drivers should be used to control the test equipment. RadiMation® allows you to configure specific test equipment lists for each type of test as well as different test equipment lists for the same type of tests. (This can be useful if you have, for example, more than one signal generator to perform conducted immunity tests with).
In the 'Test Equipment' window a set of test equipment will be selected. When a calibration file is generated, RadiMation® will record this test equipment configuration together with the calibration data. When a substitution test is started, the test equipment selected for the substitution test will be compared with the test equipment used (as recorded) during the calibration test. If the equipment does not match, an error message will be displayed.
The error message window will ask you to abort the test or to ignore the error message and continue the test with different test equipment. To achieve maximum accuracy, the same test equipment should be used (whenever possible) during both the calibration and the substitution tests.
To add, modify or delete test equipment lists, go to the 'Test Equipment' window in the 'Configuration' tab.
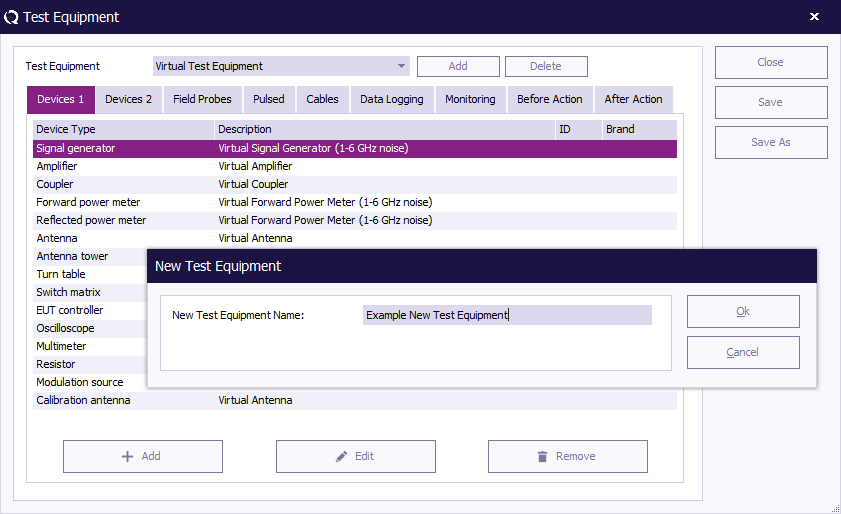
The 'Test Equipment' window will open and show the current configured list of test equipment. To leave the 'Test Equipment' window, click 'Close' .
Adding test equipment[edit]
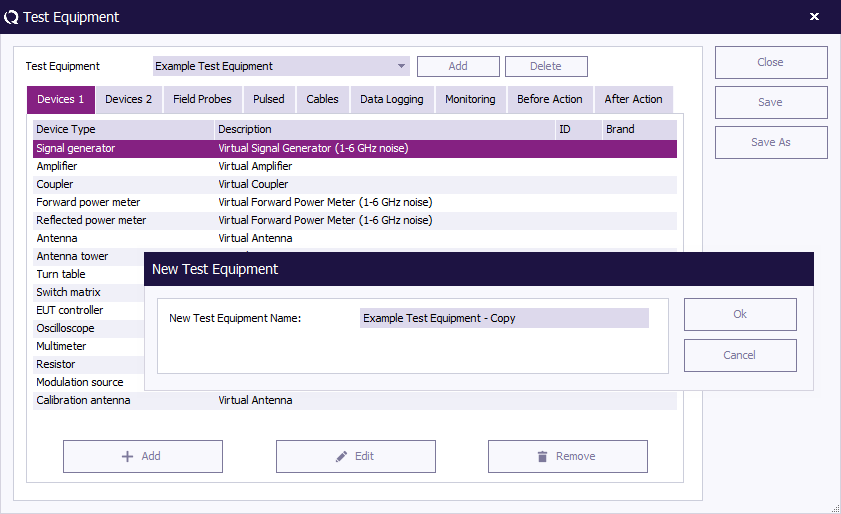
To add a (set of) test equipment to the configuration, click the 'Add' button in the top of the window. The 'New Test Equipment' window will appear.
Enter a name for the new test equipment in the 'New Test Equipment' window (e.g. Example Test Equipment).
Click 'OK' to confirm the name of the new test equipment, or click 'Cancel' to cancel the new name. You will be returned to the 'Test Equipment' window.
Deleting test equipment[edit]
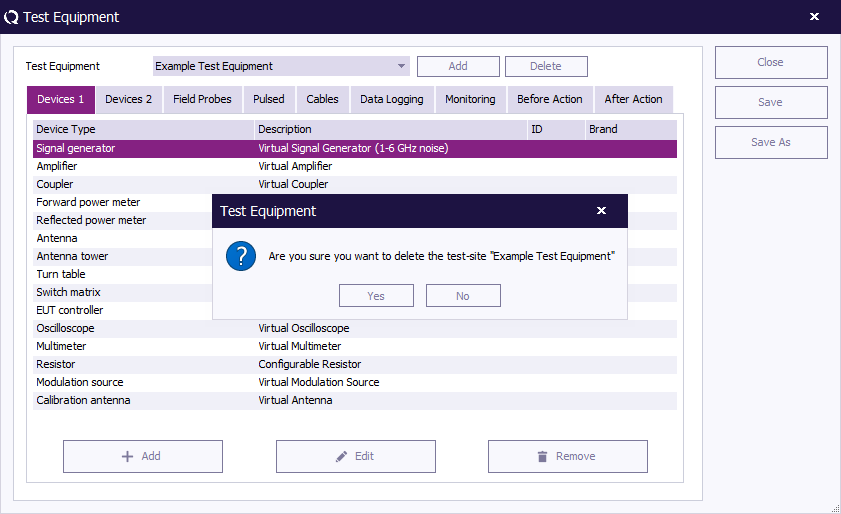
To delete a (set of) test equipment from the configuration, select the Test Equipment from the pull down menu and click the 'Delete' button in the top of the window. A confirmation window will appear.
Click 'Yes' to remove the device from the list, click 'Cancel' to cancel. You will be returned to the 'Test Equipment' window.
Editing test equipment[edit]
To configure the equipment of a test, select the desired Test Equipment from the pull down menu (e.g. Example Test Equipment).
Specify the equipment for the test by adding, editing and/or removing devices under the designated tabs. (This is described further below.)
Devices 1 & 2[edit]
Under the tabs 'Devices 1' and 'Devices 2' the devices of the (selected) test equipment set can be added, edited and/or removed.
Adding devices[edit]
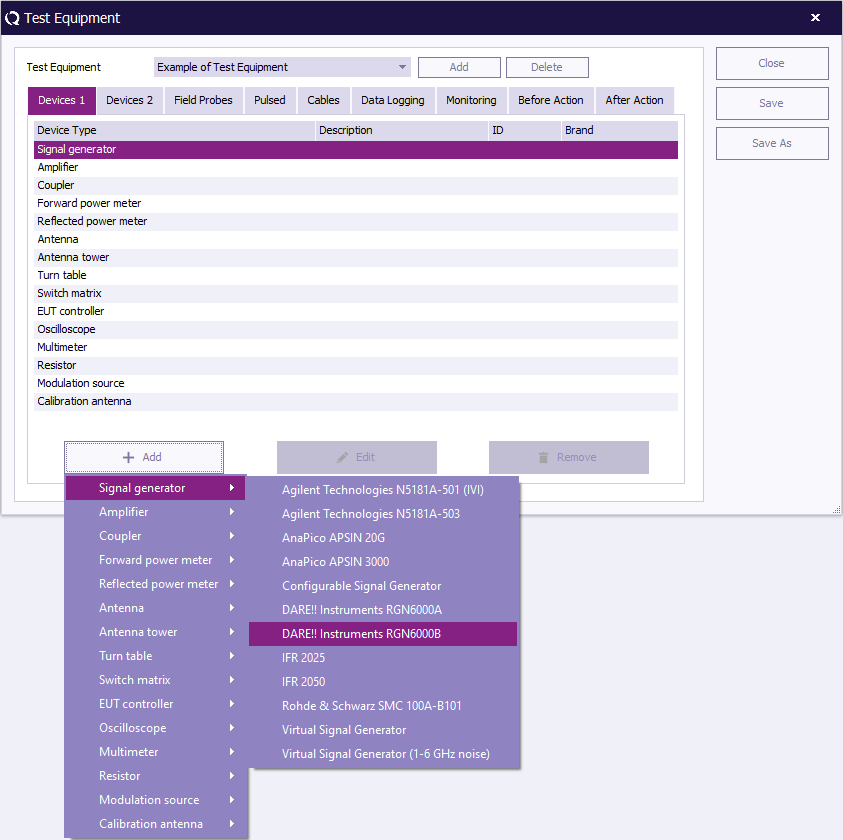
To add a device, click 'Add' (at the bottom left of the window), a menu will open below the button to show the available devices for each Device Type.
Select and click on the desired device. The device will then appear in the equipment overview.
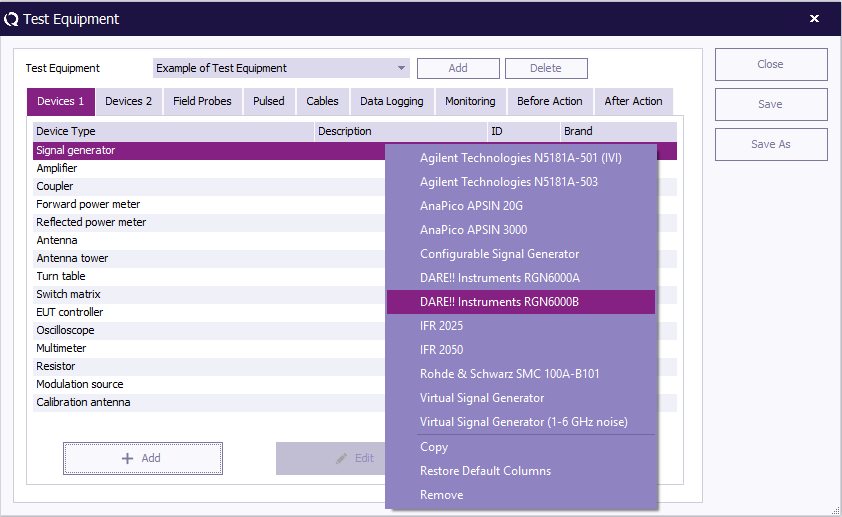
Another way to add a device is to click the desired Device Type in the 'Test Equipment' overview.
A menu will open (at your mouse point) with the available devices for that Device Type.
Select and click on the desired device. The device will then appear in the equipment overview.
Editing devices[edit]
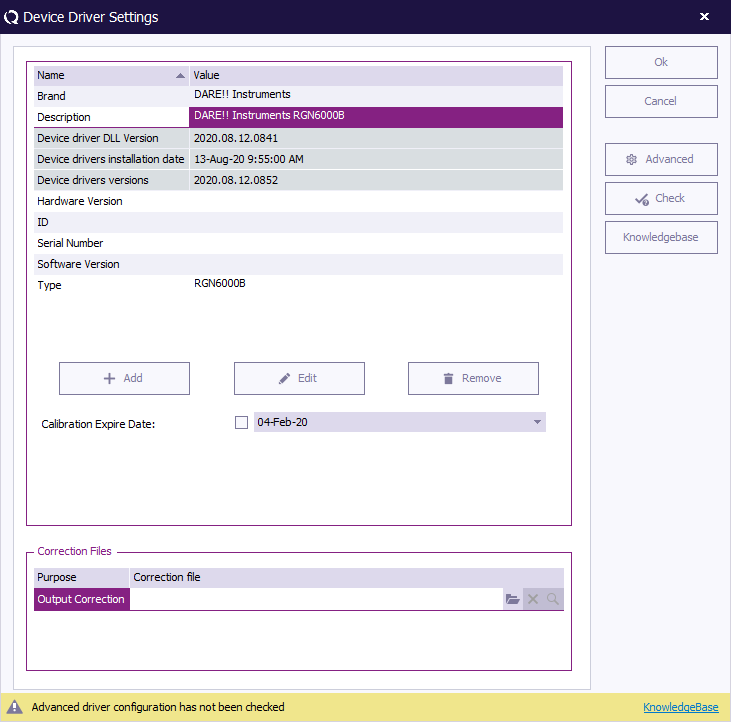
To edit a device, select the device and click 'Edit' . The Device Driver Settings window will appear.
Edit the settings as desired. To confirm your changes, click 'OK' , to cancel your changes, click 'Cancel' . You will be returned to the 'Test Equipment' window.
Removing devices[edit]
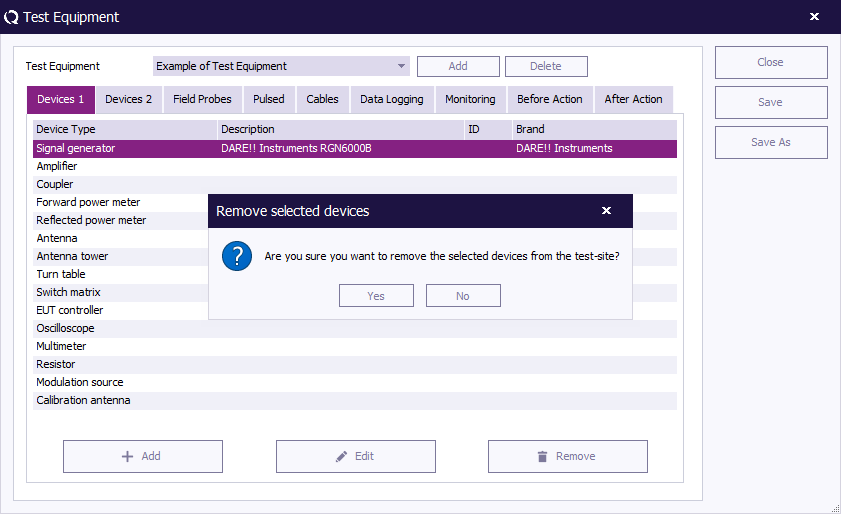
To remove a device, select the device and click 'Remove' . A confirmation window will appear.
Click 'Yes' to remove the device from the list, click 'Cancel' to cancel. You will be returned to the 'Test Equipment' window.
Saving test equipment[edit]
To save the changes made in the test equipment list, click 'Save' (you will remain in the 'Test Equipment' window).
Save As[edit]
To save the test equipment list under a new name, click 'Save As' .
Enter a new name for the test equipment in the 'New Test Equipment' window (e.g. Example Test Equipment 2).
Click 'OK' to confirm the name of the new test equipment, or click 'Cancel' to cancel the new name. You will be returned to the 'Test Equipment' window.
To close the 'Test Equipment' window, click 'Close' .
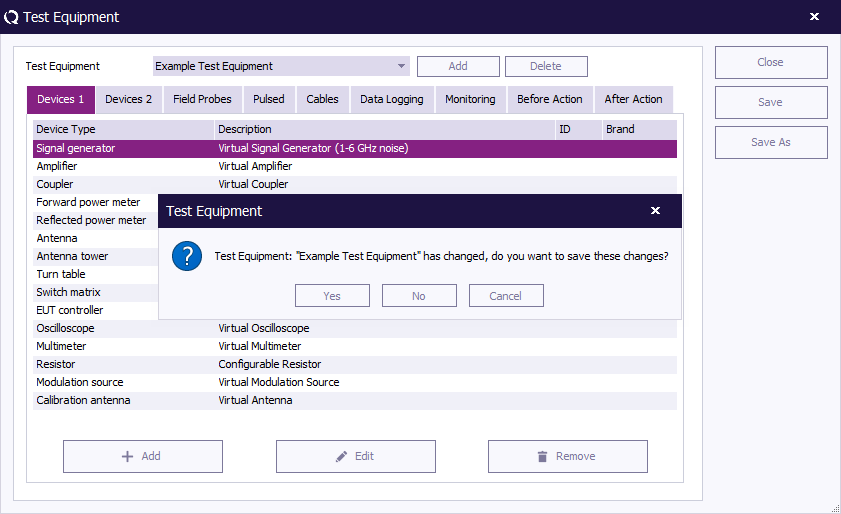
If you have not saved the changes to the test equipment list, a dedicated window will appear asking you to save these changes.
To save the changes, click 'Yes' , to not save the changes, click 'No' . The 'Test Equipment' window will close.
Default address information configuration[edit]
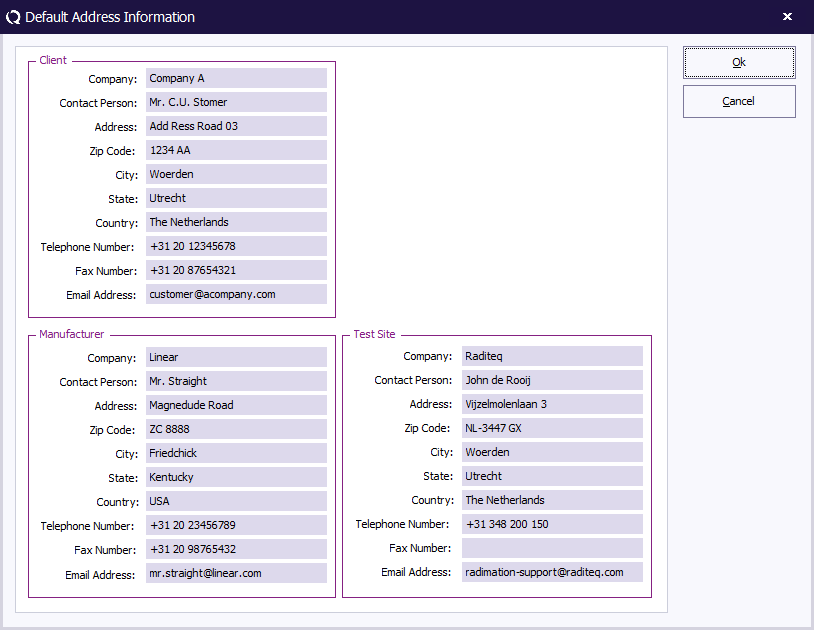
When a new EUT file is made the name and address information of the producer, test house and client can be entered separately. In many situations one or more of these will be the same for every EUT (i.e.: when a test house owns the software, the test house data will always be the same). In order to prevent retyping of often-used information RadiMation® allows entering the default address information for:
- The default client
- The default manufacturer
- The default test site
Data entered under “default address information”, will automatically be entered in the EUT window and must therefore only be entered once.
To add, modify or delete the default address information, select the:
-
 Configuration
-
 Default address information
-
-
Default Units[edit]
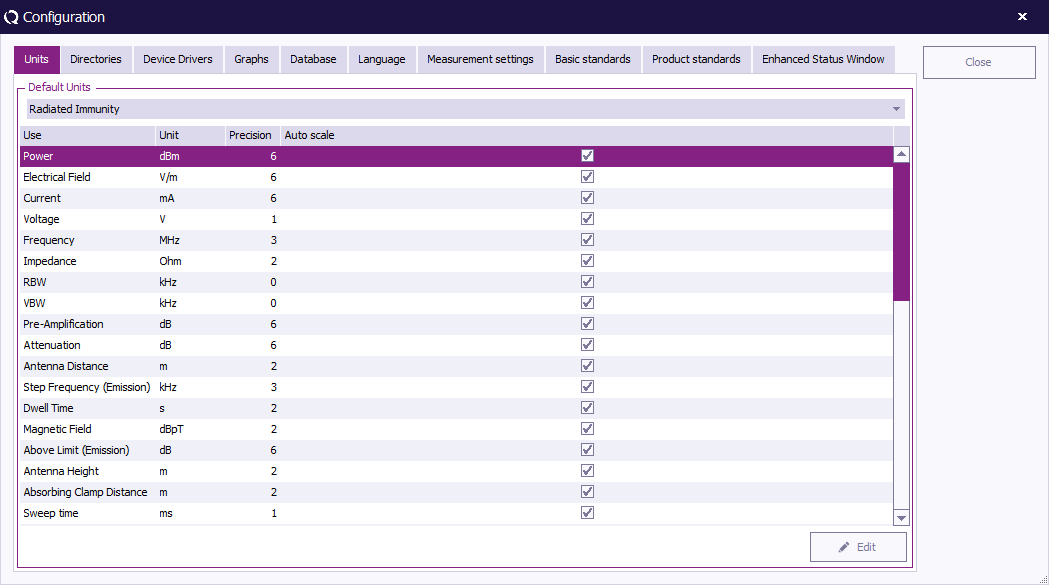
RadiMation® allows the user to define the default units. These units are used throughout the package although they can be changed at any time during measurements and viewing.
The units for the following parameters can be defined:
- Power : dBuW, dBm, dBmW, dBW, uW, mW and W
- Field Strength : dBuV/m, dBmV/m, dBV/m, uV/m, mV/m and V/m
- Voltage : dBuVrms, dBmVrms, dBVrms, uVrms, mVrms and Vrms
- Current : dBuA, dBmA, dBA, uA, mA and A
- Emission : dBuV, dBmv, dBV, V, W, dBuV/m, dBmV/m and V/m
- And many more
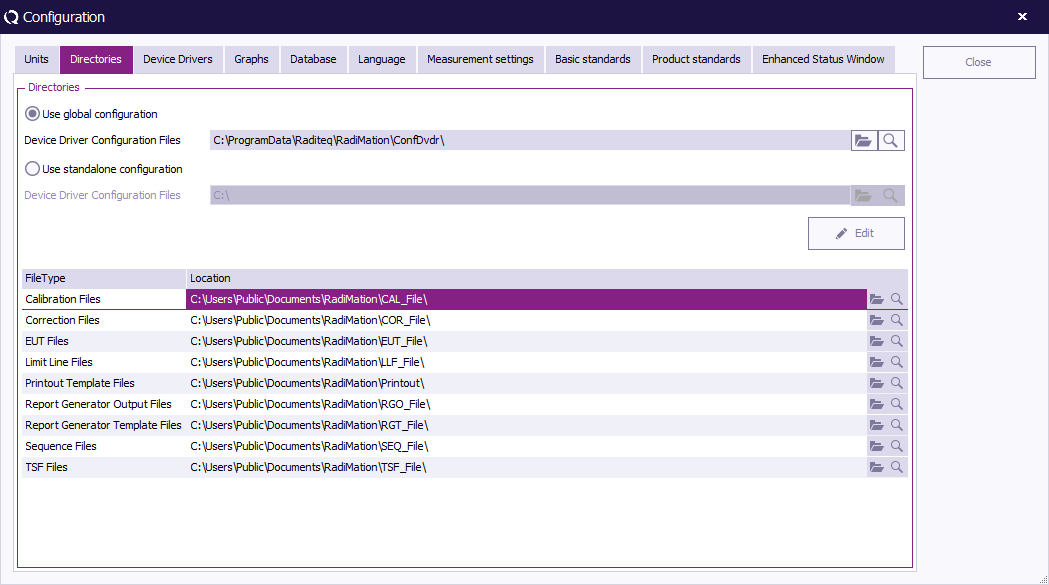
Default directories configuration[edit]
The RadiMation® software can use different directories to store test data (*.EUT files). The following file types are used:
- Equipment Under Test Data files (*.EUT files),
- Correction files (*.COR files)
- Calibration files (*.CAL files),
- Configuration files (*.TSF files),
- Sequence files (*.SEQ files)
- Limit line files (*.LLF files).
Under "RadiMation® file types and locations" the different file types are described. For each data type the default path name can be entered through the configuration, directories pull down menu.
The path name can be either a local directory or a directory on a network drive. The second makes it possible to store EUT data central on a computer network.
To modify the path name select the:
-
 Configuration
-
 Configuration
-
 Directories
-
-
-
Device driver configuration[edit]
Device drivers are used to let your software know which equipment has to be used and controlled during EMC tests.
In RadiMation®, the device drivers must be configured to customer requirements once. During the configuration of the device driver, information like the IEEE address or RS232 COM-port has to be entered.
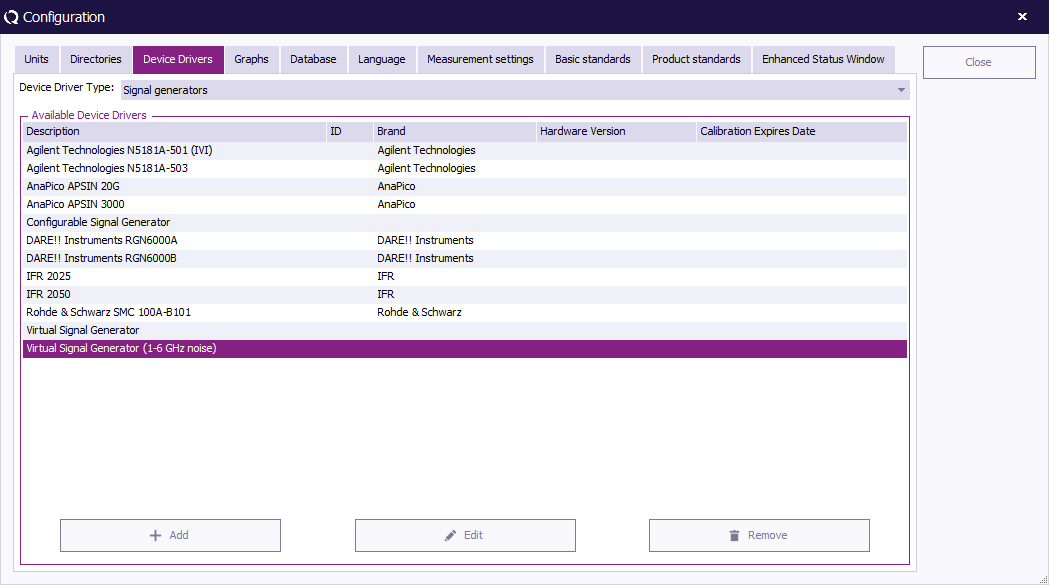
You can configure a device in the configuration screen. You can access the configuration screen by selecting:
-
 Configuration
-
 Configuration
-
 Device Drivers
-
-
-
You can select the type of device you want in the box that is situated top right. The big window will display all currently configured device drivers, like in the picture all configured Signal Generators.
| Different types of devices are available in RadiMation®. Only the created device drivers of the type that is selected for Device Driver Type will be shown in the list |
| Shows a list of all the available device drivers for the selected Device Driver Type |
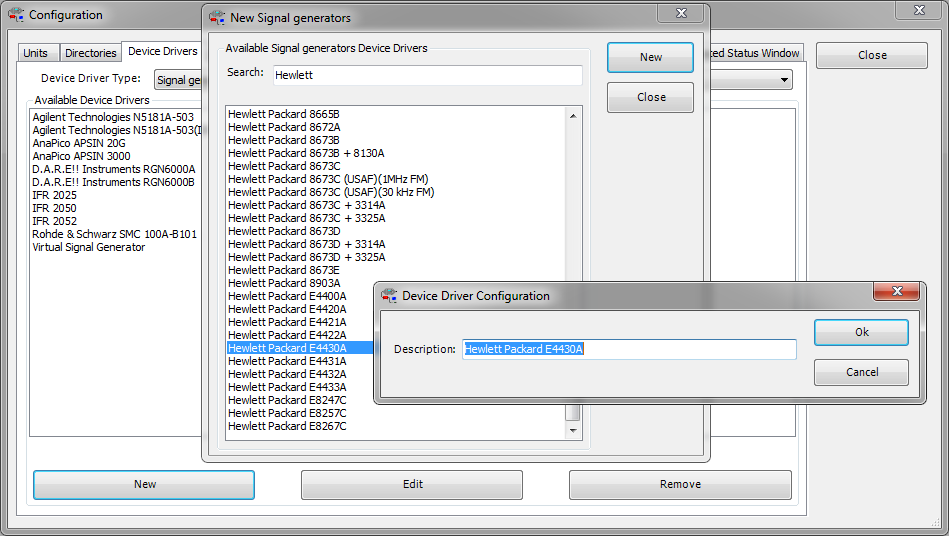
| Creates a new RadiMation® device driver for a specific device. It is only possible to create a new device driver for the selected Device Driver Type. |
| To edit the configuration of a device, select the device in the list and press Edit. This allows to change the generic set of device driver settings of the selected device driver from the list of Available Device Drivers. See Chapter 14: Device Driver settings for a detailed description of these settings. |
| Removes the configuration of the selected device driver from the list of Available Device Drivers. Please note that this driver will then not be available anymore in the test sites. Even if a new device driver is created with the exact same name, it will not automatically reappear in the test sites. |
When the New button is pressed, a list of all supported device drivers will be shown.
The required device driver can be selected from this list. The new device driver will then be created when New button is pressed. At that moment it is possible to use the default name of the device driver, or to change it to another (eg. more specific) name.
If you do not whis to create a new device driver press Close.
Device Driver settings[edit]
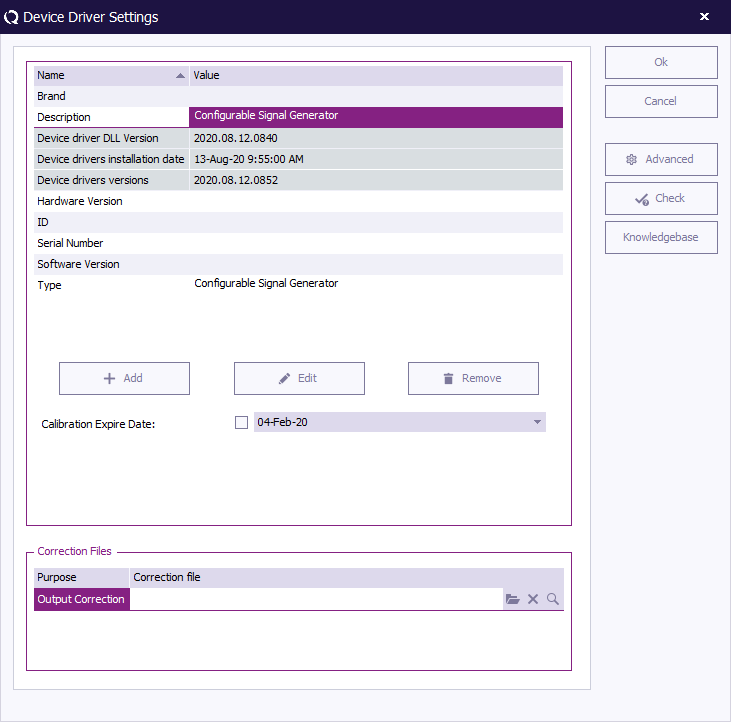
All device drivers have a generic set of settings that can be configured for every device driver. The picture below shows an example.
| In the software version the brand of the device can be changed/viewed. This brand can be used in the report generator. |
| In the description window the description of the device can be changed/viewed. The description can be used in the report generator. Changing the description does not result in losing the device in the test sites. the description is automatically updated in test site. When generating a report with a test prior to the change the old description is inserted. |
| In the brand window the brand of the device can be changed/viewed. This brand can be used in the report generator. |
| In the hardware version the brand of the device can be changed/viewed. This brand can be used in the report generator. |
| In the brand window the brand of the device can be changed/viewed. This brand can be used in the report generator. |
| In the type window the brand of the device can be changed/viewed. This type can be used in the report generator. |
| Shows the exact version of the DLL in which the device driver is contained. This is an unique identifier that specifies the version of the device driver. The contents of this cell cannot be changed |
| In the ID window the internally used ID of the device can be changed/viewed. This ID can be used in the report generator. The main function of this window is to link your measurement to your devices for easier reproduction. |
| Shows the date and time at which the last update of the device drivers has been installed. The contents of this cell cannot be changed |
| Shows the version number of the last installed device drivers update. The contents of this cell cannot be changed |
| The Add button can be used to add additional information items to the general device driver settings. The additional items will be shown in the list. Additional information items can for example be used to note the storage location, the location of the user manual or something else. |
| When the Edit button is pressed, when an information item is selected, it is possible to change the value of the information item. Information items that cannot be modified, are not allowed to be edited. |
| When the Remove button is pressed, the selected information item will be removed from the list. Only custom information items can be removed. Fixed information items, like described above, cannot be removed. |
| When the Zero interval is activated, it is possible to specify a time period in minutes, in which a device does not need to be rezeroed. For accurate measurements it is necessary that Power Meters and Field Sensors are zero-ed. A zero operation however generally takes several seconds to be completed, and it may be valid for a few hours. To prevent that a device is rezeroed during each test initialization, it is possible to set a zero interval in minutes. When a test is initialized and the device is already zeroed within the specified zero interval, no zero will be performed at that time. Specifying and activating the zero interval, can be a large reduction of the time that is needed to initialize each test.
This setting is only available for powermeter and field strength sensor devices. |
| This field can be set to the date on which the device needs to be re-calibrated. Depending upon the setting in the configuration window RadiMation® will use this date, to give warnings/notifications of the recalibration. When you press the control a small window will appear, allowing you to select the new date. |
| Pressing Advanced opens the advanced menu of the device driver. Device specific configuration will explain this menu for every device type. Please note that the configuration does not apply on the configurable or virtual drivers. Please view chapter Configurable devices or Virtual devices for these devices. |
| Pressing Check performs a check if the device is connected. This check is the same as the check that is performed during each test initialization. This check can be used to determine if the correct addressing is set, and if communication with the device is possible. |
| Pressing the Knowledgebase button, opens a new web-browser window which will show the RadiWiki page that is specific for that device driver. That RadiWiki page can contain some additional information or a detailed explanation of all advanced settings. |
Graphics configuration[edit]
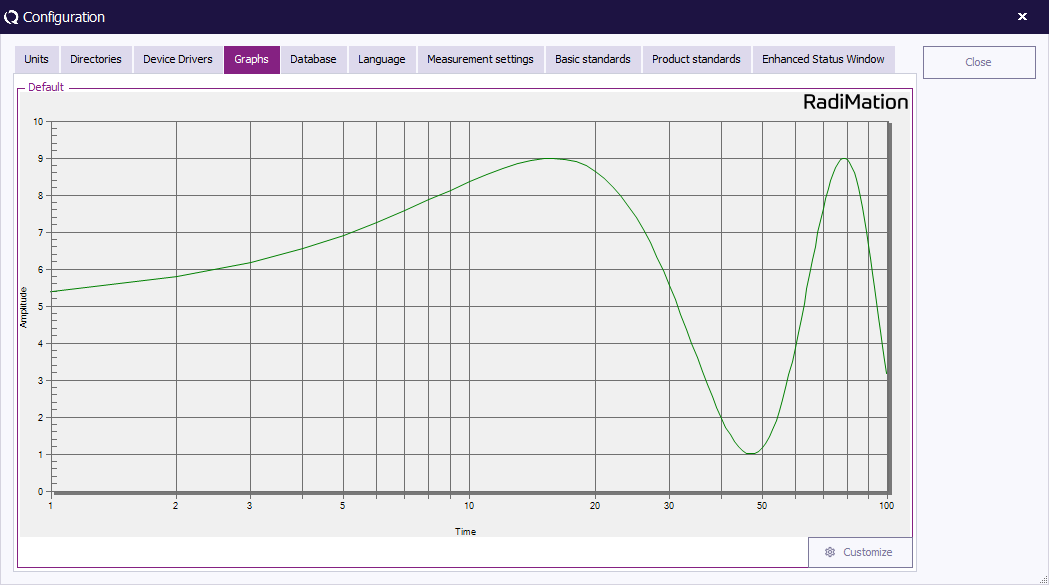
RadiMation® allows you to customise the way graphics are displayed on your screen.
The following configurations can be made:
- Background colour
- Grid colour
- Text colour
- Grid style (solid line or dashed)
- Default linear or log scale (during each test the user is able to switch between linear log scales).
To configure the graphical interface please select:
-
 Configuration
-
 Configuration
-
-
Now select the “Graphics” TAB and make all required selections.
Database Configuration[edit]
Introduction[edit]
RadiMation® can retrieve customer information (such as name and address) from external databases, for example from your company's customer relationship management (CRM) database. This option is called Customer database and will reduce the need to manually enter large amounts of customer information in RadiMation®.
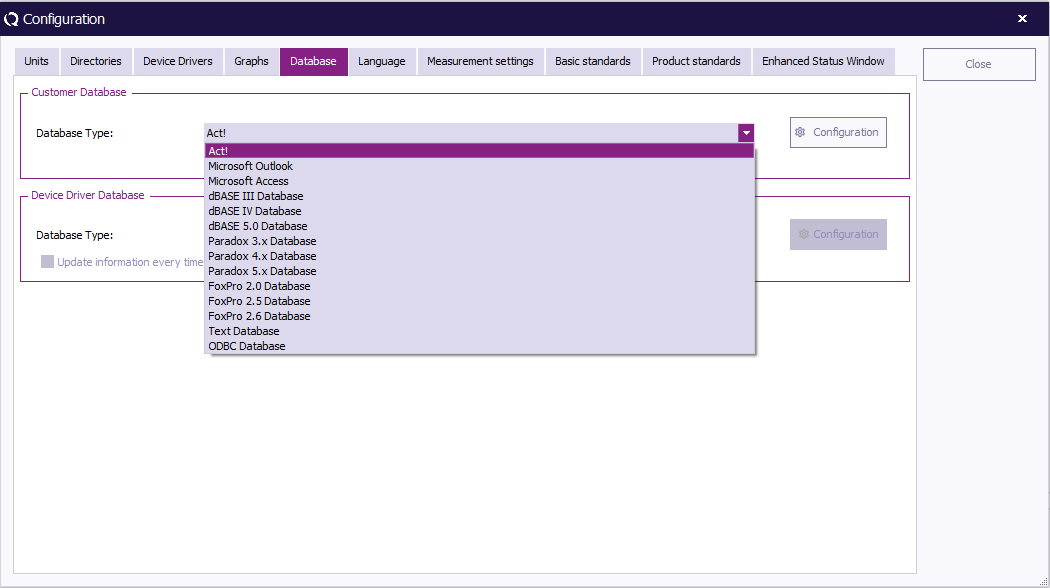
Customer database can interface with several external databases, such as:
Changing the customer database driver[edit]
To configure RadiMation® to support your customer database, go to the 'Configuration' window in the 'Configuration' tab.
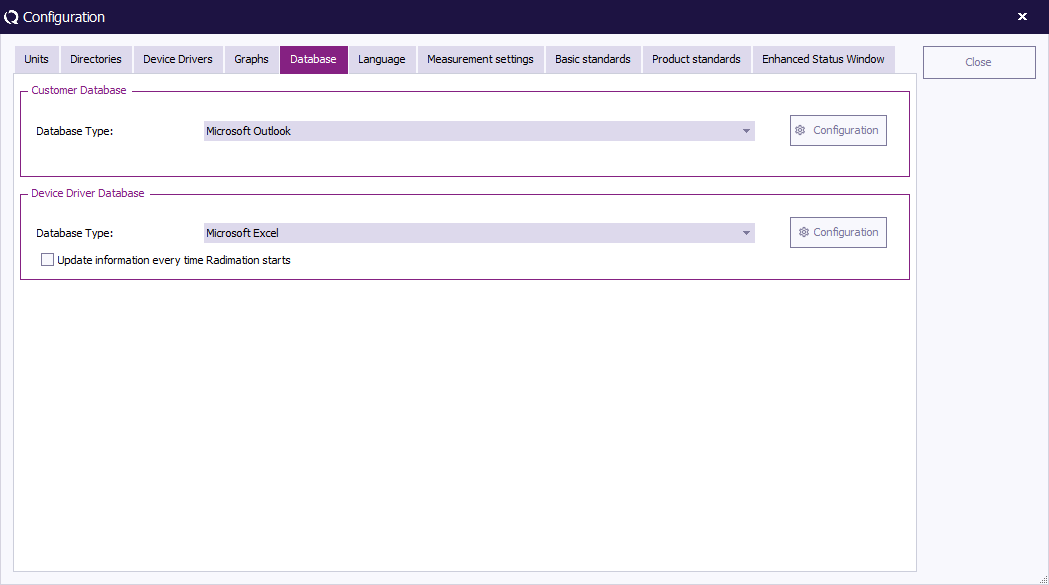
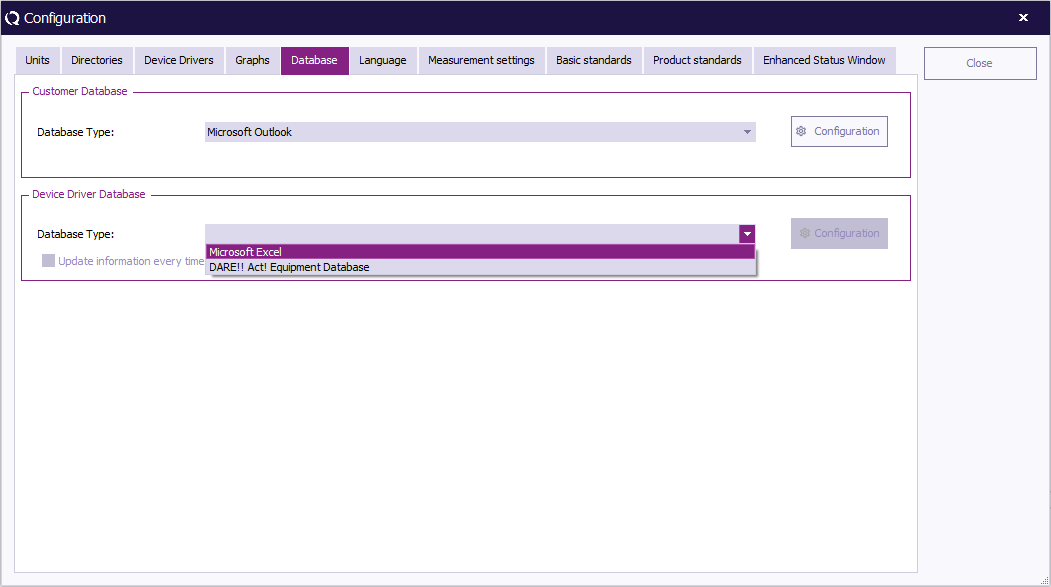
Go to the 'Database' tab to select and/or change the Customer Database and Device Driver Databases.
To select a Customer Database, select a database type from the pull-down menu.
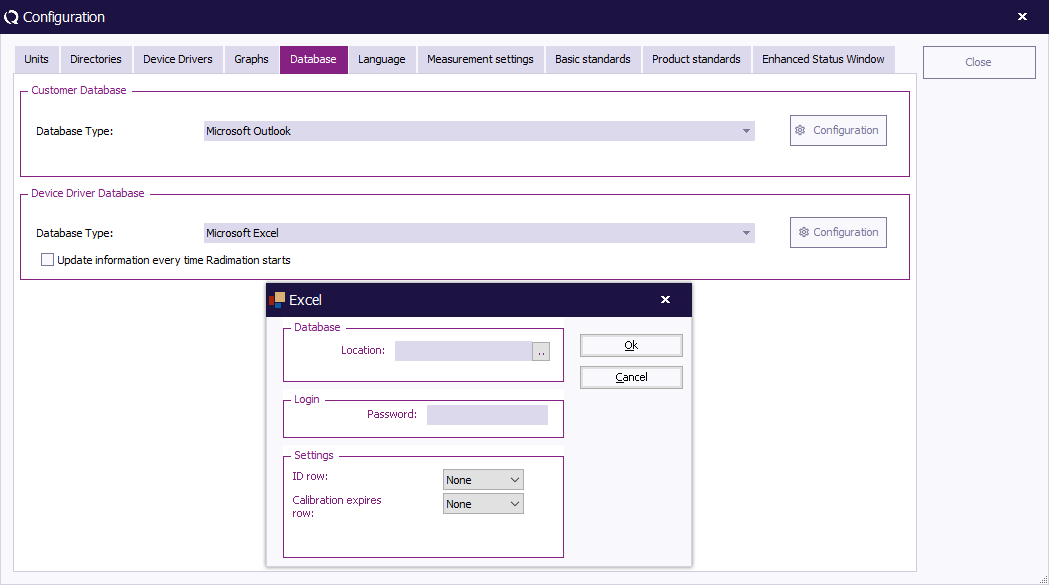
To see and/or change more detailed settings (of the selected database type), click 'Configuration' .
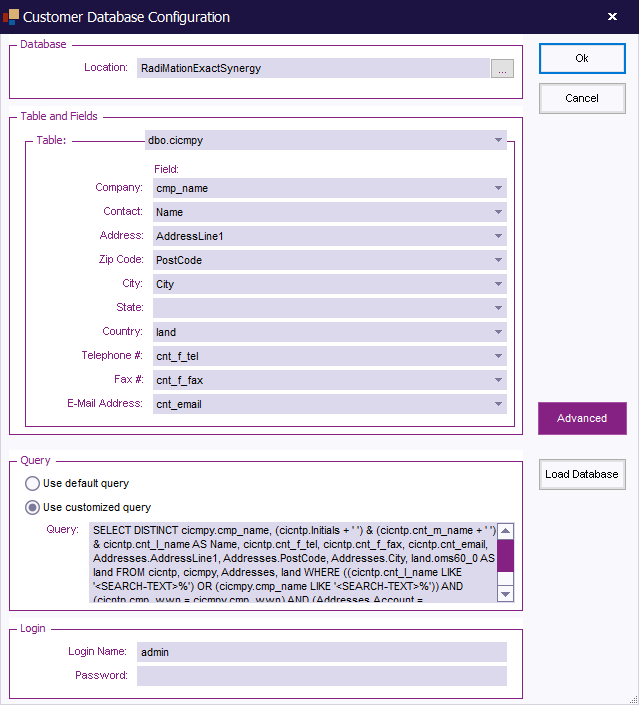
The 'Customer database configuration' window will appear. (This window can differ depending on the selected database type).
To confirm your changes, click 'OK' , to cancel your changes, click 'Cancel' . You will be returned to the 'Configuration' window.
For more detailed information on the Database Configuration settings, go to Chapter 14 “Database Configuration”. Information on the settings of the different database types can be found in the paragraphs that follow “Database Configuration”.
To select a Device Driver Database, select a database type from the pull-down menu.
To see and/or change more detailed settings (of the selected database type), click 'Configuration' . A dedicated window will appear. (This window can differ depending on the selected database type).
To confirm your changes, click 'OK' , to cancel your changes, click 'Cancel' . You will be returned to the 'Configuration' window.
Click 'Close' to leave the 'Configuration' window.
Additional Setup for ODBC Connected databases[edit]
Text, CSV, Excel, MSSQL and MySQL dabase files need some additional setup before they can be used. The reason for this is that RadiMation® uses ODBC to connect and read out thoes databases. This additional setup of an ODBC connection must be performed before the database driver can be configured in RadiMation®. The configuration of the ODBC connection should be done within the Microsoft Windows operating system.
Select
-
 Start
Start
-
 Settings
-
 Control Panel
-
 ODBC Data Sources
-
-
-
-
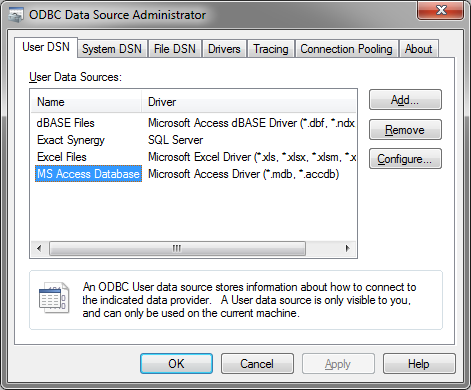
Now the ODBC Data Source Administrator dialog will be shown, which can be used to manage the available ODBC Data Sources.
Then Select Add... to add a new ODBC Data Source.
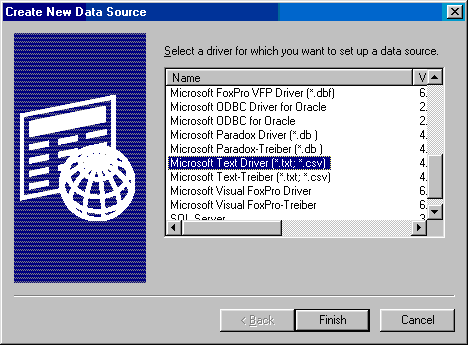
Depending on the required Database connection, the correct driver should be selected. The selected driver will be used to create a new Data Source when the Finish button is pressed. Depending on the selected ODBC driver, a specific driver configuration window will appear. This driver specific configuration window has to be configured to further finalize the ODBC connection with the correct parameters.
ODBC text and CSV database files[edit]
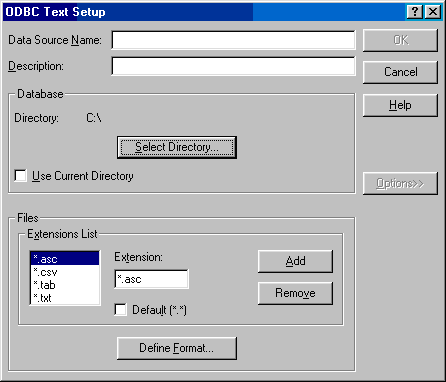
If the Microsoft Text Driver (*.txt,*.csv) is selected, it will show the ODBC text setup dialog.
The ODBC text setup dialog is used to configure the ODBC driver for a text based database.
In this window we need to set several items:
| This is just a name for the setup you are making, name this Radimation, or another descriptive name for the used database |
| Allows to select the directory in which the text based database files are stored |
| Overrules the selected directory to use the current directory. It is best to turn this checkbox off, and select a specific directory by using the Select Directory... button |
| Shows a list of filename extensions which will be used to determine the correct text files. Remove *.asc and *.tab from the extentions list |
| Will show the Define Text Format dialog, which can be used to define the format of the database as it is maintained in the text file |
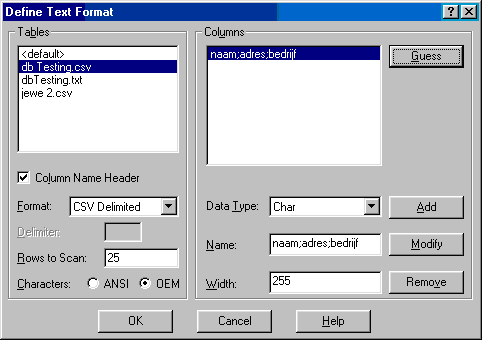
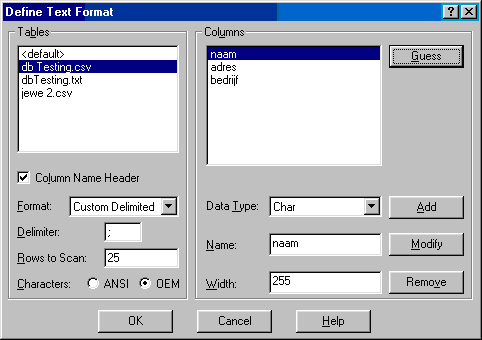
Select the file you want to use, check the Column Name Header checkbox and select the format. Press the Guess button to see if the column headers from your database are set correctly. In the screenshot above the columns are not set correctly. The .csv file format is different, to solve this press the Format combobox and select Custom Delimited. Insert ';' in the delimiter textbox and press Guess again.
Configuration of the characterset[edit]
When using a csv file that is stored in UTF-8 or UTF-16, the following needs to be configured. Locate the folder where the csv file is, there should be a file named 'schema.ini', open this with a text editor and change the characterset to:
| Characterset | value |
|---|---|
| UTF-8 (without bom) | CharacterSet=65001 |
| UTF-16 LE (without bom) | CharacterSet=Unicode |
Now everything is set correctly, close all windows by pressing the Ok button on every window. Once the ODBC Data Source connection is correctly configured, the configuration of the customer database in RadiMation® can be performed.
MySQL ODBC database[edit]
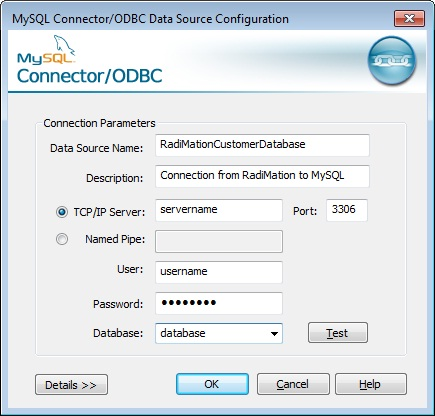
If the MySQL ODBC Driver is selected, it will show the MySQL Connector/ODBC Data Source Configuration dialog.
The MySQL Connector/ODBC Data Source Configuration dialog allows you to configure the details of an ODBC connection to a MySQL database. This dialog is not part of RadiMation®, but it is provided by the MySQL Connector/ODBC software package.
| A unique name that uniquely identifies the Data Source from the other available Data Sources. |
| Any additional information regarding the Data Source |
| The name (or IP address) of the MySQL server, to which a connection should be made |
| The port-number to which the which the connection should be made. By default this is port-number 3306 |
| The name of the MySQL user that should be used to connect to the MySQL Server |
| The password of the MySQL user that should be used to connect to the MySQL Server |
| The name of the MySQL database that should be connected to |
| Will perform a connection test to the specified MySQL server and Database |
| Will show additional configuration details for the MySQL connection. Your MySQL database administrator can help you with setting this details. |
Once the MySQL ODBC Data Source connection is correctly configured, the configuration of the customer database in RadiMation® can be performed.
MSSQL ODBC database[edit]
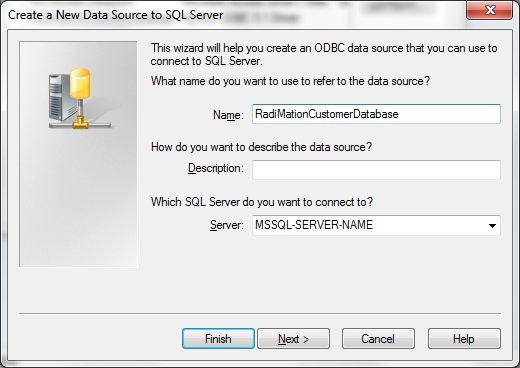
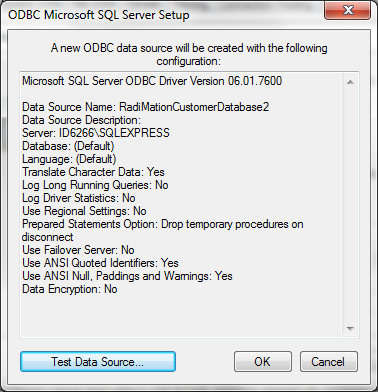
If the SQL Server driver is selected, it will show the SQL Server ODBC Driver Configuration dialog.
The SQL Server ODBC Driver Configuration dialog allows you to configure the details of an ODBC connection to a MSSQL database. This dialog is not part of RadiMation®, but it is provided by Microsoft.
| A unique name that uniquely identifies the Data Source from the other available Data Sources. |
| Any additional information regarding the Data Source |
| The name (or IP address) of the MSSQL server, to which a connection should be made |
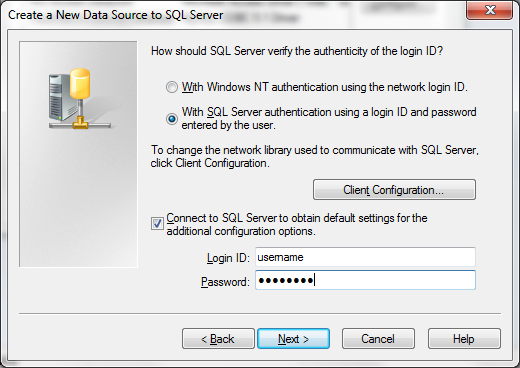
When the Next > button is pressed, a second configuration dialog is shown.
| Select this option to use the credential of the logged in user to connect to the MSSQL server. |
| Select this option to use a SQL Server specific username and password to connect to the MSSQL server. |
| Will show additional configuration details for the MSSQL connection. Your MSSQL database administrator can help you with setting this details. |
| The name of the MSSQL user that should be used to connect to the MSSQL Server |
| The password of the MSSQL user that should be used to connect to the MSSQL Server |
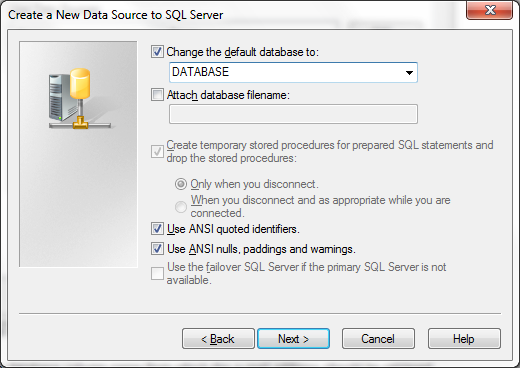
When the Next > button is pressed, a third configuration dialog is shown.
| Enable the option, and specify or select the name of the database on the MSSQL Server that should be used. |
All other parameters should be left on their default value, or they should be set accoording to the instructions of your MSSQL database administrator.
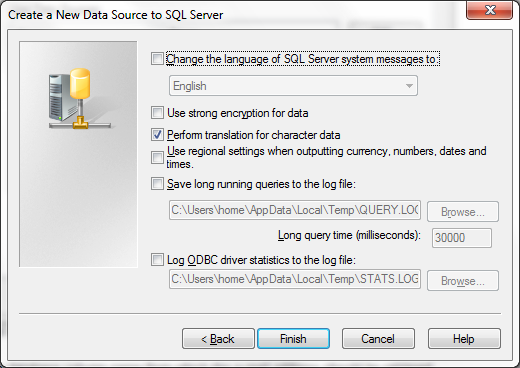
When the Next > button is pressed, a fourth configuration dialog is shown.
All parameters should be left on their default value, or they should be set accoording to the instructions of your MSSQL database administrator.
When the Finish button is pressed, a final configuration dialog is shown.
| Will perform a connection test, to determine if a connection with the MSSQL server can be established, using the configured parameters. A confirmation or error dialog with some additional information will be shown. |
| Stores the configured ODBC connection. |
| Closes the dialogs without creating an ODBC connection. |
Once the MSSQL ODBC Data Source connection is correctly configured, the configuration of the customer database in RadiMation® can be performed.
Language Selection[edit]
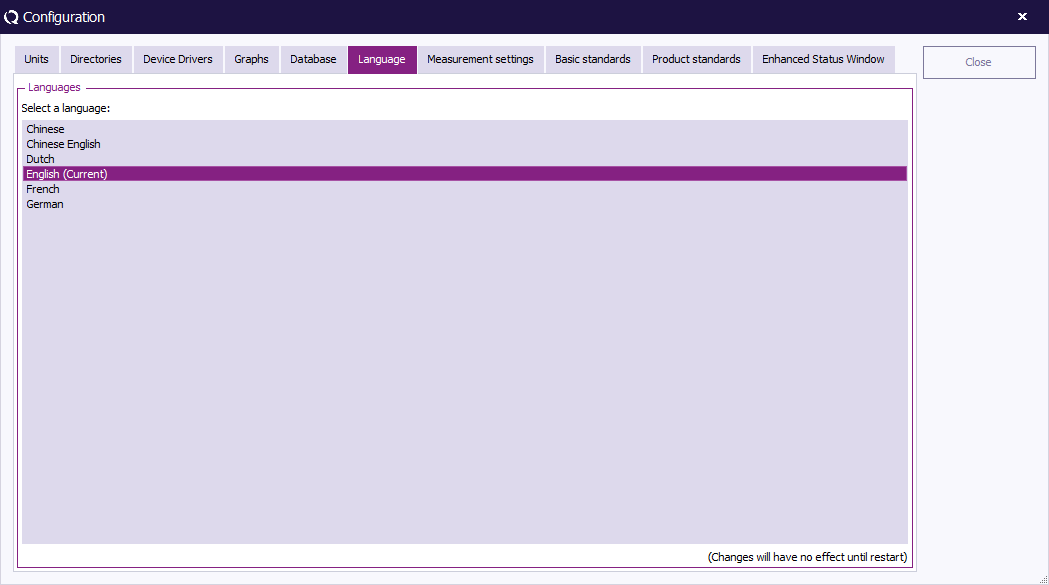
RadiMation® supports multi-language operation. This means that the software package can be operated in any language. Further more, the multi- language support allows easy translation from English to virtually every other language. Please contact your local reseller for the availability of the language driver you require.
The default language of RadiMation® is English. If you want to change the language it must be selected from the list of available languages. To configure the language, please select:
-
 Configuration
-
 Configuration
-
 Language
-
-
-
The selected language is activated after the RadiMation® package is restarted.
Please note that not all languages are available. Please contact your local reseller for language availability.
Measurement Settings[edit]
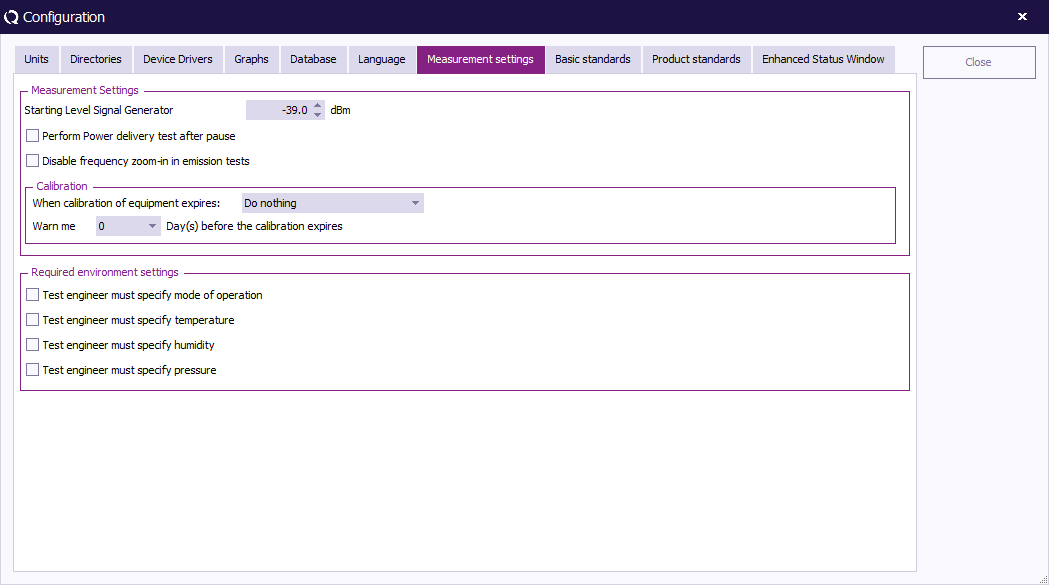
The measurement settings are settings to assist the test engineer with the measurement. With Starting Level Signal Generatorhe engineer can determine the starting level of the signal generator. For example increase the starting level so the test is starting just above the noise level.
| Warning: | It is the responsibility of the test engineer that the Starting Level Signal Generator is set correctly. RadiMation® nor its producers can not be held responsible for setting this value wrong, and any damages / injuries resulting from setting this value wrong. The most optimal setting is just below the noise level of the power meters. Please contact your contact person when in doubt about the correct setting of this value. |
If Perform Power delivery test after pause is checked, RadiMation® performs a power delivery test after leaving manual mode during immunity testing.
RadiMation® can warn or even stop a measurement when a used device is out of calibration. In the top combo box you can select if RadiMation® only warns you that a device is out of calibration or, if it should stop the measurement. With the second combo you can specify the amount days RadiMation® should warn you before the calibration expires. Please note that you type in the value yourself or select one of the predefined periods.
With the checkboxes in the Required environment settings you can define the environment settings that need to be set for every measurement. For sequences the engineer only has to set the selected values once.
Correction files[edit]
Correction files can be used to correct the frequency response of cables, generators, clamps, antenna’s, couplers etc. When the frequency response of a device is known, the operator can create a new correction file and assign it to the device.
Creating correction files[edit]
To create a correction file, select
-
 File
File
-
 New
New
-
 Correction file
-
-
-
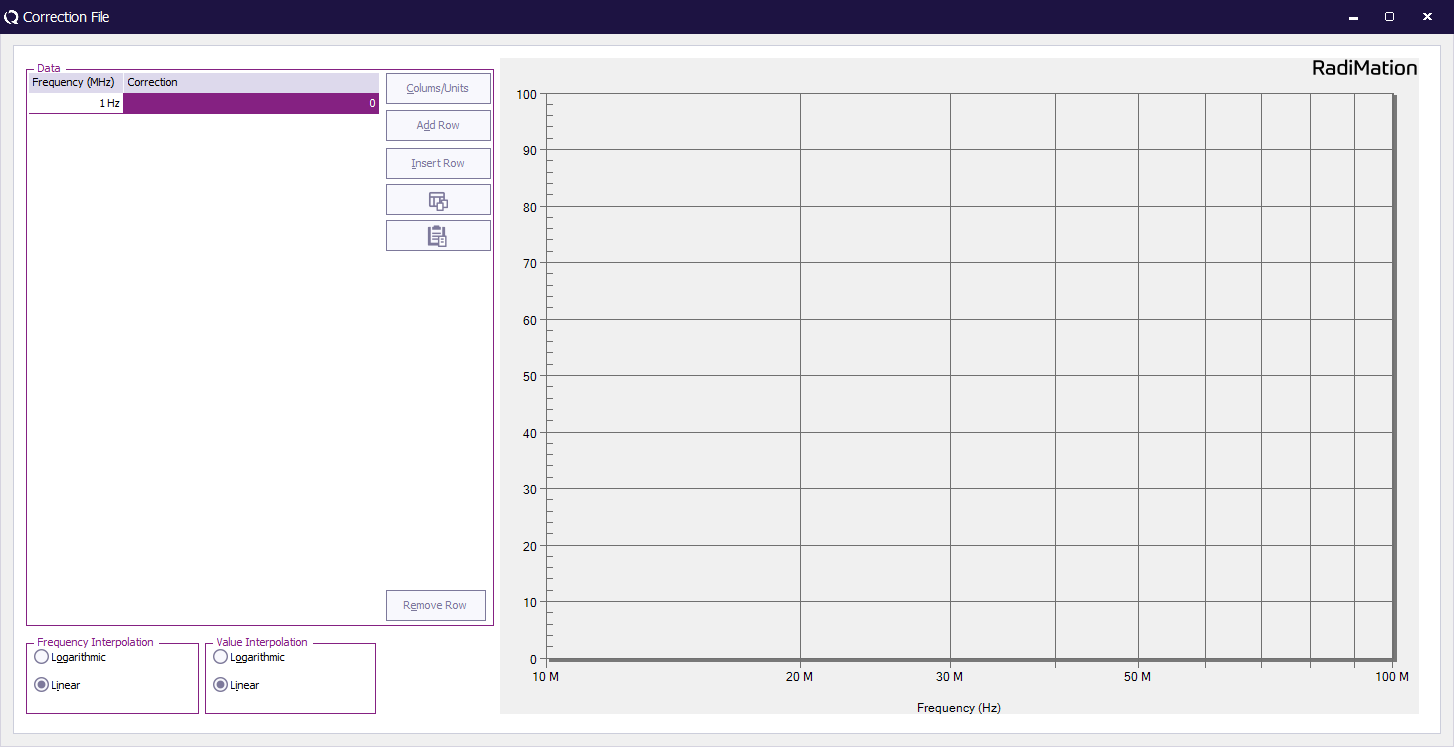
The window below will be displayed.
The first step is to define the columns in the table by pushing the Columns/Units button. A selection box appears and columns can be added or removed. Based on the use of the correction file the proper columns should be selected. For example an amplifier correction file will have two columns one frequency column and one power column. In the case of a radiated emission test three columns are required specifying frequency, correction, angle and height. For most columns, a unit can be specified. Values that are specified in this column will be interpreted as being values in the selected unit.
Entering data points[edit]
To enter data points, press the “Add row" button. A new line will appear and you can enter values in the columns.
When a data point is incorrect, it can be removed by selecting the data point and pressing the “Remove row” button.
Linear/Logarithmic interpolation[edit]
The user can select either linear or logarithmic frequency interpolation. This choice is dependent on the applicable standard.
Saving correction files[edit]
To save the new correction file please select:
-
 File
File
-
 Save correction file
-
-
RadiMation® will prompt you to enter a filename for the correction file.
Attaching a correction files[edit]
Most correction files are used for correcting a measured value of a device driver. The made correction file should therefor be 'attached' to the correct device driver.
You can attach a correction file to a device driver in the configuration screen. You can access the configuration screen by selecting
-
 Configuration
-
 configuration
-
-
in the main menu. The window shown below will appear.
You can select the type of device you want in the box that is situated top right. The big window will display all currently configured device drivers, like in the picture all configured AD Converters. To edit the configuration of a device, select the device in the list and press Edit.
Now you get the configuration window of the device driver.
In the lower part of this window, the made correction files can be selected, for one of the specified uses. The RadiMation® software will use the specified correction files, every time when the device driver is used during a test. Depending on the type of the device driver, different uses of the correction files are available.
Correction file uses[edit]
Correction files can be used in many situations. The type and number of columns that should be used in the correction file is depending on the situation.
Signal Generator Output Correction[edit]
The output level of a signal generator can be corrected. A correction file with the correction should be attached to the device driver of the signal generator. The correction file should contain the columns:
- Frequency
- Correction
The values in the correction column should be expressed in dBm. The value specified in the correction column is added to the desired carrier level and then send to the signal generator. For example: a signal generator that outputs 0.2 dB more than is specified on its display, can be corrected with a value of: -0.2
Amplifier Input Protection Level[edit]
The input level of an amplifier can be protected to never be above a certain power level. A correction file with the maximum input level should be attached to the device driver of the amplifier. The correction file should contain the columns:
- Frequency
- Correction
Or
- Frequency
- Power
The values in the correction column should be expressed in dBm. The value specified in the correction or power column is the maximum power that will be inputed to the amplifier.
Amplifier Forward Protection Level[edit]
The forward power level of an amplifier can be protected to never be above a certain power level. A correction file with the maximum forward power level should be attached to the device driver of the amplifier. The correction file should contain the columns:
- Frequency
- Correction
Or
- Frequency
- Power
The values in the correction column should be expressed in dBm. The value specified in the correction or power column is the maximum forward power that will be outputted by the amplifier.
Amplifier Reflected Protection Level[edit]
The reflected power level of an amplifier can be protected to never be above a certain power level. A correction file with the maximum reflected power level should be attached to the device driver of the amplifier. The correction file should contain the columns:
- Frequency
- Correction
Or
- Frequency
- Power
The values in the correction column should be expressed in dBm. The value specified in the correction or power column is the maximum reflected power. During the regulation of the test-level is this maximum reflected power monitored.
Coupler Forward Power Attenuation Correction[edit]
The forward power attenuation of a coupler can be corrected by a correction file. A correction file with the correction should be attached to the device driver of the coupler. The correction file should contain the columns:
- Frequency
- Correction
Or
- Frequency
- Attenuation
Or
- Frequency
- Gain
The values in the correction column should be expressed in dB. The value specified in the gain column is subtracted from the typical attenuation of the coupler. The values in the correction or attenuation column is added to the typical attenuation of the coupler. For example: A coupler is used with a typical forward attenuation of 60 dB. A correction file with a frequency and attenuation column is connected to the device driver. The value specified in the attenuation column for 100 MHz. Is 1.3 dB. Then the software will use a value of 61.3 dB for the total attenuation of the coupler.
Coupler Reflected Power Attenuation Correction[edit]
The reflected power attenuation of a coupler can be corrected by a correction file. A correction file with the correction should be attached to the device driver of the coupler. The correction file should contain the columns:
- Frequency
- Correction
Or
- Frequency
- Attenuation
Or
- Frequency
- Gain
The value specified in the gain column is substracted from the typical attenuation of the coupler. The values in the correction or attenuation column is added to the typical attenuation of the coupler. For example: A coupler is used with a typical reflected attenuation of 40 dB. A correction file with a frequency and attenuation column is connected to the device driver. The value specified in the attenuation column for 130 kHz. is 0.13 dB. Then the software will use a value of 40.13 dB for the total attenuation of the coupler.
Powermeter correction[edit]
The measured power level of a power meter can be corrected with a certain value. A correction file with the correction should be attached to the device driver of the powermeter. The correction file should contain the columns:
- Frequency
- Correction
Or
- Frequency
- Attenuation
Or
- Frequency
- Gain
The values in the correction column should be expressed in dB. The value specified in the attenuation column is subtracted from the measured power level. The values in the correction or gain column is added to the measured power level. For example: A power level of -14.58 dBm is measured with a power-meter. A correction file with a frequency and attenuation column is connected to the device driver. The value specified in the attenuation column for 81.7 MHz. is 0.27 dB. Then the software will use a value of -14.85 dBm as the value that was measured with the power-meter.
Cable loss correction[edit]
The power loss inside a cable can be corrected inside the software. A correction file with the cable loss should be attached to the device driver of the cable. The correction file should contain the columns:
- Frequency
- Correction
Or
- Frequency
- Attenuation
Or
- Frequency
- Gain
The values in the correction column should be expressed in dB. Cable device drivers can be used in different parts of a test-site setup. But they all have in common that an 'interesting' power-level is attenuated by the cable before it is measured by a measuring device (most of the time a powermeter, receiver or an analyzer). The values of the correction and attenuation column are therefore added to the measured powerlevel. The values in the gain column are inverted before they are added to the measured powerlevel.
Absorbing clamp loss correction[edit]
The power loss inside an absorbing clamp can be corrected inside the software. A correction file with the loss should be attached to the device driver of the absorbing clamp. The correction file should contain the columns:
- Frequency
- Correction
Or
- Frequency
- Attenuation
Or
- Frequency
- Gain
The values in the correction column should be expressed in dB. The values of the correction and attenuation column, are added to the measured emission level. The values in the gain column are subtracted from the measured emission level. In this way the real emission level can be calculated.
Antenna Factor[edit]
For converting the reading dBuV into dBuV/m the antenna factor is needed.
The correction file should contain the columns:
- Frequency
- Correction
Where the correction column is the antenna factor.
GPSHeight till AntennaHeight Correction[edit]
This correction is only available when the Antenna Diagram module is activated. The height distance between the GPS receiver and the Antenna can be corrected by a correction file. A correction file with the height distance should be attached to the device driver of the antenna. The correction file should contain the column:
- Height
Only one row should be present in the correction file. If multiple rows are available, only the height value of the first row will be used. The value of the height column, is subtracted from the height received by the GPS receiver. The result is the exact height of the receiving antenna for the antenna diagram measurements.
AntennaGain versus Angle Correction[edit]
This correction is only available when the Antenna Diagram module is activated. The antenna gain is depend on the measuring angle during antenna diagram measurements. A correction file can be used to specify the AntennaGain depending on the receiving angle. This correction file should be attached to the device driver of the antenna. The correction file should contain the columns:
- Angle
- Attenuation
The value of the attenuation column is added to the measured radiated power.
Calibration Jig Transfer correction[edit]
The transfer factor of a calibration jig can be corrected inside the software. A correction file with the correction should be attached to the device driver of the calibration jig. The correction file should contain the columns:
- Frequency
- Correction
The value specified in the correction column should be expressed in dB and the value is added to the typical transfer factor of a calibration jig. For example: A calibration jig is used with a typical transfer factor of 9.6 dB (correction for 150 Ω to 50 Ω). A correction file with a frequency and correction column is connected to the device driver. The value specified in the correction column for 1.23 MHz. is 0.3 dB. Then the software will use a total transfer factor for the calibration jig of 9.9 dB.
If the jig is not "Configurable" there is a default correction factor of 9.5 dB (theoretical value). We will explain how the presence of a correction factor is it taken into account by RadiMation and how this value is used by an example. For instance we have the following situation: At 150 kHz the real total correction factor of the jig is 10 dB. When this value is saved in the correction file, what will be the behavior of RadiMation? Will it now take the 10 dB as the total transfer correction? The answer is that the correction value will be added, but RadiMation will use this specified 10 dB correction on top of the internal correction value. In this case it is not correct and a correction of app. 0,5 should have been used.
There are two categories of Injection devices:
- 50 Ohm. (E.g. Luthi CR 100 A, Tegam 95241, FCC BCICF)
- 150 Ohm. (E.g. Luthi EM 101, MEB KAL-M2, MEB KAL-KEMZ, FCC F-203I-CF-23mm)
Depending on the used injection device, a matching calibration jig is necessary to correctly calibrate the injection device. Based on the impedance of the injection device, the calibration jig should be corrected with a value. In RadiMation we use the principle that we already programmed the correct correction value in the device driver of the calibration jig. This simplifies the implementation of our software, as you only have to select the correct device driver, and RadiMation automatically knows the correct correction value for the calibration jig.
This implies that:
- The device drivers for the calibration jigs for the 50 Ohm injection devices already have an internal correction factor of 0 dB.
- The device drivers for the calibration jigs for the 150 Ohm injection devices already have an internal correction factor of 9.5 dB (9.5424 dB to be more exact).
We are aware that it is not very clearly visible which correction factor is used inside a device driver of the calibration jig. That is why the newer device drivers, report the frequency range and the correction factor that is programmed inside the RadiMation device driver of a calibration jig. When you want to retrieve this information (shown in a 1 digit precision) just press the 'Advanced' button on the device driver configuration window.
In this example we are using a jig for a CDN where the jig has 100 Ohm resistors in the connection. In this case a 150 Ohm system (as the 100 Ohm resistors are in series with the coax which already has a 50 Ohm resistance) is used.
The calibration jig value (as a factor or as a resistance) is only used for a conversion of the impedance of the CDN to the 50 Ohm typical impedance of the coax cables and powermeters. In some RadiMation device drivers a resistance should be specified, and in other device drivers a calibration jig factor should be specified. If a resistance should be specified in a device driver, the calibration jig factor is calculated using the formula:
calibration jig factor = 20 * log10(<resistance [Ohm]> / 50)
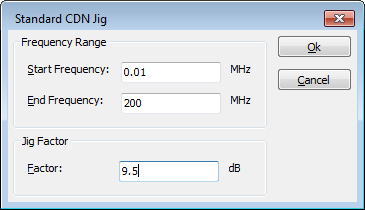
For a 150 Ohm system the correct jig transfer factor is 9.5 dB. Depending on the selected calibration jig device driver a calibration jig factor of 9.5 dB should be selected:
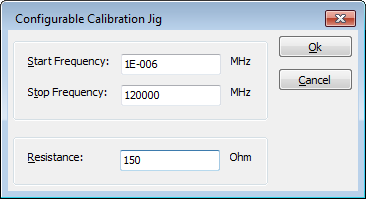
or a resistance of 150 Ohm should be specified for the 150 Ohm system:
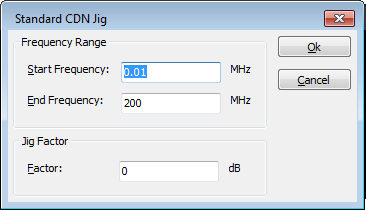
For a 50 Ohm system, (where no 100 Ohm resistors are included in the calibration jig) the calibration jig factor should be 0 dB:
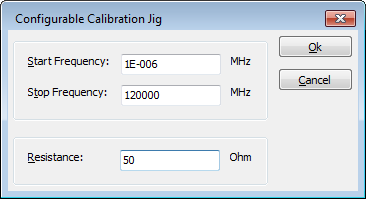
or a resistance of 50 Ohm should be specified:
Current sensor impedance[edit]
The impedance of a current sensor is very important to calculate the correct measured current. The impedance is current sensor dependant. Before a current sensor can be used, an impedance correction file should be attached to the device driver of the current sensor. The correction file should contain the columns:
- Frequency
- Correction
The values in the correction column should be expressed in Ohm (Ω). The value specified in the correction column is used to correctly calculate the current flowing through the current sensor.
Field sensor correction[edit]
The measured value of a field sensor, can be corrected by the software. The measured value can be corrected with an offset, or it can be corrected by a multiply factor. Both corrections can also be used together but the multiply correction will be performed first, and after that the offset correction will be added. The correction files with the correction should be attached to the device driver of the field sensor. The correction files should contain the columns:
- Frequency
- Correction
The values in the correction column of the offset correction should be expressed in V/m. The values in the correction column of the multiply factor should be expressed as x (multiplier).
LISN Amplitude correction[edit]
The power loss inside an LISN can be corrected inside the software. A correction file with the correction should be attached to the device driver of the LISN. The correction file should contain the columns:
- Frequency
- Correction
The values in the correction column should be expressed in dB. The values of the correction column are added to the measured emission level. In this way the real emission level can be calculated.
Preamplifier Gain[edit]
The gain of an used preamplifier can be corrected inside the software. A correction file with the frequency dependant gain of the preamplifier should be attached to the device driver of the preamplifier. The correction file should contain the columns:
- Frequency
- Correction
The values in the correction column should be expressed in dB. The values of the correction column are subtracted of the measured emission level. In this way the real emission level can be calculated.
Receiver loss correction[edit]
The power loss inside a receiver or a spectrum analyser can be corrected inside the software. A correction file with the loss should be attached to the device driver of receiver of spectrum analyser. The correction file should contain the columns:
- Frequency
- Correction
The values in the correction column should be expressed in dB. The values of the correction column are added to the measured emission level. In this way the real emission level can be calculated.
Correction Factor (dBpT/uV) correction[edit]
During emission measurements when the measured emission values have to be shown in Ampere-units, the impedance correction factor should be configured in the software. A correction file with the impedance should be attached to the device driver of the receiver or spectrum analyser. The correction file should contain the columns:
- Frequency
- Correction
The value specified in the correction column should be expressed in Ohm (Ω). The values in the correction column is used in the law of Ohm to calculate the correct to be displayed emission values in an Ampere unit.
During emission measurements when the measured emission values have to be shown in magnetic field (Tesla) units, the correction factor should be configured in the software. A correction file with the correction factor should be attached to the device driver of the receiver or spectrum analyser. The correction file should contain the columns:
- Frequency
- Correction
The value specified in the correction column should be expressed in dB. The values in the correction column are added to the measured emission levels to calculate the correct to be displayed emission values in a Tesla unit.
Resistor Correction[edit]
The typical value of a used resistor can be corrected by a correction file. A correction file with the correction should be attached to the device driver of the resistor. The correction file should contain the columns:
- Frequency
- Correction
The value specified in the correction column should be expressed in Ohm (Ω). The values in the correction column is added to the typical resistance of the resistor. For example: A resistor of 0.5 Ω is used. A correction file with a frequency and correction column is connected to the device driver. The value specified in the correction column for 594 kHz. is 0.04 Ω. Then the software will use a value of 0.54 Ω for the exact value of its calculations with the resistor.


